Showing posts with label shortening. Show all posts

Saturday, September 1, 2012

Chocolate Cupcakes with Buttercream Frosting


Oh my word, these were so scrumptious.  I brought these yummies to a cook out - attended by a bunch of hungry runners - and they disappeared before I had a chance to blink.  One runner said (and I quote!) "that may have been the best cupcake I've ever had."  The chocolate cupcakes themselves have the perfect amount of cocoa, are moist, fluffy, and aren't too sweet...allowing you to taste the chocolate more.  The frosting is definitely the BEST buttercream frosting I've ever had.  I have never used heavy cream in frosting before, and now I'll never stop!  Heavy cream makes the frosting so incredibly fluffy and melts in your mouth.  Using shortening in the frosting also gives it an amazing consistency; Not too runny, not too dense.  I don't think there's anything that compliments buttercream frosing better than rich, chocolate cupcakes. This recipe is truly perfection.

Yield: about 12 cupcakes

For the Chocolate Cupcakes:

Ingredients:

  • 1 1/2 cups all-purpose flour
  • 1 cup white sugar
  • 1/2 cup cocoa powder
  • 1 teaspoon baking soda
  • 1/2 teaspoon salt
  • 1/3 cup vegetable oil
  • 1 teaspoon vanilla extract
  • 1 teaspoon distilled white vinegar
  • 1 cup water

Directions:

  1. Preheat oven to 350 degrees F (175 degrees C). Lightly grease one medium cupcake pan or line with paper liners.
  2. Sift together the flour, sugar, cocoa, baking soda and salt. Add the oil, vanilla, vinegar and water. Mix together until smooth.
  3. Pour into prepared muffin pan (batter should be just below the rim, for large cupcakes. For medium cupcakes, pour batter 2/3 to 3/4 full) and bake at 350 degrees F (175 degrees C) for 18-25 minutes, or until a toothpick inserted in the center comes out clean. Remove from oven and allow to cool in pans for 15 minutes.
  4. After 15 minutes, carefully remove cupcakes from pan, place on wire rack, and allow to cool completely.  Frost generously with Buttercream Frosting (recipe below).


For the Buttercream Frosting:

Ingredients:

  • 1/2 cup shortening
  • 1/2 cup unsalted butter, softened
  • 3 cups confectioners' sugar
  • 1/4 teaspoon salt
  • 1 teaspoon vanilla extract
  • 1/2 cup heavy whipping cream

Directions:

  1. In a mixing bowl, cream shortening and butter until fluffy. Add sugar, and continue creaming until well blended.
  2. Add salt, vanilla, and 6 ounces whipping cream. Blend on low speed until moistened. Add additional 2 ounces whipping cream if necessary. Beat at high speed until frosting is fluffy, at least 5 minutes.  Frost cooled cupcakes.  

You will have some frosting left over (I had about a cup)...so you can either use it for another recipe or eat it by the spoonful...your choice(;

Monday, July 2, 2012

Applesauce Cookies with Caramel Frosting


Ohhh these were so, so yummy.  I seriously lost count of how many I ate within a few hours of making them. I took these to my friends lake house, and everyone gobbled them up even when we were stuffed from dinner.  The cookies themselves are super soft and fluffy and seem just like muffin tops.  They taste like a spice cake with a touch of apple....very comforting and delicious.  Then you get the wonderful, rich, decadent, smooth, dreamy, melt-in-your-mouth, caramel frosting.  The frosting definitely takes these cookies to the next level.  It's like you're biting into a heavenly cloud of perfect deliciousness.   I first spotted these cookies a few weeks ago on Pinterest, and had been dying to make them but we never had heavy cream in the house.  So when we finally did have heavy cream, I knew their time had come.


Recipe credit to Chef In Training.

Saturday, March 17, 2012

Baked Pancakes


I may never make normal pancakes again.  I discovered a baked pancake recipe a few weeks ago, and I was totally dumbfounded.  Why hadn't I thought of it sooner???  Baking pancakes with guarantee a light, fluffy texture, they'll be cooked perfectly (since they're cooked at a lower heat and slower in the oven), and you're at a much lower risk of them burning than if you make them on a griddle.  These pancakes were so perfect...everything you could [dream] of a pancake being.  They soak up butter and syrup super well, too.  You can add anything you want to this basic baked pancake recipe - chocolate chips, blueberries, nuts, etc.

Ingredients:

  • 1 3/4 cups all-purpose flour
  • 5 teaspoons baking powder
  • 4 tablespoons white sugar
  • 1 teaspoon salt
  • 3 eggs
  • 1 1/2 cups milk
  • 1 teaspoon vanilla extract
  • 3 tablespoons shortening, melted

Directions:

  1. Preheat oven to 450 degrees F (230 degrees C). Grease a 10x15 inch jellyroll pan or 13x9 in baking pan.
  2. Sift together the flour, baking powder, white sugar and salt, set aside.
  3. In a large mixing bowl, beat eggs until light and fluffy (at least 1 minute with a whisk). Add milk, vanilla, and shortening; mix well. Gradually stir in dry ingredients until smooth. Pour the batter into the prepared pan. 
  4. Bake for 15 minutes, In the preheated oven, or until pancakes are cooked through. Cut into pieces and serve hot with butter and syrup.

Wednesday, March 7, 2012

Blueberry Crumble Bars


Last night, I was really in the mood for some blueberry cobbler, (and we had fresh blueberries in the fridge)...so I decided to transform it into a bar.  I really wasn't expecting these to be anything special; just something worth trying...and it turned out AMAZING!  I think these may be even better than my blueberry cobbler (here).  These are definitely the best fruit bar I've ever had. Everything about them was just perfect.  A buttery, shortbread like bottom, sweet and juicy blueberries in the middle, and topped with a buttery crumble mixture.  They are wonderfully moist and the crumble mixture doesn't fall of the bars when you cut them, and they're super neat and easy to cut.  I had these warm from the oven with vanilla ice cream and whipped cream.  Oh my goodness.  I honestly couldn't stop eating it!!  I swear I ate half a batch on my own (with the addition of ice cream and whipped cream).  They didn't last 24 hours in my house either.  I can't wait to try this recipe with fresh blackberries or raspberries.  I recommend using fresh blueberries for the best taste.

Ingredients:

  • 1 cup white sugar
  • 1 teaspoon baking powder
  • 3 cups all-purpose flour
  • 1 cup shortening
  • 1 egg
  • 1 pinch salt
  • 1 pinch ground cinnamon
  • 4 cups blueberries, rinsed and patted dry
  • 1/2 cup white sugar
  • 3 teaspoons all-purpose flour

Directions:

  1. Preheat oven to 375 degrees F (190 degrees C). Grease one 13x9 inch pan.
  2. Combine 1 cup of the sugar, the flour, baking powder, salt, ground cinnamon, shortening, and egg. Dough will be crumbly. Pat half of the dough into the prepared pan.
  3. Combine the remaining 1/2 cup sugar, the flour and berries. Place mixture over dough in pan. Crumble the remaining dough over the tops of the berries.
  4. Bake at 375 degrees F (190 degrees C) for 45 minutes or until the top is slightly brown.

Friday, February 17, 2012

Tenderest Buttermilk Biscuits


Mmmm....Who doesn't love a light, fluffy, buttery, melt-in-your-mouth biscuit?  Biscuits from Bojangles are one thing I can never get enough of.  Buttttt my biscuits are better.  Mmhmm..I went there.  My biscuits are better than Bojangles.  Don't believe me?  Try this recipe yourself. Who needs Bojangles when I can make fresh, delicious biscuits in just minutes in my own kitchen?? My biscuits are super soft, with just the right amount of flakiness and buttery goodness. Be sure to leave some big crumbles of butter; the  bigger the crumbs, the more flaky and tender the biscuit. These golden-brown pillows bake up tall, light, and tender.  They taste so amazing when you slather some butter and/or jam on them, or you could even use them for an incredible breakfast sandwich with egg and cheese and/or sausage/ham. However, if you do make a sandwich, they tend to fall apart a bit because they are so extremely tender.   I call it an egg and cheese sandwich mash.  I would alter this recipe to make a more sturdy biscuit for a sandwich, but they taste so incredibly delicious that I can't get myself to alter them. It's the taste that counts! I made these this year for the super bowl and served them with my Momma Buscemi's  Favorite Ribs (found here)...ohmyword.... Talk about the perfect, gameday comfort food.


Yield: about 6 large biscuits

Ingredients:

  • 2 cups all-purpose flour (use a spoon to spoon this into a measuring cup.  Do NOT pack)
  • 4 teaspoons baking powder
  • 3 teaspoons sugar
  • 1/2 teaspoon salt
  • 1/4 cup shortening
  • 1/4 cup butter, preferably salted, cold (I recommend freezing the butter for at least 20 minutes)
  • 1 egg
  • 2/3 cup buttermilk
  • 2 tablespoons melted butter, for brushing

Directions:

  1. In a small bowl or food processor, combine the flour, baking powder, sugar and salt. Cut in shortening and butter (or pulse if using a food processor) until the mixture resembles coarse crumbs. If using food processor, transfer flour mixture to a large bowl. Beat egg with buttermilk in a separate, small bowl; stir into dry ingredients just until moistened.  Batter should be pretty wet (too wet to roll).
  2. Use a medium-large ice cream scoop to scoop large balls of dough onto parchment paper or a lightly greased baking sheet. Bake at 450 degrees F for 8-10 minutes or until golden brown. Brush with melted butter, and serve warm.

Tuesday, December 27, 2011

Almond Butter Cake


A few years ago, my mom and I had a fun idea that we wanted to try that we thought could lead to a successful business and some extra money: decorating wedding cakes.  Haa...boy, did that idea last.  We thought it would be really cool to make wedding cakes, decorate them, and sell them for reasonable prices, since most wedding cakes now-a-days are sky-high expensive.  The cost is typically in the hundreds; ranging from $300-600.  I'm sure a bride would kill to buy a cake at lets say...$50?  That looks like a pretty low price to me, compared to $300.  So my mom and I started with the basic, first step: making a delicious wedding cake.  We looked online and through all our cookbooks, trying to find the perfect recipe.  I finally found it in "The Ultimate Southern Living Cookbook" (Which - unfortunately - no recipes from it are available online.)  Now...this recipe was made in 3 ginormous cake pans and created to serve 85 people...so, of course, I cut it down to 1/6.  I mean really...who would be willing to use 4.5 cups of butter, 7.5 cups of white sugar, 6 16-ounce boxes of powdered sugar, 13.5 cups of flour, and 27 egg whites in one recipe??? Not me, that's for sure.  Cutting it down to 1/6 was the perfect amount, and I only had to bake it in one pan.  The recipe stated that it would take 1 hour and 45 minutes to prep, 2.5 hours to cook, and 3.5 hours to assemble and decorate.  No way was I spending 8 hours on a cake!!!  The hands on time it took my mom and I to make this (since we made a fraction of the recipe) was 2 hours tops.  And it came out perfect!  It's a rich, almond-y, buttery cake with a thin, sweet layer of apricot filling that makes it super moist.  It's then topped with a decadent, almond-butter frosting.  I brought some of this to school for my lunch table to try, and everyone loved it.  One of my friends declared it the best cake she'd ever tasted and still her all-time favorite today.  She's obsessed with it and makes her mom make it as her birthday cake every year.  My mom and I really should start working on this business again, cause with this cake, our business would be booming.


Yield: 1 10x3 inch round cake pan  (about 12-15 servings)


Ingredients:
1/2 cup butter, softened
1/4 cup shortening
1.25 cups sugar
2.25 cups all-purpose flour
1/2 tablespoon baking powder
1/4 teaspoon salt
3/4 cup cold water
1 teaspoon vanilla extract
1/2 teaspoon almond extract
4 large egg whites, at room temperature


Apricot Filling:
1/2 cup apricot halves, drained.
1/2 tablespoon amaretto (optional)


Almond-Butter Frosting:
1/4 cup butter, softened
1/4 cup shortening
1 16-ounce package powdered sugar, unsifted
1/3 cup whipping cream
1/6 teaspoon salt
1/2 teaspoon almond extract


To Bake Cake:
1. Grease bottom and sides of cake pan.
2. Beat butter and shortening at medium-high speed with electric mixer 3 minutes.  Gradually add sugar, beating at medium-high speed 4 minutes.
3.  Combine flour, baking powder, and salt; add to butter mixture alternately with the cold water, beginning and ending with the flour mixture, beating well after each addition.  Stir in vanilla and almond extracts.  
4. Beat egg whites in a large bowl until soft peaks form (about 1.5 minutes).  Stir half of the beaten egg white into batter to lighten; fold remaining egg white into batter.  Pour into pan.  Gently drop pan on counter-top twice to release air bubbles from batter.
5. Bake at 325 degrees F for 40 to 45 minutes or until cake springs back when lightly touched in center and begins to pull away from sides of pan.  Cool in pan on wire rack 20 minutes.  Loosen edges of cake with a knife.  Remove from pan, and let cool completely, rounded side up, on wire rack.


To Fill:
1. Lay cake on a flat surface.  Carefully slice it in half horizontally, using a long knife with a serrated edge.  Insert two wooden picks into each layer, one above the other, to indicate how the two layers should match up when going back together after filling.
2. Process apricot and amaretto in container of an electric blender or food processor until smooth. Spread on bottom half of cake layer, spreading evenly over cake.  Replace top layer, carefully matching wooden picks to keep layers level.


To Frost:
1. Beat butter and shortening at medium speed with electric mixer 2 minutes or until creamy.  Gradually add sugar, beating at medium speed 2 to 3 minutes.  Add whipping cream, salt, and almond extract, beating well. Add more cream if necessary.  Continue beating until mixture is fluffy.  Frost top and sides of cake immediately.


Saturday, December 24, 2011

Cinnamon Bun Cookies


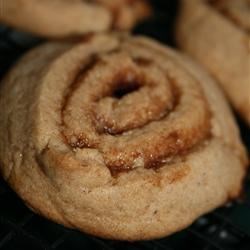
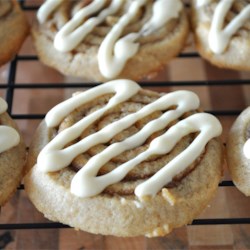
Ahh...cinnamon buns.  There's nothing like them.  My personal favorite brand of cinnamon buns is a tie between Pillsbury Grands and Cinnabon.  I love the gooey textures of Grands, but I adore Cinnabon's cream cheese frosting.  I actually tried using Cinnabon's frosting on grands this morning, and the Grands didn't taste as good as they do with their frosting!  I was really surprised.  The Cinnabon frosting is much more delicate and less sweet than Grands' frosting.  I guess both brands just pair their frosting and cinnamon rolls so perfectly, that they shouldn't be changed.  The only thing that I think would make the best cinnamon roll is Grands with a home made cream cheese frosting (a little sweeter than Cinnabons).  I'll be sure to try it soon(:  But anyways...because of my love for cinnamon rolls (or buns..whatever you choose to call them), I saw a recipe for Cinnabun Cookies on allrecipes.com, found here, and I had to make them. I did make a few alterations that made them better, though.  I baked them for a party a few months ago, and everyone loved them. I've made them about four times since then, and I've now mastered the recipe.  My friend declares them the best cookies she's ever tasted.  And I made her a big batch of them for Christmas.  I added a glaze for experiencing a true cinnamon roll taste...and they are absolutely amazing. They look so pretty too!  I almost didn't want to give it to her because they were so perfect looking.  And the great thing is, you can have them for breakfast or dessert.  [These are definitely on my list for one of the best cookies I've ever made.]  A tall glass of milk on your side is a perfect compliment as well.


Yield: about 18 cookies


For the cookies: 

Ingredients:

  • 1/4 cup butter, softened
  • 1/4 cup shortening
  • 1/2 cup light brown sugar
  • 1/4 cup white sugar
  • 1 eggs
  • 1/2 tablespoon vanilla extract
  • 1/2 tablespoon ground cinnamon
  • 1.5 cups all-purpose flour
  • 1 teaspoons baking powder
  • 1/2 teaspoon salt
  •  
  • 1/4 cup brown sugar
  • 2 tablespoons cup butter
  • 1 teaspoon ground cinnamon

Directions:

  1. In a large bowl, cream together the 1/4 cup butter, shortening, light brown sugar and white sugar until smooth. Beat in the eggs one at a time then stir in the vanilla. Combine the 1/2 tablespoon cinnamon, flour, baking powder and salt; stir into the creamed mixture. Cover and refrigerate dough for at least 1 hour.
  2. Preheat the oven to 375 degrees F (190 degrees C). In a small microwave safe dish, heat the 1/4 cup brown sugar, 2 tablespoons of butter and 1 teaspoons cinnamon in the microwave. Stir frequently until butter is melted and the mixture is well blended.
  3. On a lightly floured surface, roll out the dough to a 12x6 inch rectangle. Spread 2/3 of the cinnamon mixture over each rectangle. Roll it lengthwise into a log. Cut into 1 inch segments (I would highly recommend using unflavored dental floss...this makes it much easier). Use remaining filling to place a small dollop*** of the mixture onto the cookie sheet where each cookie will be placed, about every 3 inches. Place 1 cookie onto each dollop with the cut side down.
  4. Bake for 8 to 10 minutes in the preheated oven. Quickly remove cookies from cookie sheet and gently place on cooling rack while they are still very hot to prevent them from sticking. If the cookies are stuck, heat the pan in the oven again for a few minutes to soften the cinnamon dollops.  Let cool completely before frosting.
***I mean a very small dollop!  About half the size of your fingernail.  If you do it too big, it will expand too much and burn the cookie, and the cookie sheet.

For the frosting:

Ingredients:

1 tablespoon butter, melted
2 tablespoons hot milk
1 teaspoon vanilla
1 dash of allspice
1 cup powdered sugar (your may add more if you want it thicker)

Instructions:

1. Mix together all ingredients except the powdered sugar.
2. Gradually beat in the powdered sugar.  Mix well.
3. Spread on cooled cookies, or drizzle by squeezing through a zip-lock bag (cut a very tiny hole and squeeze through).