Monday, April 30, 2012

Favorite Meatloaf


I know what you're thinking...."ewww, mealoaf!!"  The name isn't exactly the most appetizing thing, but it's one of my favorite dinners.  My mom and I made this recipe last night, adapted from a recipe on Allrecipes, and it was sooooo delicious!  The best meatloaf I've ever had.  The recipe is incredibly easy, and took us no time at all to whip up.  I've made many meatloaf recipes, usually the ones with a ketchupy glaze on top, and I've been looking for the perfect one for a while.  Well..this is it.  It is not as sweet as most meat loaf recipes I've had, because it has a small amount of ketchup (compared to the amount of salt) and no brown sugar.  However, it has a richer, moister, saltier, cheesier, and buttery flavor...which I love.  It also makes fabulous meatloaf sandwiches for the next day.  I recommend serving this with mashed potatoes and veggies for a delicious, comfort-food-for-the-soul meal.

Ingredients:

1 slice of bread, torn in half
  • 1 1/2 pounds lean ground beef
  • 1/2 cup crushed buttery round crackers
  • 3/4 cup shredded Cheddar cheese
  • 1 (1 ounce) package dry onion soup mix
  • 2 eggs, beaten
  • 1/4 cup ketchup
  • 2 tablespoons steak sauce

Directions:

  1. Preheat oven to 350 degrees F (175 degrees C).
  2. Place the bread halves in one layer on the bottom of a 9x5 loaf pan (this soaks up any leftover grease form the meat).
  3. Stir the ground beef, crushed crackers, Cheddar cheese, and onion soup mix in a large bowl until well combined. Whisk the eggs, ketchup, and steak sauce in a separate bowl until smooth. Mix the eggs into the meat until evenly combined, if the mixture seems too dry, add a little water. Press into the 9x5 inch loaf pan, on top of the bread slices.
  4. Bake in preheated oven until the meatloaf reaches 160 degrees F (71 degrees C) and is no longer pink in the center, 45 to 60 minutes.  Discard the bread pieces that are cut out.

Sunday, April 29, 2012

Cinnamon Sugar Scones


Yum yum yum...scones.  I absolutely love these things!  Especially glazed, full of flavor, and dipped in coffee.  These are definitely some of the best scones I've ever had.  They are way better than any coffee shop or bakery's scones, that's for sure.  They are definitely up there with my Orange Chocolate Chip Scones, found here.  I can't really call one better than the other though, because this recipe is more cinnamon flavored than chocolate chip. I created these myself, and I tested them SO many times! It was ridiculous.  I kept baking them weekend after weekend because I kept feeling like I could make them better and better.  And after the 3rd or 4th trial, I finally perfected them.  They have a wonderful spiced, cinnamon flavor, and are perfectly sweet and cakey.  They're very flavorful with or without the chocolate/cinnamon chips.  However, I prefer a little bit of both.  The sour cream makes them really moist as well.  And they taste so delicious up to 3 days later!!  Which is crazy, because usually scones degrade pretty fast...but these didn't in the slightest.  So don't buy that scone you want so badly in that coffee shop!  Just makes these, please(:  I promise, you won't regret it after the first bite of these bad boys.


Ingredients:

  • 2 cups all-purpose flour
  • 1/4 cup white sugar
  • 1 teaspoon ground cinnamon
  • 1/8 teaspoon nutmeg
  • 2 teaspoons baking powder
  • 1/4 teaspoon baking soda
  • 1/4 teaspoon salt
  • 1/2 cup unsalted butter
  • 1 cup sour cream
  • 2 tablespoons milk
  • 1/2 cup chocolate chips and/or cinnamon chips (optional)
  • 1 cup confectioners' sugar
  • 4 teaspoons milk
  • 1/2 teaspoon vanilla extract
  • 1/2 teaspoon cinnamon 

Directions:

  1. Preheat oven to 390 degrees F.
  2. In a large mixing bowl, combine flour, sugar, cinnamon, nutmeg, baking powder, soda, and salt. Cut in margarine. Make a well in center. Add sour cream, 2 tablespoons milk, and/ chocolate/cinnamon chips, stirring till just combined (add a bit more milk, if needed).
  3. On floured surface, gently knead 8-10 stokes. Pat dough to 1/2" thickness. Cut with biscuit cutter or however you wish, dipping in flour between cuts. Place on baking sheet.
  4. Bake at 390 degrees F for 16-22 minutes, or until the very top just cracks and is firm to the touch. Cool slightly on wire racks.
  5. Stir together confectioners' sugar, 4 teaspoons milk, vanilla, and cinnamon. Drizzle over biscuits. Sprinkle with additional cinnamon and sugar, if desired.  Serve warm or cooled.


Friday, April 27, 2012

Italian Grilled Cheese Sandwich


Oh my goodness.  This is the best grilled cheese sandwich I have ever made...no doubt about it.  I will never make a normal grilled cheese sandwich again.  Usually ordinary grilled cheeses are kind of boring;  just some bread, a little butter, and some cheese.  But this one was like BAM! Sooo full of flavor!  It was like savory, stuffed french toast, minus the sweet syrup/fillings of course. It's ooey and gooey with rich, melted cheese in every bite.  I don't know why I didn't think of making grilled cheese like this before!  You are welcome to try variations with different cheeses and other filling ingredients (like meats and veggies).  I made it with hot dog buns (It reminded me of the ultimate cheese dipper...so amazing!!!).because I like the texture better than regular bread, but fresh white bread would be good too.  I'm gonna make it next week for my family with both american and white cheese (probably provolone, mozzerella, or swiss), and a sliced tomato.  I'll also try to make it on fresh, white, sandwich bread. My mom insists I make it with bacon too (I don't like bacon.  But she loves the stuff).  Serve this with some marinara sauce or tomato soup...Mmm...I can guaruntee this is way better than the boring, grilled cheese sandwich you grew up having.

Yield: about 6 servings

Ingredients:

  • 3 eggs
  • 2 tablespoons milk
  • 2 teaspoons garlic powder
  • 2 teaspoons Italian seasoning
  • 2 tablespoons grated Parmesan cheese
  • 6 slices American cheese
  • 6 hot dog buns
  • Marinara sauce (optional)

Directions:

  1. Whisk eggs, milk, garlic powder, Italian seasoning, and Parmesan cheese together in a bowl.
  2. Tear each American cheese slice in half and place 2 halves evenly between each hot dog bun, so one hot dog bun half is completely covered. Close each hot dog bun.
  3. Coat the entire sandwich in the egg mixture.
  4. Heat a non-stick frying pan over medium heat (or grease a normal pan).
  5. Place dipped sandwiches in the hot frying pan; cook until golden brown and cheese is melted, about 3 minutes per side.  If there is left over egg mixture, pour it on top of each side of the sandwiches as you cook (they taste best when all the egg mixture is used).
  6. Serve with marinara sauce if desired.

Monday, April 23, 2012

Chocolate Chip Banana Muffins

These are seriously bakery quality muffins!  They are so yummy and incredibly easy to make.  Both my parents LOVED them, and they don't even like banana muffins!!! Until now at least(:  I've tried so many batches of banana muffins, changing up recipe after recipe after recipe...but this one is the winner for sure.  They are so moist and flavorful, with the perfect amount of sweetness, and just the right amount of chocolate chips.  The texture is almost more like a cupcake than a muffin (which I like..since cupcakes have smoother textures).  These taste to-die-for warm from the oven, so I definitely recommend eating them while they're hot as opposed to the next day.  However, they do taste very good the next day (I reheated one in the microwave this morning!), just not as good as hot from the oven.  I'm not sure how they will taste after two days since they didn't exactly last very long in my house! I had these warm from the oven, spread with a little peanut butter and a dollop of whipped cream (or try nutella!)...mmmm.  Of course, you don't have to dress yours up like I did. They're amazing plain too(:  I also tried dunking a piece in coffee, and it was really delicious!  It reminded me of a banana chocolate chip coffee cake.  I recommend using very ripe (I mean completely brown!) bananas for best flavor.


Ingredients:

  • 1 3/4 cups all-purpose flour
  • 1/4 cup white sugar
  • 1/2 cup brown sugar (not packed)
  • 1 teaspoon baking powder
  • 1 teaspoon baking soda
  • 1/2 teaspoon salt
  • 1 egg
  • 1/4 cup vegetable oil
  • 1/2 cup plain yogurt
  • 1 teaspoon vanilla extract
  • 1 cup mashed ripe bananas (about 2 large)
  • 3/4 cup semisweet chocolate chips

Directions:

  1. In a large bowl, combine the flour, sugars, baking powder, baking soda and salt. In another bowl, combine the egg, oil, yogurt and vanilla. Stir into dry ingredients just until moistened. Fold in bananas and chocolate chips. Fill greased or paper-lined muffin cups two-thirds full. Bake at 350 degrees F for 18-22 minutes or until a toothpick comes out clean. Cool for 5 minutes before removing from pans to wire racks.

Sunday, April 22, 2012

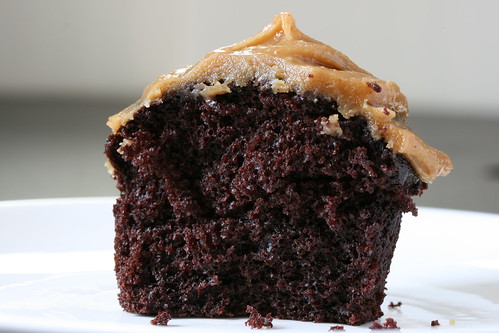
Chocolate Cupcakes With Peanut Butter Frosting


These cupcakes tastes like a Reese cup...but in cupcake form.  I brought these to school for a party and everyone loved them!  Both the chocolate cake and the frosting are just perfect. The chocolate cake is richly chocolatey, soft, fluffy, and so flavorful.  It's my favorite chocolate cake recipe...I use it so incredibly often.  It's the same recipe I use in my Best Chocolate Cake Recipe, here. The frosting tastes like peanut butter fudge...just like the inside of a Reese cup. These keep well for a few days too.  They taste amazing warm (heating them up in the microwave), room temperature, or even chilled in the refrigerator.  Top them with some Reese cup crumbles and you're in for some chocolate peanut butter filled heaven


You can find the chocolate cake recipe here
And the peanut butter frosting recipe here.


***For the chocolate cupcakes, spray the cupcake pan well and fill them about 2/3 of the way full (not to the top!  they will overflow).  Also, they will only need about 20-25 minutes in the preheated oven, or until a toothpick inserted comes out clean.  Follow the rest of the directions exactly.
***For the peanut butter frosting, you may need to add a lot more milk...depending on the type of peanut butter you use.  I used Smuckers All Natural Smooth peanut butter, which I don't really recommend because I'm pretty sure the recipe is for peanut butters like Jif.  You're more likely to get a fluffy frosting with Jif than Smuckers (Smuckers was more dense).

Friday, April 20, 2012

Strawberry Pavlova

I saw this recipe on Allrecipe.com a few weeks ago, and I had never had Pavlova before, so I figured: why not? I altered it a little bit based on what I had in my house, and it turned out soooo tasty!  And incredibly pretty! The perfect dessert on a hot, spring or summer day.  It's light, sweet, and very refreshing. What made this pavlova super amazing was the fact that the strawberries I used were freshly picked that same day.  A local strawberry patch is now open where I live, and my family picks strawberries every year.  Mmm...who doesn't love freshly picked, sweet strawberries with whipped cream?  This pavlova is simply a light, sweet, base for that.  Crunchy on the outside, and soft and fluffy on the inside.  The almond extract gives it a delicious flavor that pairs really well with the strawberries and whipped cream.  After a few days, the outside of this pavlova will get too soft, so eat it quickly!  I promise ---> it won't be difficult.

Yield: about 12 servings

Ingredients:

  • 4 egg whites
  • 1 1/4 cups sugar, divided
  • 2 pinches of flour, divided
  • 1 teaspoon lemon juice
  • 1/2 teaspoon almond extract
  • desired amount of Cool Whip, thawed
  • 1 quart fresh strawberries, sliced

Directions:

  1. Place egg whites in a large mixing bowl; let stand at room temperature for 30 minutes. Beat egg whites on medium speed until foamy. Add 1 pinch of flour; beat until soft peaks form. Gradually add 1-1/4 cups sugar, 1 tablespoon at a time, beating on high until stiff peaks form. Sprinkle pinch of flour over egg white mixture; fold in. Fold in lemon juice and extract.
  2. Coat a 14-in. pizza pan with nonstick cooking spray. Spoon meringue onto pan, forming any shape you want. Build up edges slightly. Bake at 250 degrees F for 45-55 minutes or until crisp. Cool on pan over a wire rack.
  3. When cool, spread with Cool Whip. Arrange strawberries over top. Serve immediately.

Monday, April 16, 2012

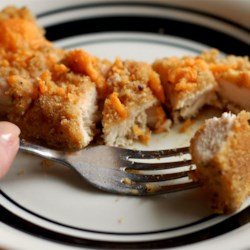
Cheesy Garlic Chicken


Who doesn't love cheesy, buttery, chicken?  This is a perfect comfort food recipe: chicken breasts dipped in garlic butter and cheddar bread crumbs, then drizzled with more butter and sprinkled with crushed croutons.  Mmmmmm.  I served this a few days ago with my cucumber tomato salad recipe, found here.  The combo was so delicious together and my parents wouldn't stop telling me how amazing the meal was.  I can't wait to experiment with this recipe by using different cheeses, breadcrumbs, and crackers/croutons.  I want to try it with Ritz crackers and white cheddar cheese next(:


Ingredients:

  • 1/2 cup butter
  • 4 cloves garlic, minced
  • 3/4 cup dry, italian seasoned bread crumbs
  • 1/2 cup freshly grated Parmesan cheese
  • 1 1/2 cups shredded Cheddar cheese
  • 1/4 teaspoon dried parsley
  • 1/4 teaspoon dried oregano
  • 1/4 teaspoon ground black pepper
  • 1/2 cup crushed croutons
  • 8 skinless, boneless chicken breast halves - pounded thin

Directions:

  1. Preheat oven to 350 degrees F (175 degrees C).
  2. Melt the butter in a saucepan over low heat, and cook the garlic until tender, about 5 minutes.
  3. In a shallow bowl, mix the bread crumbs, Parmesan cheese, Cheddar cheese, parsley, oregano, and pepper.  Sprinkle some breadcrumbs (not from the mixture) onto the bottom of a 9x13 inch baking dish in a thin layer.
  4. Dip each chicken breast in the garlic butter to coat, then press into the cheddar bread crumb mixture. Arrange the coated chicken breasts in the 9x13 inch baking dish. Drizzle with any remaining butter and top with any remaining bread crumb mixture.  Sprinkle crushed croutons on top, lightly pressing them onto the chicken to keep from falling off.
  5. Bake 30 minutes in the preheated oven, or until chicken is no longer pink and juices run clear.