Monday, July 15, 2013

Chocolate Chip Cookie Dough Brownies


I've been on quite a cookie dough frenzy lately.

I mean how can you not be??? 

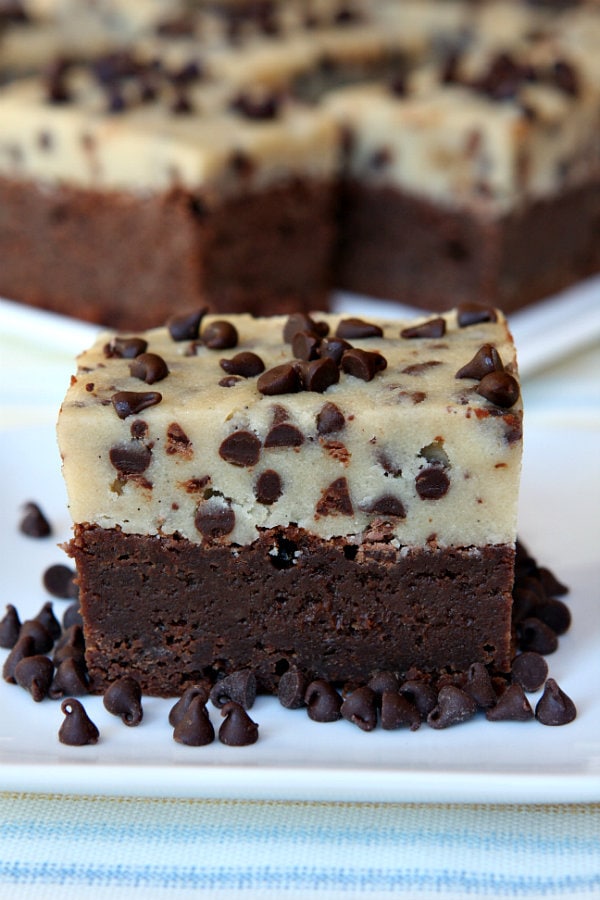
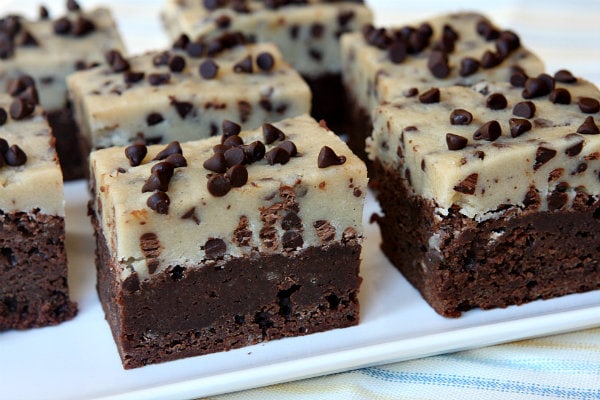
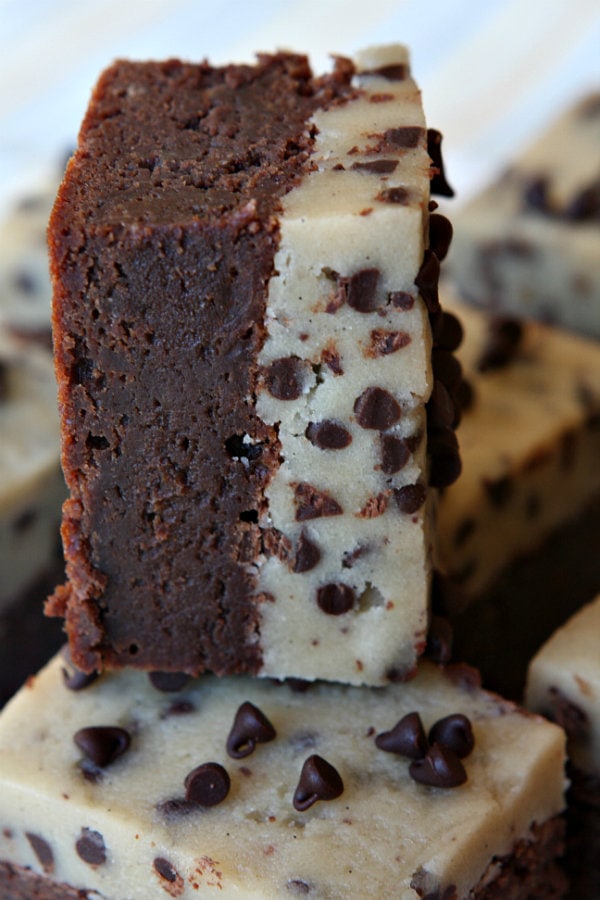
Cookie dough, by definition, is absolute BLISS. It's basically just butter and sugar....and you gotta love those two ingredients. But cookie dough ON TOP OF A BROWNIE?????? Umm...yummmmm! This recipe is so sinfully delicious, and I promise everyone will be asking you for it once they take the first bite. The bottom layer is a super fudgey, rich, densely chocolatey brownie (no cakey texture here! Just the way I like it!), and the cookie dough is wonderfully buttery, vanilla-y, and everything you believe the perfect cookie dough should taste like. And, just like my incredibly delicious cookie dough cheesecake bars here, the cookie dough is eggless, so you can eat as much as your little tummy pleases(:

I brought these treats to a party at my school and they were declared "little squares of heaven." My friend is now seriously OBSESSED with them and goes insane and drools whenever someone mentions them. As do I.

Don't believe me? Try them yourself.

Yield: 16 brownies

Ingredients:
BROWNIE LAYER:
3/4 cup (1 1/2 sticks) unsalted butter
1 1/2 cups bittersweet chocolate chips
1 cup granulated white sugar
1/2 cup packed light brown sugar
4 large eggs
1 teaspoon vanilla extract
1/2 teaspoon salt
1 cup all-purpose flour


COOKIE DOUGH:
3/4 cup (1 1/2 sticks) unsalted butter, room temperature
3/4 cup granulated white sugar
3/4 cup packed light brown sugar
1/4 teaspoon salt
2 tablespoons milk
1 1/2 teaspoons vanilla extract or vanilla bean paste
2/3 cup all-purpose flour
1 cup miniature chocolate chips
additional miniature chocolate chips, if desired (to garnish the top)


Instructions: 
Prepare the brownie layer:
1. Preheat the oven to 350 degrees F. Spray a 9x9-inch pan with nonstick spray, then line with a strip of parchment paper so that it covers the bottom and comes up two sides of the pan. Spray the parchment with nonstick spray too.
2. In a microwave safe bowl (or in the top of a double boiler or pan set on top of a pan of simmering water), microwave in 30 second bursts to melt butter and chocolate chips together until all is melted and smooth. Whisk in the sugars, then whisk in the eggs, vanilla and salt. Sift flour into the bowl and stir that in too. Scrape the brownie batter into the prepared pan. Bake for 25 to 30 minutes, or until the brownie layer is cooked through (toothpick inserted into the center comes out clean). Place the pan of brownies in the refrigerator to speed up the cooling process (or cool at room temperature and add the cookie dough layer later).


Prepare the cookie dough layer:
3. In a large bowl, use an electric mixer to combine the butter, sugars and salt until soft and creamy (2 minutes). Mix in the milk and vanilla. Sprinkle in the flour and mix in until combined. Stir in the 1 cup of chocolate chips. Scoop the cookie dough onto the top of the brownies and spread onto the brownie layer. I find that it's easiest to do this if the brownie layer is chilled and firm. Wet your hands or spray them with nonstick spray and pat the cookie dough on top in a even layer. Sprinkle additional chocolate chips on top to create a nicer, visual appearance. For easy, clean cutting, chill the brownies (wrap the brownies with plastic wrap and chill until firm- 1 to 2 hours or up to 2 days).
4. Cut the brownies: Run a knife along the sides of the brownie pan and then use the parchment paper to lift the brownies from the pan and onto a cutting board. Slice the brownies with a sharp knife, wiping the knife with a paper towel between cuts. If you'd like all of your slices of brownies to look clean-cut without edges, use the knife to cut the sides of the brownies off before cutting pieces. Keep brownies slices covered and chilled until ready to serve.


Note: these taste most delicious just slightly cool (after about an hour of thawing at room temperature) or completely at room temperature (at least two hours of thawing), or my personal favorite: warmed up in the microwave until gooey and amazingly delicious.

Sunday, July 14, 2013

Chocolate Chip Cookie Dough Cheesecake Bars


First off, I sincerely apologize for not blogging in such a long time. The end of my junior year in high school was...well - INSANE. But now it's summer! And all my hard work was totally worth it. Now I am officially a senior! 

You wanna know what I'm pumped about the most for this summer? BAKING! So my first post of the summer is this absolutely incredible recipe for cookie dough cheesecake bars. Oh my goodness, are they something magical. These scrumptious treats are the perfect combination of cheesecake and chocolate chip cookie dough. Can you even think of a more amazing pairing? I sure can't. I brought a full pan of these to a cross country party and they literally vanished before I could even blink. I guess you could say my parents were more than a little disappointed that I came home with an empty tray...

The recipe begins with a fool-proof, classic graham cracker crust. Above the crust lies another perfect, creamy layer of luscious cheesecake, wonderfully vanilla-y and delicious. Last but not least, my personal favorite layer is at the top: the cookie dough. Ahh cookie dough....my love...buttery and brown-sugary and studded with chocolate chips....can you say YUM??? This cookie dough is egg-less, so it's safe to eat (yes, by the spoonful if you wish). Together, the three layers form this heavenly dessert that you won't be able to resist.


Yield: about 12 bars

Ingredients:
Crust
1 1/2 cups graham cracker crumbs
1 teaspoon ground cinnamon
5 tablespoons unsalted butter, melted


Cookie Dough
5 tablespoons unsalted butter, room temperature
1/3 cup packed light brown sugar
3 tablespoons granulated sugar
1/4 teaspoon salt
1 teaspoon pure vanilla extract
1/2 cup all-purpose flour
3/4 cup chocolate chips


Cheesecake Filling
10 ounces cream cheese, at room temperature
1/4 cup granulated sugar
1 large egg, at room temperature
1 teaspoon vanilla extract

Instructions:
1. Preheat the oven to 325 F. Line an 8 inch square baking pan with parchment paper or foil allowing a little overhang and spray with nonstick cooking spray. Set aside.
2. Mix the melted butter, cinnamon, and graham cracker crumbs until thoroughly combined. Press the mixture into the bottom of the prepared pan. Bake in preheated oven for 6 minutes. Remove pan to a cooling rack. Leave your oven on while you prepare the dough.
3. While the crust is cooling, prepare the chocolate chip cookie dough. In the bowl of a stand mixer fitted with the paddle attachment or in a large bowl with an electric mixer, beat butter, brown sugar, granulated sugar, salt and vanilla until smooth and thoroughly combined, about 1 minute. Mix in the flour on low speed, and mix until just incorporated. Mix in the chocolate chips. Set aside. (Note: if the cookie dough looks a little dry, it's fine. It will be crumbled on top of the cheesecake layer.)
4. In the bowl of a stand mixer fitted with the paddle attachment or in a large bowl with an electric mixer cream together the cream cheese and sugar until smooth. Mix in the egg and vanilla on low speed just until incorporated. Pour the cheesecake batter into the prepared crust. Use your hands to form "clumps" of the cookie dough, smoosh it together and flatten it out.  Distribute the cookie dough onto the top of the cheesecake batter in teaspoon-sized clumps. Be sure to use all of the dough.
5. Bake for about 30 minutes, until the top feels dry and firm (the cookie dough) and the entire pan looks set if given a gentle shake. Move bars to a cooling rack and allow to cool completely. Chill in refrigerator overnight or for at least a couple hours.
6. Lift the bars out by the overhang and cut into squares for serving.

**Note: these taste best at room temperature.


Sunday, March 31, 2013

Brown Butter Soda Bread

brbuttsodabread2.jpeg


brbuttsodabread.jpeg


Brown Butter Soda Bread

Every Saint Patrick's Day, my family has to have Irish Soda Bread. It's tradition, and you can't mess with tradition. I typically bake a large batch in the morning for breakfast, where my family and I eat the bread hot from the oven with salted butter....Mmmm....it's truly to-die-for.  And then that night, we dip the bread in our corned beef and cabbage or stew or whatever Irish dinner we're having. Then, we have the leftovers for breakfast the following morning reheated with butter -- that is...if it makes it that long.

And I am pleased to announce that this is officially my favorite soda bread recipe. Why? Because of the browned butter

If you've never browned butter in a recipe before, here is your chance (and if you seriously haven't tried my Brown Butter Cookies, you really haven't lived yet). By browning the butter, you end up with a toasty, rich aroma that tastes so flavorful and savory. The rich flavor compliments the rosemary perfectly, and the whole wheat flour gives the bread an amazing texture. By brushing the top of the bread with olive oil before baking, you end up with wonderfully crisp edges, while the interior stays soft and fluffy.  You also get a delicious burst of sea salt and black pepper with every bite.

This is definitely going to be a staple in my house every Saint Patrick's Day!


*adapted from Epicurious

Yield: 2 loaves

Ingredients:

  • 1/4 cup (1/2 stick) unsalted butter
  • 2 cups all purpose flour
  • 1 1/2 cups whole wheat flour
  • 1/2 cup old-fashioned oats
  • 1 tablespoon white sugar
  • 1/2 tablespoon dried rosemary (or 1 tablespoon chopped fresh)
  • 2 teaspoons baking powder
  • 1 teaspoon baking soda
  • 1 teaspoon salt
  • 3/4 teaspoon ground black pepper plus additional for topping
  • 1 3/4 cups buttermilk
  • Olive oil, for brushing
  • Sea salt


Instructions:
1. Position rack in center of oven and preheat to 375°F. 
2. Stir butter in heavy small saucepan over medium heat until melted and golden brown, about 3 minutes. Remove from heat.
3. Stir flour, oats, sugar, rosemary, baking powder, baking soda, salt, and 3/4 teaspoon pepper in large bowl to blend. Pour buttermilk and melted browned butter over flour mixture; stir with fork until flour mixture is moistened.
4. Turn dough out onto floured work surface. Knead gently until dough comes together, about 7 turns (the goal is to work it as little as possible -- for a fluffy texture. If you work it too much it will become dense). Divide in half. Shape each half into ball; flatten each into 6-inch round. Place rounds on ungreased baking sheet, spacing 5 inches apart. Brush tops with olive oil. Sprinkle lightly with ground black pepper and sea salt. Using small sharp knife, cut 1/2-inch-deep X in top of each dough round.
5. Bake breads until deep golden brown and tester inserted into center comes out clean, about 40-45 minutes. Cool breads on rack at least 20 minutes. Serve warm or at room temperature.

Saturday, March 30, 2013

Sweet Potato Oranges


I made these this past fall and I am SO excited to finally be posting them! When I was a baby, my favorite food was sweet potatoes -- I gobbled down so many baby food cans of mashed sweet potatoes...I just couldn't get enough! And now...I still LOVE them. I don't understand why people love regular baking potatoes so much. They are just bland and tasteless unless you add a bunch of cheese and sour cream, especially when compared with the magnificent sweet potato.  I was extremely happy with the flavor in this recipe; the potatoes compliment the oranges very well. And not only do these taste amazing, but they look absolutely fabulous and oh-so-impressive! Don't get me wrong...they were a bit of work -- having to scoop out the flesh of the oranges wasn't so easy. But it was totally worth it. The orange flavor is subtle and the brown sugar topping caramelizes the nuts, while seeping into the mashed potato mixture below. The result? Pure sweet potato bliss.

Yield: 6 servings

Ingredients
6 medium/large oranges
3 cups mashed, cooked sweet potatoes
1/4 cup white sugar
1/4 cup loosely packed light brown sugar
2 eggs, at room temperature, lightly beaten
1 teaspoon vanilla extract
1 cup butter, softened, divided
1 tablespoon grated orange peel
1 cup light brown sugar
1/2 cup all purpose flour
1 cup (largely) chopped pecans

  1. Preheat oven to 350 degrees F (175 degrees C).
  2. Prepare oranges by cutting tops off, 1/4 to 1/2 inch down. Spoon out the flesh, leaving a shell.
  3. In a large bowl combine sweet potatoes, sugar, orange juice, eggs, vanilla extract, 1/2 cup butter and grated orange peel. Spoon mixture into orange shells. Place in a deep casserole dish.
  4. In a small saucepan over medium heat, combine remaining 1/2 cup butter, brown sugar, flour and pecans. Cook until sugar dissolves in melted butter. Spoon over oranges. Fill casserole dish with water to reach 1/2 inch in depth.
  5. Bake in preheated oven for 30 minutes.

Friday, March 29, 2013

Beef Bourguignon (Beef Stew With Red Wine)


Beef Bourguignon

Unfortunately, I do not know how to pronounce "Bourguignon." I wish I did.

However, I do know that this soup, despite the rather intimidating name, is fabulous. My mom declared it "the best beef stew [she has] ever tasted." The red wine gives this dish such a rich, flavorful, and soul-satisfying taste that will be sure to impress a crowd. After making this, I not only fell in love with the soup, but I realized that I absolutely adore pearl onions! They are so sweet and tasty, with a satisfying crunch that I had never experienced before. Also, t
here are a few key details to remember when making the stew: Be sure to brown the meat well in the beginning, use a good quality red wine that you would happily drink, and, if possible, make it a day in advance to let the flavors develop. Unlike a soft, mushy, murky stew, the components of this bourguignon stay intact just enough - so that you know what you're eating, but it still feels cohesive. My family be making this in big batches all winter long.

Yield:
4-6 servings

Ingredients
3 tablespoons vegetable oil
1 medium onion, diced
1 medium carrot, peeled and diced
4 cloves garlic, diced
1 teaspoon dried, crushed thyme
2 pounds cubed stewing beef (chuck or sirloin tip)
1 1/2 teaspoons kosher salt
1/2 teaspoon freshly ground black pepper
2 tablespoons all-purpose flour
3 cups red wine
1 cup beef broth
1 tomato, seeded and diced
2 cups pearl onions
1/4 pound bacon, cut into 1/2-inch strips
1/4 pound mushrooms quartered
2 tablespoons minced fresh flat-leaf parsley
Buttered Egg Noodles (optional)


Instructions

Heat 1 tablespoon of the oil in a Dutch oven or ovenproof stewpot, and sauté the onion, carrot, garlic, and thyme over medium heat until browned, 8 to 10 minutes. When the vegetables are nicely colored, transfer them to a bowl. Wipe out any little bits of vegetable clinging to the pan so they don't burn when you sear the beef.

Pat the meat cubes dry and season them with 1/2 teaspoon of the salt and 1/4 teaspoon of the pepper. Add 1/2 tablespoon of the oil to the pan and sear the beef in batches over high heat until it is a rich mahogany brown on all sides. This will take approximately 5 to 7 minutes depending on the thickness of the meat. Cubes tightly packed in the pan won't brown properly. Clean out any juices which are released before the next batch. Over high heat add 1/2 tablespoon of oil for each batch, then sauté the meat until browned on all sides.

Preheat the oven to 375 degrees F. Return the vegetables and the meat to the pan, dust the meat and vegetables with the flour, and cook for 2 minutes over medium heat, stirring frequently. Toasting the flour helps to develop the overall flavor of the stew. Add 2 cups of the red wine to cover the beef and bring to a boil. Add the tomato and season the stew with the rest of the salt and pepper. 

Place the stew in a crock put set for low and cook 7-8 hours, or until the meat is tender. (If as the stew simmers the wine reduces below the meat, add a little water.)

After at least 3 hours, bring a medium pot of water to a boil. To peel the pearl onions, trim the roots and make a small X with a paring knife in the other end. Boil the onions for 3 minutes, spoon them out, and set them aside to cool. Then squeeze the onions out of their skins. In the same water, blanch the bacon pieces for 3 to 4 minutes, and keep any grease.

Heat a separate medium skillet, add the remaining oil, and brown the bacon and onions. Add the mushrooms and cook over high heat until golden brown. Pour any excess fat into the slow cooker.  Add the final cup of red wine to the vegetables, and simmer until the onions are tender, about 10 minutes. Add this mixture to the slow cooker.

When the beef is tender, pour the stew into a warm bowl, dust with the minced parsley, and serve with buttered noodles if desired, or crusty bread.

Thursday, March 28, 2013

Italian Cream Pancakes

Italian Cream Pancakes Recipe


I know I haven't posted in a while...I've been super busy with school work (junior year is killing me), but now it's FINALLY time for Spring Break! I will try my best to post at least one recipe each day because there are so many recipes I've been meaning to post and I know I am super behind. For my first post in a while, I have decided to present to you these incredible, sweet, nutty pancakes topped with a decadent cream cheese glaze. 

Yes, they are just as delicious as they sound. I promise.

If you've never tasted Italian Cream Cake, then you totally need to. Like...immediately. Sooo..you can start with this breakfast recipe! These pancakes seriously taste just like Italian Cream Cake, only hot and in heavenly pancake form, with warm glaze oozing all over them. Coconut, cream cheese frosting, and pecans are the most perfect combination perhaps in the entire world, and they taste scrumptious in this recipe.  Not to mention, toasting ] the pecans give the pancakes a wonderful nutty-ness that tastes so warm and comforting.

There were no leftovers when I made these for my family, and I'm sure the same thing will happen for you.

You can find this decadent recipe here. 

Friday, January 18, 2013

Toasted Coconut Banana Bread


I've been trying to find the perfect, classic banana bread recipe, and I have not had any luck with that yet, however....during my search, I found this delicious alternative.  Coconut and banana are just so amazing together, am I right?  The combo reminds me of summer: drinking pina-coladas....just so refreshing!  This bread is also not too sweet, and has just the right amount of banana flavor.  In this recipe, your classic banana bread jumps up to a whole new level. Finely shredded coconut adds a sweet crunch to this moist, flavorful treat.  I recommend it plain, but I highly recommend it with these loaded up variations: served warm with a scoop of vanilla ice cream/whipped cream and/or chocolate chips, with coffee for breakfast, chilled in the refrigerator, or toasted with cream cheese frosting and/or nutella and/or peanut butter.

Yield: 1 loaf (about 10-12 servings)

Ingredients:
1 3/4 cups all-purpose flour
1/2 cup sugar

2 teaspoons baking powder
1/2 teaspoon baking soda
1/4 teaspoon salt
2 beaten eggs, at room temperature
1 cup mashed, very ripe bananas (2 large or 3 medium bananas)
1/3 cup vegetable oil
2 tablespoons milk
1 1/4 teaspoons vanilla
1 3/4 cups flaked coconut, toasted

Instructions:

Grease a 9-by-5-by-3-inch loaf pan; set aside. In a large mixing bowl stir together flour, sugar, baking powder, baking soda, and salt. Make a well in the center. In a medium mixing bowl combine beaten eggs, mashed bananas, oil, milk, and vanilla; mix well. Add egg mixture to flour mixture; stir just till combined. (The batter should be lumpy.) Fold in toasted coconut.


Pour batter into prepared loaf pan. Bake in a preheated 350 degrees F oven for 45 to 55 minutes, or till a toothpick inserted near the center comes out clean.

Cool in pan on a wire rack for at least 10 minutes before removing to a wire rack.  Serve warm, at room temperature, and/or chilled.

Thursday, January 17, 2013

THE BEST EVER CHOCOLATE CHIP COOKIES

Oh yeah.  This is definitely worthy of the ALL CAPS TITLE.


I've been trying to find the perfect chocolate chip cookie recipe for seriously like....well....FOREVER.  I can't even tell you how many different recipes I've tried. My mom always insisted that the chocolate chip cookie recipe on the back of the Nestle Toll House bag of chocolate chips were the best, since she made those as a kid, but they really aren't.  For me at least, the Toll House cookies made from scratch always turn out too flat.  The cookie dough was awesome, don't get me wrong (I could eat cookie dough all day), and the cookies tasted fantastic just out of the oven, but they got crunchy overnight.  I have been looking for that perfect, go-to chocolate chip cookie recipe that's bursting with flavor, loaded with chocolate chips, and is thick and fluffy and not flat as a pancake.  I also hate when you pick up a warm chocolate chip cookie and it flops over like a soggy piece of pizza.  I wanted a fresh-out-of-the-oven cookie that would be perfectly soft, yet not flop over.  All of my attempted chocolate chip cookie recipes have been too flat, not rich enough, not vanilla-y enough, or too crunchy....all of them were good, just not knock-my-socks off good.  That is...until I found this glorious recipe.  Once I made my first batch of these bad boys, I was literally singing "Hallelujah" around the kitchen because I was so happy to have FINALLY found the most PERFECT recipe. These cookies are fluffy (if you follow the recipe EXACTLY), they do not flop over (see in the first picture how the middle is very soft, yet the bottom is firm?  Yes...perfection right there), yet are still incredibly moist, they're full of buttery-brown-sugary-vanilla flavor, keep a soft, yet slightly crunchy-just-around-the-edges texture, and my favorite part - they are lightly swirled with flecks of sea salt.  The sea salt is what truly sets them apart from other chocolate chip cookie recipes.  Anybody who cooks/bakes knows that salt is the key ingredient to any good recipe, since it brings out all the other ingredient flavors.  The sea salt in these cookies form a sort of salted-caramel like flavor mixed with the brown sugar.  Which brings me to another reason why I'm in love with this recipe...the majority of the sugar is brown sugar, as opposed to half white half brown, which gives the cookies their perfectly soft texture (brown sugar tends to yield a more chewy cookie because of the molasses). I told me dad, "In the future, when I own my own bakery, these cookies will be there."  He said he would never let me forget that.

You can find this blissful recipe here.

Classic Monkey Bread


Hmmmm.....sticky....gooey....sweet....oozing with caramel and cinnamon....the amazing, classic monkey bread.  If you've never tasted it, mannnnn are you missing out because it's unforgettable.  I don't know if you have tried my fluffernutter monkey bread, but this classic recipe is, in my opinion, even better.  I guess I can't really compare the two recipes because the fluffernutter one is bursting with my favorite combo: peanut butter and marshmallow fluff.  However, this recipe is a CLASSIC, and it's just so darn good.  Also, the leftovers store wonderfully in a resealable container; just reheat them and they will taste almost as good as they do straight from the oven(:  I wouldn't change anything about this recipe except to make MORE of it because it goes so quickly.  Once you start eating it, you just can't stop!  You just keep popping the bite-size pieces of heaven into your mouth! It's truly irresistible.

Yield: about 12 servings

Ingredients


1/2
cup granulated sugar
1
teaspoon cinnamon
2
cans (16.3 oz each) Pillsbury® Grands!® Homestyle refrigerated buttermilk biscuits
1/2
cup chopped walnuts, if desired
1/2
cup raisins, if desired
1
cup firmly packed light brown sugar
3/4
cup butter, melted


Instructions:
  • Heat oven to 350°F. Lightly grease 12-cup fluted tube pan with shortening or cooking spray. In large -storage plastic food bag, mix granulated sugar and cinnamon.
  • Separate dough into 16 biscuits; cut each into quarters. Shake in bag to coat. Arrange in pan, adding walnuts and raisins among the biscuit pieces.
  • In small bowl, mix brown sugar and butter; pour over biscuit pieces.
  • Bake 26 to 30 minutes or until golden brown and no longer doughy in center. Cool in pan 10 minutes. Turn upside down onto serving plate; pull apart to serve. Serve warm.