Showing posts with label heavy cream. Show all posts

Thursday, March 28, 2013

Italian Cream Pancakes

Italian Cream Pancakes Recipe


I know I haven't posted in a while...I've been super busy with school work (junior year is killing me), but now it's FINALLY time for Spring Break! I will try my best to post at least one recipe each day because there are so many recipes I've been meaning to post and I know I am super behind. For my first post in a while, I have decided to present to you these incredible, sweet, nutty pancakes topped with a decadent cream cheese glaze. 

Yes, they are just as delicious as they sound. I promise.

If you've never tasted Italian Cream Cake, then you totally need to. Like...immediately. Sooo..you can start with this breakfast recipe! These pancakes seriously taste just like Italian Cream Cake, only hot and in heavenly pancake form, with warm glaze oozing all over them. Coconut, cream cheese frosting, and pecans are the most perfect combination perhaps in the entire world, and they taste scrumptious in this recipe.  Not to mention, [ toasting ] the pecans give the pancakes a wonderful nutty-ness that tastes so warm and comforting.

There were no leftovers when I made these for my family, and I'm sure the same thing will happen for you.

You can find this decadent recipe here. 

Sunday, November 25, 2012

Cheesy Potato and Corn Chowder


This takes comfort food to a whole new level.  That's what I love about chowder recipes...they're easy, yet incredibly rich and literally the definition of true soul-food.  This is rich, creamy (yet chunky!), cheesy, and full of fabulous flavor.  It's also incredibly perfect for those cold, winter nights.  I wouldn't change anything about this recipe...it's just too perfect.  The only thing I may experiment with is trying it with different meats, like chicken, ham, or - I think this would taste best - sausage. My family and I gobbled it up and we all agreed that this is one of my best chowder recipes of all time.  I served it with crusty french bread for dipping, and it was a wonderful, southern, comforting meal.

Yield: about 6-8 servings

Ingredients:
2 tablespoons butter
1 cup chopped celery
1 cup chopped onion 
2 14.5 ounce cans chicken broth
3 cups peeled and cubed potatoes
1 15-ounce can whole kernel corn
1 15-ounce can creamed corn
1 4-ounce can diced green chiles
1 2.5 ounce package country style gravy mix
1 cup milk
1 cup heavy cream
1 1/4 cup shredded, Mexican-style blend cheese
Garnish: crumbled bacon, sliced green onions, and/or extra cheese (optional)

Instructions:

  1. In large saucepan, melt butter over medium high heat. Add celery and onion; cook and stir until tender, about 5 minutes.
  2. Add chicken broth; bring to a boil. Add potatoes; cook over low heat for 20 to 25 minutes or until potatoes are soft, stirring occasionally.
  3. Stir in both corn cans and chiles; return to boiling. Combine milk and heavy cream, and dissolve gravy mix in the milk/cream mixture; stir into boiling mixture.  Let simmer over low heat for about 10 minutes. Add cheese; cook and stir over low heat until cheese is melted.  Garnish (if desired) and serve hot.
***If you love spicy, feel free to add some hot sauce to your bowl(:

Saturday, September 1, 2012

Chocolate Cupcakes with Buttercream Frosting


Oh my word, these were so scrumptious.  I brought these yummies to a cook out - attended by a bunch of hungry runners - and they disappeared before I had a chance to blink.  One runner said (and I quote!) "that may have been the best cupcake I've ever had."  The chocolate cupcakes themselves have the perfect amount of cocoa, are moist, fluffy, and aren't too sweet...allowing you to taste the chocolate more.  The frosting is definitely the BEST buttercream frosting I've ever had.  I have never used heavy cream in frosting before, and now I'll never stop!  Heavy cream makes the frosting so incredibly fluffy and melts in your mouth.  Using shortening in the frosting also gives it an amazing consistency; Not too runny, not too dense.  I don't think there's anything that compliments buttercream frosing better than rich, chocolate cupcakes. This recipe is truly perfection.

Yield: about 12 cupcakes

For the Chocolate Cupcakes:

Ingredients:

  • 1 1/2 cups all-purpose flour
  • 1 cup white sugar
  • 1/2 cup cocoa powder
  • 1 teaspoon baking soda
  • 1/2 teaspoon salt
  • 1/3 cup vegetable oil
  • 1 teaspoon vanilla extract
  • 1 teaspoon distilled white vinegar
  • 1 cup water

Directions:

  1. Preheat oven to 350 degrees F (175 degrees C). Lightly grease one medium cupcake pan or line with paper liners.
  2. Sift together the flour, sugar, cocoa, baking soda and salt. Add the oil, vanilla, vinegar and water. Mix together until smooth.
  3. Pour into prepared muffin pan (batter should be just below the rim, for large cupcakes. For medium cupcakes, pour batter 2/3 to 3/4 full) and bake at 350 degrees F (175 degrees C) for 18-25 minutes, or until a toothpick inserted in the center comes out clean. Remove from oven and allow to cool in pans for 15 minutes.
  4. After 15 minutes, carefully remove cupcakes from pan, place on wire rack, and allow to cool completely.  Frost generously with Buttercream Frosting (recipe below).


For the Buttercream Frosting:

Ingredients:

  • 1/2 cup shortening
  • 1/2 cup unsalted butter, softened
  • 3 cups confectioners' sugar
  • 1/4 teaspoon salt
  • 1 teaspoon vanilla extract
  • 1/2 cup heavy whipping cream

Directions:

  1. In a mixing bowl, cream shortening and butter until fluffy. Add sugar, and continue creaming until well blended.
  2. Add salt, vanilla, and 6 ounces whipping cream. Blend on low speed until moistened. Add additional 2 ounces whipping cream if necessary. Beat at high speed until frosting is fluffy, at least 5 minutes.  Frost cooled cupcakes.  

You will have some frosting left over (I had about a cup)...so you can either use it for another recipe or eat it by the spoonful...your choice(;

Friday, August 24, 2012

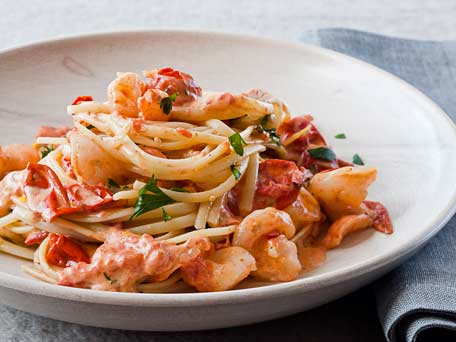
Pasta with Shrimp and Creamy Roasted Tomatoes


I'm on a roll with the shrimp recipes lately. My Garlicy Shrimp Scampi , New Orleans Barbecue Shrimp, Sweet and Spicy Honey Grilled Shrimp Skewers, and (my personal favorite) Lemony Asparagus Pasta with Shrimp are all incredible.  I'm a sucker for creamy pastas and juicy shrimp, so this recipe had my name all over it when I first saw it on Recipe.com.  I love the idea of roasting the tomatoes and adding them to a creamy sauce...this makes such a wonderful, roasted-tomato flavor.  Heavy cream also makes everything better, causing this sauce to be super creamy and comforting.  This has big, flavorful shrimp swimming in a roasted tomato-creamy sauce.  The sauce isn't too tomato-y, which I really liked, and has a touch of lemon flavor...very refreshing.  It was rich and filling (from the heavy cream), yet light and summery (from the lemon flavor and shrimp) at the same time. There is also a perfect amount of sauce in proportion with the pasta and shrimp.  If you like lots of shrimp, use two pounds.  If you prefer less shrimp, then use one pound.  I used two pounds and there was lots of flavorful, big, juicy shrimp with every bite.  My parents said this was "restaurant quality"...I totally agree.

Yield: about 4 servings

Ingredients:
1 1/2 cups grape tomatoes
1 tablespoons extra-virgin olive oil
1 teaspoon fresh thyme leaves
Kosher salt and freshly ground pepper
3/4 pounds pasta (of your choice) 
1 cup heavy cream
1 to 2 pounds large shrimp, shelled and deveined
2 teaspoons fresh lemon juice
1 teaspoons finely grated lemon zest
2 tablespoons coarsely chopped fresh flat-leaf parsley 

Directions:
1.
Preheat the oven to 375 degrees. In a large ovenproof skillet, toss the tomatoes with the olive oil and and thyme and season with salt and pepper. Roast the tomatoes for about 25 minutes, until starting to brown and their skins split.
2.
Meanwhile, in a large pot of boiling, salted water, cook the pasta until al dente; drain.
3.
Add the cream and a generous amount of salt and desired amount of pepper to the tomatoes and bring to a simmer. Cook over moderate heat, gently crushing the tomatoes, until the cream thickens slightly, about 3 minutes. Add the shrimp*** and simmer over moderate heat until cooked through, about 2-4 minutes.  Season with more salt and pepper. Add the pasta to the skillet along with the lemon juice and toss over low heat until the pasta is coated, about 1 minute. Add the lemon zest and parsley and toss. Add more salt and pepper to taste.  Transfer the pasta to warm bowls and serve at once.

***If using 2 pounds of shrimp, cook the shrimp in 2 batches, transferring the first batch to a plate with a slotted spoon and keeping warm with foil.  Add first batch of shrimp to pasta in the end.


***adapted from Recipes.com

Sunday, August 12, 2012

Best Scrambled Eggs EVER!


These truly are the BEST scrambled eggs in the entire world.  They are so incredibly fluffy and creamy and just perfect in every way possible.  The secret?  Heavy cream.  Oh yesss...heavy cream makes everything better.  These may not be the healthiest eggs in the world, but they sure are the tastiest.  Cooking them in the microwave assures that they don't cook to fast and brown on the outside, like they do in a skillet.  I will never make eggs another way again - these are just too good.


Yield: one large serving, or 2 small servings

2 large eggs
3.5 tablespoons heavy cream 
2 tablespoons water
a pinch of salt
a dash of pepper 

additional salt and pepper for serving

Break eggs into a microwaveable plastic measuring container. Add the heavy cream, water, salt and pepper. Whisk vigorously until well combined and fluffy, about 1 minute. Place the container in the microwave and set on high. Check every 20-30 seconds, gently swirling the container to shift the cooked egg and coat with it with uncooked egg. Repeat until  the liquid egg is significantly reduced. Fold the cooked egg in with the raw gently using a spatula (do not break it up too much!) Microwave again until you get moist, creamy, folded eggs. The success is in the folding, and not letting any part of the egg become dry and over cooked. Sounds too easy? It is. Best eggs ever.


Want to watch me do it? I'll go through the folding with you. And give you a running commentary.

Your egg mixture should look a bit like this after the first 30 seconds or so of cooking. Of course, this depends upon the power of your microwave. See how the edges are starting to cook yet the centre is still very liquid? Just give it a swirl in the bowl. No spoons yet! Pop it back in the microwave for 30 seconds.


Remove from the microwave and swirl again. Try to get the liquid egg mixture on top of the cooked edges. We don't want that egg to dry out! Pop it back in for another 30.


Repeat the above process, covering the cooked edges with the egg liquid every time, with a simple swirl of the bowl. It's a very gentle process, as we don't want to break up the egg too much, we just want the cooked egg to shift so it doesn't dry out.


There will come a stage where the cooked egg on the edges is quite thick and the uncooked centre reduces in size. If the cooked egg no longer moves when you swirl the bowl, gently ease it off the side with a spatula.


I'm just going to take a moment here to say YUM! I simply LOVE these scrambled eggs we're making. They're...well, you'll find out. Okay. Stick it back in the microwave, we're almost there!


Be careful at this stage where there isnt much liquid egg left, because the cooked egg can dry out if not watched well. Get your spatula and gently fold the cooked egg into the uncooked to moisten it. You can now set it aside! The heat in the cooked egg will cook the rest on its own.
If the scrambled egg looks dry, you can try and save it by adding a dob of butter to the top and letting it melt in. It should moisten the egg sufficiently. Serve immediately.  Add more salt and pepper to taste.


If your using one egg instead of two, I recommend cooking the egg at 15 second increments.


***Adapted from Lick The Spoon

Sunday, July 8, 2012

Lemony Asparagus Pasta with Shrimp


This is my new favorite pasta recipe ever.  Like...of all time. I am so NOT exaggerating. I really need to enter this in a contest or something, because it would win first prize for sure. The pictures don't look as nice because I totally forgot about them since I ate my bowl so fast, so I had to take them at the very last minute.  Spaghetti, asparagus, and shrimp are bathed in a rich sauce with a slight bite of mustard, garlic, lemon, and Parmesan.  The shrimp is super flavorful as well, and very juicy.  My parents and I both agree the shrimp itself is the best we've ever had.  Cooking the large amount of garlic in the oil left over from the shrimp, salt, and pepper gives the sauce an amazingly flavorful base.   I'm still in shock of how perfectly this turned out....I honestly threw it together myself expecting an average pasta dish.  The result is summery and refreshingly light, but rich and comforting at the same time.  I've never had anything like it before, and  -> I wouldn't change a thing about it.<-   My parents are still raving about it as we speak....they're saying I need to give it to Carrabba's to put on their menu.  And my mom is making me make it for her every night before a race for her pasta meal (carb loading). My family and I will definitely be looking forward to those nights!

Yield: about 4 servings

Ingredients:
1 tablespoon olive oil
1 pound extra large, raw shrimp
salt and pepper


8 ounces whole-wheat spaghetti pasta
1 bunch asparagus, trimmed and cut into 3/4-inch pieces
1/2 cup heavy cream
1 cup low fat milk (I used 2%)
4 teaspoons Dijon mustard
4 teaspoons all-purpose flour
1/4 teaspoon salt
1/2 teaspoon ground black pepper
1 teaspoon  extra-virgin olive oil
3.5 tablespoons minced fresh garlic
1/2 teaspoon dried tarragon 
1/2 teaspoon freshly grated lemon zest
2 teaspoons lemon juice
1 cup freshly grated Parmesan cheese, divided


Instructions:
In a large skillet over medium-high heat, heat the tablespoon olive oil.  Add the shrimp and cook until pink and just cooked through, about 4 to 5 minutes (I recommend cutting the biggest one in half to make sure it's done).  While shrimp is cooking, add a very generous amount of salt and pepper.  When shrimp is fully cooked, transfer to a bowl and cover with aluminum foil to keep warm.  Do not clean off the skillet you cooked the shrimp in; set it aside for later use with the sauce.

Bring a large saucepan of water to a boil. Cook pasta for 6 minutes. Add asparagus and continue cooking, stirring occasionally, until the pasta and asparagus are just tender, about 3 minutes more. Drain and return to the pot.


Meanwhile, whisk milk, mustard, flour, salt and pepper in a medium bowl. Add the one teaspoon olive oil to the skillet you cooked the shrimp in over medium-high heat. Add garlic and cook, stirring constantly, until fragrant and lightly browned, 30 seconds to 1 minute. Whisk in the milk mixture. Bring to a simmer, stirring constantly, and cook until thickened, 3 to 5 minutes. Stir in tarragon, lemon zest and juice.


Stir the sauce into the cooked pasta and place over medium heat. Cook, stirring constantly, until the sauce is thick, creamy and coats the pasta, about one to two minutes. Reduce heat to low and stir in the cooked shrimp.  Stir 1/2 cup Parmesan into the pasta until combined. Serve the pasta topped with the remaining 1/2 cup Parmesan.

Tuesday, July 3, 2012

Ham and Cheese Scones


These were just too good.  I don't even know what else to say.  These scones literally melt in your mouth, and remind  me of my Cheddar Parmesan Biscuits (found here) but these have more Cheddar than Parmesan and have ham and no garlic.  I wouldn't change anything about these scones, though. They are so darn good!  I think using heavy cream instead of milk/buttermilk makes a big difference...it makes these scones so much richer...just the way I like it.  The cream is definitely the cause of the melt-in-your-mouth effect.  But the ham is probably the star of this savory scone.  I insisted on getting fresh Virginia Ham from the deli in our grocery store because I had been wanting to make this ham and cheddar scone recipe. One thing I love about ham is how versatile it is.  They can jazz up omelets, be built into sandwiches, mix in a casserole, or star in this soft and buttery scone. Scones are generally sweet, not salty, but these savory scones are now my favorite. They are little triangles of buttery bread goodness, packed with the salty flavor of ham and cheddar cheese and the mild flavor of green onion. They're easy to prepare and work as either a side dish or a breakfast.  These seriously lasted minutes in my house.  I was actually really angry at my parents because they ate them all when I wasn't looking before I could grab a third.  My new rule: the cook gets the last one!

Yield: about 8 scones

Ingredients:
2 cups (8 1/2 ounces) All-Purpose Flour
3/4 teaspoon salt
1 tablespoon baking powder
2 teaspoons white sugar
4 tablespoons (1/2 stick, 2 ounces) cold  butter
3/4 cup shredded cheddar cheese

1/4 cup shredded Parmesan chese
1/3 cup (about 1/2 ounce) snipped fresh chives, or finely diced scallion tops (the green part, 3/4 ounce)
1 cup cooked ham pieces - about 1 inch, torn from the slices
3/4 cup + 2 tablespoons heavy cream or whipping cream, or enough to make the dough stick together

Instructions:
Preheat the oven to 425°F. Line a baking sheet with parchment paper.
1) Whisk together the flour, salt, baking powder, and sugar.
2) Work the butter into the flour until the mixture is unevenly crumbly.
3) Mix in the cheese, chives, and ham till evenly distributed.
4) Add ¾ cup of the cream, stirring to combine. Try squeezing the dough together; if it’s crumbly and won’t hang together, or if there are crumbs remaining in the bottom of the bowl, add cream until the dough comes together. Transfer the shaggy dough to a well-floured work surface.
5) Pat the dough into a smooth 7" disk about ¾" thick. Transfer the disk to the prepared baking sheet.
6) Use a knife or bench knife to cut the disk into 8 wedges, spreading the wedges apart a bit on the pan.
7) Brush the scones with a bit of cream; this will help their crust brown.
8) Bake the scones for 15-17 minutes, until they’re golden brown. Remove them from the oven, and cool right on the pan. Serve warm, or at room temperature. 

adapted from Heat Oven to 350

Monday, July 2, 2012

Applesauce Cookies with Caramel Frosting


Ohhh these were so, so yummy.  I seriously lost count of how many I ate within a few hours of making them. I took these to my friends lake house, and everyone gobbled them up even when we were stuffed from dinner.  The cookies themselves are super soft and fluffy and seem just like muffin tops.  They taste like a spice cake with a touch of apple....very comforting and delicious.  Then you get the wonderful, rich, decadent, smooth, dreamy, melt-in-your-mouth, caramel frosting.  The frosting definitely takes these cookies to the next level.  It's like you're biting into a heavenly cloud of perfect deliciousness.   I first spotted these cookies a few weeks ago on Pinterest, and had been dying to make them but we never had heavy cream in the house.  So when we finally did have heavy cream, I knew their time had come.


Recipe credit to Chef In Training.

Thursday, June 28, 2012

Filet Steaks with an Irish Whiskey and Mushroom Cream Pan Sauce


Oh my goody goodness this was good.  Too good.  Way too good.  I'm still amazed I was capable of making such a wonderful dinner.  Last night, we had some left over heavy cream in the refrigerator from the Chocolate Fudge Truffle Cheesecake I made for my mom's birthday last week (you can find this sinful dessert recipe here), and since we almost never have heavy cream, I insisted that I make a dinner recipe using it.  My mom had already bought steak fillets, and I had a recipe saved that I had been wanting to try since it included heavy cream and whiskey (who could go wrong with these two marvelous ingredients!?).  So I altered the saved recipe based on what we had, and it turned out to be the best steak dish I've ever had.  My parents also agree.  It was absolutely perfect....the steaks themselves cut like butter, were super duper juicy, and had a wonderful, meaty flavor.  The sauce was unlike anything I had ever had before.  It had the dominant flavor of beef - from the stock - but the whiskey gave it a zesty burst of flavor, and the cream wasn't overpowering at all; in fact, my parents couldn't even tell there was any cream in the sauce.  It simply blended all the flavors of the ingredients together and made the sauce slightly rich.  I decided to add the mushrooms to the dish last minute, and boy am I happy I did because they went so perfectly with the rich, beefy sauce.  However, if you don't like mushrooms, they can easily be omitted.  This is a heavenly dish that is sure to impress.


Yield: 4 servings


Ingredients:
Four 1 to 1.25 inch pieces beef tenderloin (about 7.5 ounces each)
Kosher salt and freshly ground black pepper
1 tablespoon vegetable oil (if not using a cast iron pan)
1 tablespoon unsalted butter
1 tablespoon finely chopped shallots
5 white mushrooms, sliced (optional)
1/4 cup Irish Whiskey, such as Jameson
1/2 cup beef stock 
1/2 teaspoon Worcestershire sauce
2 teaspoons Dijon mustard
1/2 cup heavy cream
1/2 to 1 teaspoon lemon juice


Directions:

1.
Season each steak generously with salt and pepper. Heat a heavy-based (preferably cast-iron) skillet that's large enough to hold the steaks over high heat until quite hot. (Add the 1 tablespoon vegetable oil if not using cast iron.) Test by touching the edge of one steak to the pan surface; it will sizzle briskly when ready. Immediately drop in the steaks and sear one side for 2 minutes. Sneak a peek to see if the first side is nicely browned. If not, continue to sear that side for another minute or so. Flip the steaks and sear the other side for 2 to 3 minutes. Reduce the heat to medium high, cook for another 2 minutes, flip, and cook until a digital instant-read thermometer in the center of the meat reads 120 degrees F for rare or 125 degrees F for medium rare, another 1 to 2 minutes. Transfer the steaks to the warm platter and let them rest, covered loosely with foil, while you make the sauce.  You can also set the steaks in a separate skillet and place on the "warming" section of your oven if you have it.
2.
To make the pan sauce: Return the unwashed pan to medium heat. Add the butter and let it melt (be careful not to let it burn if the burner is still very hot!). Add the shallots and and cook, stirring, until fragrant and just tender, 1 to 2 minutes.  Add the whiskey and mushrooms and stir with a wooden spoon, scraping up any browned bits stuck to the pan. Add the broth and Worcestershire sauce , raise the heat to medium high, and bring to a boil. Whisk in the mustard and then the cream. Continue to cook at a boil, stirring, until reduced to a saucy consistency, 5 to 7 minutes. Taste the sauce and season with salt, pepper, and lemon juice. Place a steak on each plate, drizzle with the juices left in the steak pan, and serve the steaks with the mushroom cream sauce.

Friday, June 22, 2012

Fudge Truffle Chocolate Cheesecake

cheesecake-top


This cheesecake is absolutely perfect in every way.  I made this for my mom a few days ago for her birthday, and I couldn't believe how well everything went to prepare it.  I had a chocolate cheesecake recipe saved in my recipe box, and I altered it to make it extra delicious (I don't reveal my secret ways, though!) and it turned out phenomenal.  There's a thin, sweet, slightly crunchy, vanilla-chocolate cookie layer on the bottom....a rich, soft, silky, smooth, cream-cheesy, fluffy, milk chocolatey layer in the middle....and a thin, super rich, dark chocolatey, fudgey ganache layer on top.  It just gets richer and more chocolatey as you work your way up the layers of the cake.   The only thing that was kind of annoying about this recipe is the crust is super messy to make because you have to mix the ingredients by hand...but it comes off your fingers easily (and you can lick them when you're done pressing it into the pan!) and is totally worth the effort.  This was the second cheesecake I've ever made that didn't crack (behind my incredible strawberry cheesecake recipe found here).  Even if your cheesecake does crack, you can always cover it with the oh-so-rich-and-delicious chocolate ganache.  The three wonderful layers of this cheesecake really make it seem as though you're biting into a chocolate truffle...but I'd rather have this cheesecake over a chocolate truffle any day.  Serve each slice with a dollop of whipped cream and you'll never order a chocolate cheesecake at the Cheesecake Factory ever again. (Because this recipe is sooo much better!!!)

Yield: 1 9-inch springform pan (about 14 servings)
Ingredients:
  • 1 1/2 cups Nilla wafer crumbs
  • 1/2 cup confectioners' sugar
  • 1/3 cup unsweetened cocoa powder
  • 1/3 cup butter, softened
  • 2 cups semi-sweet chocolate chips
  • 3 (8 ounce) packages cream cheese, softened 
  • 1 (14 ounce) can sweetened condensed milk, at room temperature
  • 4 eggs, at room temperature
  • 2 teaspoons vanilla extract
Directions:
  1. Preheat oven to 300 degrees F (150 degrees C).
  2. In a large mixing bowl, mix together crushed vanilla wafers, confectioners' sugar, cocoa, and butter or margarine by hand. Press ingredients into a 9 inch springform pan (a 10-inch will work also).
  3. In the top of a double boiler, melt the chocolate chips, making sure that they are very smooth.
  4. In a large bowl, beat cream cheese until fluffy with an electric mixer. Gradually beat in condensed milk until smooth. Mix in melted chocolate, eggs, and vanilla. Beat with electric mixer on low speed until the ingredients are thoroughly blended. Pour the filling into the prepared crust.
  5. Bake at 300 degrees F (150 degrees C) for 55 minutes.  The cake will seem underbaked in the center, but will continue to cook after you turn the oven off.  Turn the oven off and leave the cake in the oven, with the oven door slightly cracked, for at least one hour (this prevents the cake from cracking).  Carefully remove the cake from the oven and allow it to cool in the refrigerator for at least 3 hours (or preferably overnight) before topping with the chocolate ganache. 


For the Chocolate Ganache:

Ingredients:

  • 4.5 ounces bittersweet chocolate, chopped
  • 1/2 cup heavy cream

Directions:

  1. Place the chocolate into a medium bowl. Heat the cream in a small sauce pan over medium heat. Bring just to a boil, watching very carefully because if it boils for a few seconds, it will boil out of the pot. When the cream has come to a boil, pour over the chopped chocolate, and whisk until smooth.
  2. Allow the ganache to cool slightly before pouring over a cake (about one minute). Start at the center of the cake and work outward. Spread a thin layer all over the top of the cake, spreading just over the sides.  Refrigerate for at least 30 minutes before serving.

Tuesday, April 10, 2012

Saint Patrick's Day Cake


This is officially the best cake I've ever had.  I was planning on making it for Saint Patrick's Day since it has that theme with the beer and Irish cream and all...but I never had time.  Sooo I decided to make it as my birthday cake instead!  I did only make one layer of this cake since there's only three people in my family and I wouldn't have wanted the cake to dry out if we didn't eat it in time.  If you choose to make one layer, then just half the recipe below.  But I recommend making the full amount because the cake lasts for a long time (I had the last slice today and it was the 3rd day, and it still tasted incredible) and you will definitely have no problem eating it all in a short period of time once you have your first slice.  I don't know about you guys, but I'm a huge sucker for alcoholic beverages in desserts.  I know...my parents aren't very happy about that...but I can't control my taste buds!  This cake is the absolute best chocolate cake/birthday cake/Saint Patricks Day cake I've ever tasted!  I think it's even better than my Best Chocolate Cake recipe (found here), which kind of defeats the title..but that recipe is still the best classic chocolate cake I've ever had.  However, this recipe is a little more jazzed up with the beer in the cake, the Bailey's buttercream frosting, and the chocolate ganache.  The chocolate cake layer itself is moist, rich, and perfectly dark chocolatey.  But the frosting and ganache is what really sets this cake from a 10 on a 1 to 10 scale to 100.  The Irish cream liquor gives this frosting an incredibly unique, sweet, and rich taste that I had never tasted before but instantly fell in love with.  If you are a big frosting fan, then I would recommend doubling it...it's very delicious to eat it by the spoonful as well(:  And then you have this incredibly chocolatey and rich deep chocolate ganache drizzled on top that makes the cake so beautiful and perfect.  I'm going to be making this for many holidays and birthdays to come in the future.

Ingredients:

Cake:
  • 1 cup Irish stout beer (such as Guinness®)
  • 1 cup butter, cut into pieces
  • 3/4 cup unsweetened cocoa powder
  • 2 eggs
  • 2/3 cup sour cream
  • 2 cups all-purpose flour
  • 2 cups white sugar
  • 1 1/2 teaspoons baking soda
  • 3/4 teaspoon salt
  •  
  • Frosting:
  • 3 cups confectioners' sugar, or as needed
  • 1/2 cup butter at room temperature
  • 4 tablespoons Irish cream liqueur (such as Baileys®), or as needed
  •  
  • Ganache:
  • 1 heaping cup of bittersweet chocolate chips (or dark chocolate chips)
  • 2/3 cup heavy cream
  • 2 tablespoons butter at room temperature

  • Directions:

    1. Preheat oven to 350 degrees F (175 degrees C). Line 2 9-inch cake pans with parchment paper, and spray with cooking spray.
    2. Pour the beer into a saucepan, add the butter, and bring to a simmer over medium-low heat. Remove the pan from the heat, and whisk in the cocoa powder until the mixture is smooth. Allow the mixture to cool. In a bowl, beat the eggs and sour cream together until smooth with an electric mixer, and stir in the stout mixture to make a smooth, thick liquid.
    3. In a large bowl, mix together the flour, sugar, baking soda, and salt. Pour the stout mixture into the flour mixture, and gently combine with a spatula. Pour the batter into the prepared pans.
    4. Bake in the preheated oven until the cakes are set and a toothpick inserted into the center of a cake comes out clean, about 30 minutes. Remove and let cool in pans for 5 minutes before inverting the cakes onto wire racks to finish cooling.
    5. Mix together the confectioners' sugar, butter, and Irish cream liqueur until the mixture forms a smooth and spreadable frosting (add more sugar or liqueur as needed to create the desired consistency). Spread half the frosting on top of each cake.
    6. Place the chocolate chips into a heatproof bowl. Bring cream to almost boiling in a small saucepan, and pour over the chocolate. Stir in the butter, and stir the mixture until the chocolate melts and the mixture is very smooth. Allow to cool until the mixture is pourable but not thin or overly runny, 10 to 15 minutes. Stack a cake gently on top of the other, frosting sides uppermost, and carefully drizzle the chocolate mixture over the cake, allowing decorative drips to run down the sides.