Tuesday, July 31, 2012

Chocolate Covered Strawberry Muffins


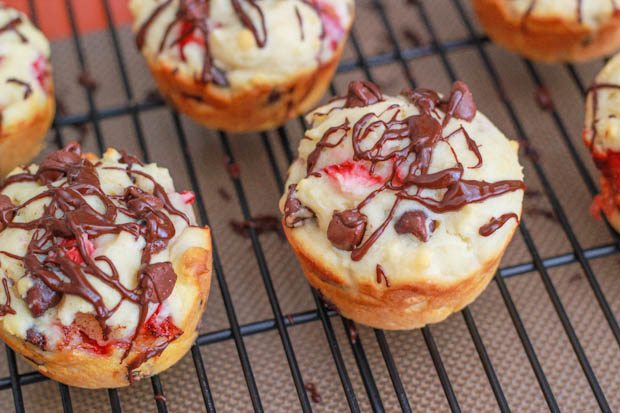
I think we can all agree that chocolate and strawberries are a match in heaven.  Am I right??? 


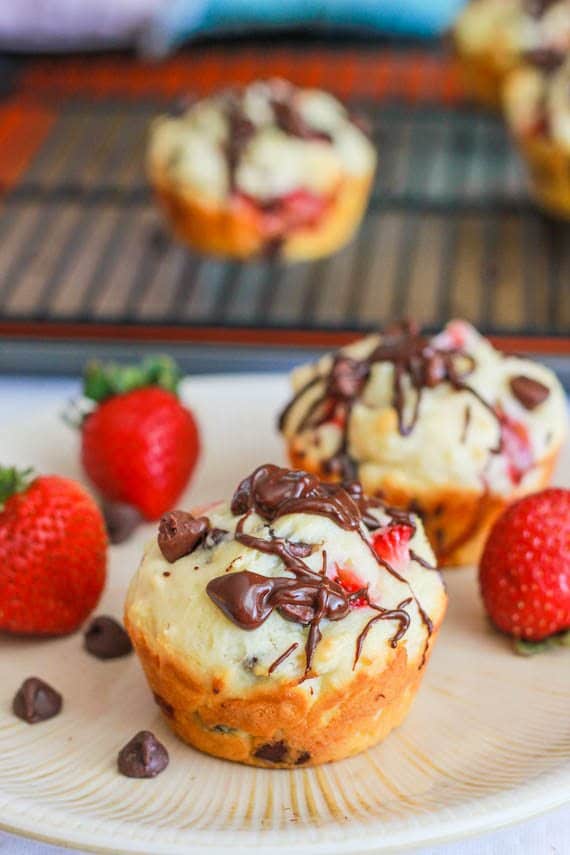
Heck to the yesssssss.


I had some fresh strawberries in my refrigerator yesterday morning, and I wanted to use them up in some kind of super yummy recipe.  Aaaand I was craving chocolate (when am I not??).  So I figured...why not make something with chocolate and strawberries?  I wasn't really craving pancakes, and I could have easily made chocolate chip pancakes and threw some strawberries on top.  I wanted something more creative.  Oatmeal?  Nahh...too boring.  And then a little light bulb went off in my head and I decided muffins.  Oh how I loveee muffins!  I call them "breakfast's cupcake."  Many people wonder the difference between a cupcake and a muffin, and you are gonna realize that you already know the answer once I tell you: Cupcakes are more cakey.  I know.  You totally knew that already, right?  Cupcakes are also more light and fluffy, whereas muffins are more dense (but not too dense! More like pound cake.), chewy, and bready.  A cupcake batter can be made into a cake, but if you were to pour muffin batter into a cake pan, it may not turn out the same.  

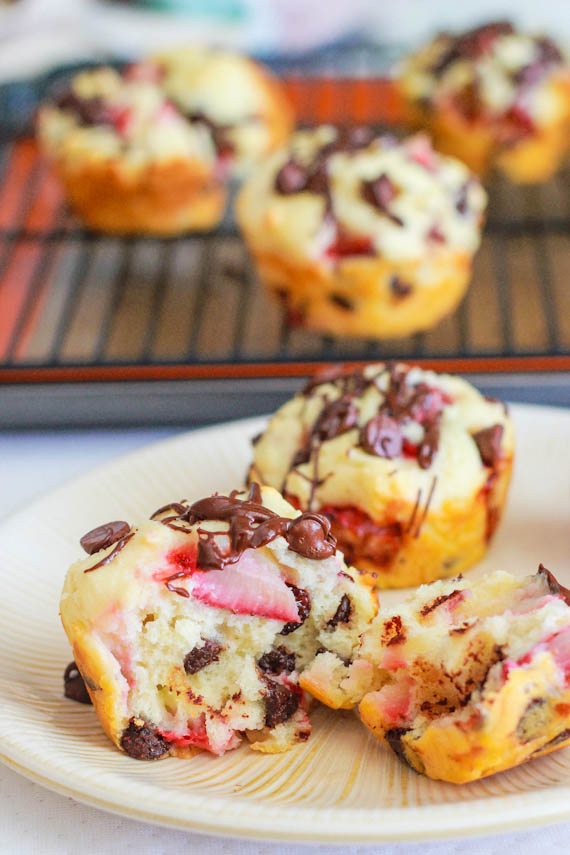
Okay, now back to this recipe.  A really, really good muffin should have a very moist texture, similar to a cupcake but still a little more dense.  This recipe is the definition of a perfect muffin.  I's everything you could dream your perfect muffin should be like. The muffin is so moist from the sour cream, and wonderfully fluffy.  It's light, though not quite as light as a cupcake.  So chocolatey (did I mention they have a chocolate drizzle, in addition to the chocolate chips already in it? Genius.), and filled with sweet chunks of delicious, fresh strawberries.  These taste SO GOOD hot from the oven with whipped cream.  Ohmygoodness...my mouth is watering just thinking of how yummy they were.  I tasted one this morning (24 hours later) at room temperature and it was still awesome.  However, I recommend heating it up, to make it even more awesome.  But I do think it was best out of the oven.  I cannot wait to make these again, but I think next time I'll try them white white chocolate chips and/or vanilla chips!  Mmmm!  These, unfortunately, were not my original recipe...so I cannot take the spotlight.  I recently discovered a wonderful blog called Sally's Baking Addiction, and you can find the recipe from her...here.

Sunday, July 29, 2012

Pizzadillas (Pizza Quesadilla!)

 Pepperoni Pizza Quesadillas  


Don't you just love my creative little name?  Half pizza + half quesadilla = PIZZADILLA! This is such a quick and yummy dinner/lunch/snack/appetizer that you can whip up in no time at all. The next time your family is having an argument about whether they want pizza or Mexican food for dinner, why not get a little creative in the kitchen and find a way to blend the two?  This recipe is so versatile. Whatever you want to add to your pizzadilla, it will always turn out awesome.  So experiment!  Use different types of cheeses, pizza sauces (or no sauce, if you want...for a white pizza), vegetables, and meats!  Be sure not to use too much sauce (no more than a tablespoon and a half) or else it will ooze out and be very messy (I made this mistake once and found myself eating a plain tortilla, while a hot, cheesy, marinara mound was sitting on my plate after falling out).  Sprinkling cheese on the tortilla before and after adding the toppings assures a "seal" - since cheese is sticky...it acts like glue - so the toppings won't fall out of the tortilla.  Now your family won't have to argue between pizza or Mexican food...you can thank me later.

Yield: 8 servings

Ingredients:

  • 2 tablespoons margarine, softened
  • 8 (10 inch) flour tortillas
  • 16 ounces cheese (your choice of type(s))
  • 1/2 cup pizza sauce
  • 4 ounces sliced pepperoni, sausage, vegetables, or other desired toppings

Directions:

  1. Heat a large skillet over medium-low heat. Spread margarine (about 1 teaspoon) over one side of a tortilla, and place it margarine-side down in the skillet. Spoon a tablespoon of pizza sauce onto half of the tortilla. Sprinkle 1/4 cup of shredded cheese over the sauce, top with desired toppings, and sprinkle another 1/4 cup of shredded cheese over the toppings. Fold the clean half of the tortilla over the filling, and cook until golden on each side. Repeat with remaining tortillas.  Serve with your choice of sauce (garlic, marinara, etc.) if desired.

Cucumber Tomato Salad

Cucumber Tomato Salad Allrecipes.com

This salad was so refreshing!  Usually I'm not a very big fan of simple salads like this...they're usually boring and tasteless...but this was awesome!  Letting the vegetables soak in the dressing overnight makes them incredibly flavorful and juicy.  My family ate this with grilled chicken and twice baked potatoes.  Mmmm..such an amazing, healthy meal.  Oh yeah...did I mention this recipe is insanely healthy?  Believe it...it's fat free!  How could something so healthy taste so delicious??

Yield: about 6-8 servings

Ingredients:

  • 1 pint cherry tomatoes, cut in half
  • 1 large cucumber, peeled and sliced
  • 1/2 cup white onion, chopped
  • 1 tablespoon white sugar
  • 1 teaspoon salt
  • 1/4 teaspoon pepper
  • 1/3 cup cider vinegar
  • 3/4 cup water

Directions:

  1. In a bowl, combine the tomatoes, cucumber and onion. In a small bowl, combine the sugar, salt and pepper. Whisk in the vinegar and water. Pour over vegetables and toss to coat. Cover and refrigerate overnight before serving.  Serve with a slotted spoon.

Thursday, July 26, 2012

Chicken Piccata


I think this was the first time I actually liked chicken piccata.  I've tasted it in restaurants before, but I always thought it had too much wine, lemon, or caper flavor.  This chicken piccata is just right.  It has juicy, tender chicken swimming in a light, lemon-wine-butter sauce.  This is the perfect dish for the summer, and looks very impressive...not to mention incredibly easy to prepare!  I recommend serving it over rice or pasta, but it's so good any way you wanna have it.  It's also super yummy to dip some garlic bread or roasted potatoes in the tasty lemon sauce.  I would tell you how it tastes the next day after sitting in the sauce over night, but there weren't any leftovers (and I doubled the recipe).


Yield: about three servings

Ingredients:

  • 3 large skinless, boneless chicken breast halves, pounded thin
  • salt and pepper to taste
  • 1/2 cup all-purpose flour
  • 1 tablespoons olive oil
  • 1 tablespoon butter
  • 3 cloves garlic, minced
  • 1 cup low sodium chicken broth
  • 1/4 cup white wine
  • 1/2 lemon, thinly sliced
  • 1/4 cup fresh lemon juice
  • 2 tablespoons capers
  • 3 tablespoons butter
  • 2 tablespoons minced Italian (flat-leaf) parsley

Directions:

  1. Preheat oven to 200 degrees F (95 degrees C). Place a serving platter into the oven to warm.
  2. Season the chicken breast pieces with salt and pepper and dredge them in flour. Shake off excess flour. Heat the olive oil and butter in a skillet; pan-fry the chicken pieces until golden brown on both sides, about 3 minutes per side. Work in batches and do not crowd skillet, adding oil as needed . Place the chicken pieces onto the warmed platter in the oven. When finished with all the chicken, drain most of the oil from the skillet, leaving a thin coating on the surface of the pan.
  3. Cook and stir the minced garlic in the skillet until fragrant, about 20 seconds. Pour in the chicken broth and white wine. Scrape and dissolve any brown bits from the bottom of the skillet. Stir in the lemon slices and bring the mixture to a boil. Let cook, stirring occasionally, until the sauce reduces to about 2/3 cup, 5 to 8 minutes.  Remove lemon slices and discard. Add the lemon juice and capers; simmer until the sauce is reduced and slightly thickened, about 5 minutes more. Drop the butter into the skillet and swirl it into the sauce by tilting the skillet until the butter is melted and incorporated. Add the parsley; remove from heat and set aside.
  4. Arrange the chicken medallions on serving plates and spoon sauce over each portion to serve.

Raspberry Almond Coffee Cake


I love coffee cake.  In my opinion, there's nothing better than waking up in the morning to a hot cup of coffee and some sweet coffee cake on the side.  This coffee cake is super moist, light, and has just the right amount of sweetness.  I love the combination of raspberries, vanilla, and almonds.  If you're a big almond fan, I recommend using half almond extract, half vanilla extract.  The almond extract really compliments the sliced almonds on top of the cake.  Another thing I love about this coffee cake is how pretty it looks!  There is a beautiful, pink, raspberry swirl running all through the cake, and the top is garnished with sliced almonds and sweet drizzle of icing.  There is so much delicious flavor going on in this cake.  You can serve it warm with vanilla ice cream and/or whipped cream, and/or you can serve it at room temperature.  In my opinion, I liked it best at room temperature the next day - or even the second or third day - because it gets moister over time.  I'm not sure how it tastes after the third day because it never lasted that long in my house.


Yield: an 8-inch round cake (about 8-10 servings)
***recipe doubles well in a 9-inch pan


Ingredients:

  • 1 cup fresh raspberries
  • 3 tablespoons brown sugar
  • 1 cup all-purpose flour
  • 1/3 cup white sugar
  • 1/2 teaspoon baking powder
  • 1/4 teaspoon baking soda
  • 1/8 teaspoon salt
  • 1/2 cup sour cream
  • 2 tablespoons butter, melted
  • 1 teaspoon vanilla extract (or half vanilla, half almond extract...your choice)
  • 1 egg
  • 1/4 cup sliced almonds
  •  
  • 1/4 cup sifted confectioners' sugar
  • 1 teaspoon milk
  • 1/4 teaspoon vanilla extract

Directions:

  1. Preheat oven to 350 degrees F (175 degrees C). Spray an 8 inch round cake pan with cooking spray.
  2. Combine raspberries and brown sugar in a bowl. Set aside.
  3. In a large bowl, combine flour, sugar, baking soda, baking powder, and salt. Combine sour cream, butter or margarine, 1 teaspoon vanilla (or half a teaspoon almond, half vanilla...if using), and egg, and add to flour mixture. Stir just until moist. Spoon 2/3 of the batter into the prepared pan. Drain raspberry mixture, and spread it evenly over the batter. Spoon remaining batter over raspberry mixture (It's okay if the filling doesn't completely cover the top). Top with almonds.
  4. Bake for 30-35 minutes, or until a wooden pick inserted in center comes out clean. Let cool for 10 minutes on a wire rack.
  5. Combine confectioners' sugar, milk, and 1/4 teaspoon vanilla. Stir well. Drizzle glaze over cake. Serve warm or at room temperature.

Monday, July 23, 2012

Buttermilk Pancakes


FINALLY!! My search is officially over for the fluffiest, and most delicious buttermilk pancake recipe EVER.  A bajillion times better than Ihop, boxed mixes, and any other breakfast restaurant. I've tried too many times to make buttermilk pancakes, and they almost always turned out flat, too thick, or lacking flavor...that is...until today.  This morning, I tried (for about the hundredth time) making buttermilk pancakes, and they were absolute perfection.  Super fluffy, lightly sweet, perfect consistency, shaped into perfect circles, cooked perfectly....did I mention these pancakes were perfect?? The secret is fresh buttermilk!  For the best flavor, you have to use fresh buttermilk.  I always combined milk with vinegar or lemon juice to create "sour" milk, since it's a good substitution for buttermilk in most recipes, but this recipe requires fresh buttermilk for best flavor. It's also extremely important that you cook all the batter within 10 minutes of mixing it together, or else the "fluff" factors in the baking soda and baking powder will wear off and the pancakes will turn into crepes (this was one of my main issues with most of my failed buttermilk pancake trials). I served these with my Buttermilk Syrup recipe (here) and my family all agreed this is the best pancake recipe we've ever had.  I (literally) cannot wait to make these again.  This is definitely going to be my default pancake recipe for now on.


Yield: about 2 dozen pancakes


Ingredients:

  • 3 cups all-purpose flour
  • 3 tablespoons white sugar
  • 3 teaspoons baking powder
  • 1 1/2 teaspoons baking soda
  • 3/4 teaspoon salt
  • 3 cups buttermilk, room temperature
  • 1/2 cup milk, room temperature
  • 3 eggs, room temperature
  • 1/3 cup unsalted butter, melted and cooled 

Directions:

  1. In a large bowl, combine flour, sugar, baking powder, baking soda, and salt. In a separate bowl, beat together buttermilk, milk, eggs and melted butter with a whisk until smooth. Keep the two mixtures separate until you are ready to cook.
  2. Heat a lightly oiled griddle or frying pan over medium high heat. You can flick water across the surface and if it beads up and sizzles, it's ready!
  3. Pour the wet mixture into the dry mixture, using a wooden spoon or fork to blend. Stir until it's just blended together (it's okay if there are some flour lumps.  They will break open on the griddle and cause more fluffiness). Do not over stir! Pour or scoop the batter onto the griddle, using approximately 1/4 cup for each pancake. Brown on both sides and serve hot.

***I suggest not poking the middle of the pancake to check for doneness on the inside, because this will cause the pancake to deflate a little since air is escaping.  For maximum fluffiness, just make lightly brown on both sides and I promise they will be cooked through.

***If adding mix-ins like nuts, chocolate chips, and fruit, then stir into the flour mixture and follow the recipe as stated.

Buttermilk Syrup


This syrup should be illegal.  It's just too good.  If you've never tasted Buttermilk Syrup, then you have got to make this recipe right now.  It's similar to caramel sauce, but has more of a syrupy consistency (as opposed to sticky, thick caramel) and is a little more buttery, more creamy, and slightly less sweet/rich.  The syrup is amazing on breakfast foods like pancakes, waffles, dutch babies (here), and french toast.  But it's also great on desserts like ice cream, brownies, and cakes (so good on cheesecake, cakes with fruit, and spice cakes).  While cooking, make sure you put it in a large pot because it will get about five times as big when boiling.  Also make sure that you stir the vanilla in at the very end - after you remove the pot from the heat - or else the vanilla may burn.  Burnt vanilla does not taste good; it makes things very bitter.  Everyone always gobbles this up when I make it.  If you ever have company, this recipe is sure to impress.


Yield: about 2 cups


Ingredients:

  • 1 1/2 cups white sugar
  • 3/4 cup buttermilk
  • 1/2 cup butter
  • 2 tablespoons corn syrup
  • 1 teaspoon baking soda
  • 2 teaspoons vanilla extract

Directions:

  1. In a saucepan, stir together the sugar, buttermilk, butter, corn syrup, and baking soda. Bring to a boil, and cook for 4 minutes. Remove from the heat, and stir in the vanilla.  Serve hot.

Sunday, July 22, 2012

Steak Stroganoff


This was my very first time ever eating Stroganoff.  It was also my dad's first time, and he is seriously raving about it as I type this right now.  My mom had Beef Stroganoff a few times growing up, but she said it was disgusting compared to this delicious recipe I cooked.  Some people would call this "Beef" Stroganoff, but that seems to me more of a Hamburger Helper type dish with ground beef and ketchup (kind of like a Sloppy Joe taste). This dish uses sirloin steak, so I'm calling it Steak Stroganoff.  The thing that makes this more unique than other Stroganoff recipes is the fact that this slow cooks for an hour, so the simmering blends all the flavors together and the meat gets super tender.  The tender meat is then mixed with a mushroom cream sauce.  I love the cream sauce because it's unlike any cream sauce I've ever had.  It's not like a rich, Alfredo sauce with heavy cream.  It's lighter, but still creamy and comforting, and uses sour cream and cream cheese.  The tartness of the sour cream balances with the sweet, red wine, and the mustard and Worcestershire sauce adds even more depth to the dish.  I served this with a side of steamed broccoli, but I recommend serving it with some french bread or garlic bread as well to soak up all the creamy sauce.  The result is a comforting, yet hearty meal that everyone will love.


Ingredients:

  • 2 pounds beef tenderloin or top sirloin, cut into 1/4 inch thick by 2 inches long strips 
  • 1/2 cup red wine, preferably Burgundy or Pinot Noir
  • 1/2 teaspoon salt
  • 1/2 teaspoon ground black pepper
  • 4 tablespoons butter
  • 1 medium white onion, chopped
  • 4 tablespoons corn starch
  • 1 1/4 cup beef stock
  • 1 tablespoon prepared mustard
  • 1 tablespoon Worcestershire Sauce
  • 8 ounces sliced mushrooms, separated into 2 4-ounce piles
  • 1/3 cup sour cream
  • 1/3 cup cream cheese, softened
  • salt to taste
  • ground black pepper to taste

For the noodles:
1 lb egg noodles
1 tablespoon butter

Garnish:
Sliced scallions and freshly grated Parmesan cheese

Directions:

  1. Season steak with 1/2 teaspoon of both salt and pepper, place in a large sealable bag and pour 1/2 cup red wine over the meat.  Shake to fully coat, and marinate in the refrigerator for 1 to 2 hours.
  2. In a large skillet over medium heat, melt the butter and pour in the beef strips along with the wine juices in the bag. Brown the beef strips, then push the beef strips off to one side. Add the onions and half of the sliced mushrooms (4-oz) into the wine/butter mixture and cook slowly for 3 to 5 minutes, then push to the side with the beef strips.
  3. Stir the cornstarch into the juices on the empty side of the pan (onions, mushrooms, and steak pieces will probably get into this puddle of juices, which is fine, it's just to give you more room to work with without a bunch of food getting in the way). Pour in beef broth and bring to a boil, stirring constantly. Lower the heat and stir in mustard and Worcestershire sauce. Cover and simmer for 1 hour or until the meat is tender.
  4. Five minutes before serving, stir in the other 4 ounces of mushrooms, sour cream, and cream cheese. Heat briefly and then salt and pepper to taste.
  5. Serve with buttered egg noodles (below) and serve (also below).

For Noodles:
Bring a large saucepan of salted water to a boil. Add the noodles to the pan of boiling water and cook at a low boil until al dente, about 10 minutes. Drain, then toss the noodles with the butter to coat.

To serve:
Arrange the buttered noodles on warm serving plates and top with the stroganoff. Garnish with desired amount of sliced scallions and freshly grated Parmesan cheese, and serve immediately.

Sweet and Spicy Honey Grilled Shrimp Skewers


My mom wanted to have a healthy, low fat meal a few days ago, and she said she was gonna grill up some barbecue shrimp.  This "cooking" she speaks of means she uses bottled barbecue sauce to baste shrimp.  And since I've turned into a little chef over the years, and really do not prefer bottled/store bought items, I insisted that I make a light sauce instead.  She agreed, of course.  I looked up a few of the top grilled shrimp recipes throughout the web, and came up with this delicious marinade.  I absolutely LOVE the flavors that combine in this dish!  The slightly spicy kick from the red pepper mixed with the sweet honey and fruity flavors, and mixed with the tart flavors from the vinegar, lemon juice, and shrimp were totally out of this world.  I never would have thought of using "fruity" flavors like applesauce and strawberry jam, but the result was so refreshing...the {perfect summer meal}.  I recommend serving this over rice, noodles, or salad.  I had this over a salad with chopped strawberries and goat cheese.  Best salad I've ever had.  My mom told me she'll definitely make this recipe instead of her "bottled" barbecue shrimp for now on.

Ingredients:

  • 6 tablespoons honey
  • 6 tablespoons olive oil
  • 2 tablespoons chopped fresh basil (or two teaspoons dried)
  • 2 tablespoons strawberry jam
  • 1/2 teaspoon crushed red pepper flakes
  • 2 cloves garlic, minced
  • 1/4 cup red wine vinegar or apple cider vinegar
  • 2 tablespoons lemon juice
  • 4 teaspoons brown sugar
  • 3 tablespoons applesauce
  • 2 pounds jumbo shrimp, peeled and deveined

Directions:

  1. Whisk together the honey, olive oil, basil, strawberry jam, red pepper flakes, garlic, red wine vinegar, lemon juice and brown sugar in a small bowl. Place and shrimp into a large resealable plastic bag or a large container with a tight lid. Pour the marinade over the shrimp, seal the bag or container, and shake to coat (if lid of container isn't very sealed, you can just stir the shrimp/marinade mixture well); refrigerate for 1.5 to 2 hours.
  2. Preheat an outdoor grill for medium-high heat.
  3. Thread the shrimp alternately on 8 metal or soaked wooden skewers.  Reserve sauce.
  4. Cook the skewers on the preheated grill until the shrimp are opaque, about 5 minutes per side, basting every 2 and a half minutes with the reserved sauce.  Serve hot.


Thursday, July 19, 2012

Red Velvet Cookies


I was looking for a way to use up some cream cheese in my fridge, and I stumbled upon a red velvet cookie recipe in my recipe box.  It was love at first sight.  Who can resist a fluffy, chocolatey, moist red velvet cake cookie? The consistency of the "cookie" is the perfect balance of red velvet cake moist-ness but the thicker texture of a soft cookie. The cookie itself is amazing, but it's not a true "Red Velvet Cookie" without the cream cheese frosting (it would simply be a red, fluffy, chocolate cookie).  This frosting is what really makes these cookies out of this world.  Maybe I just hadn't had cream cheese frosting in a while, but it's absolutely divine.  I'm not even embarrassed to say that I was eating it by the spoonful.  I like my cream cheese frosting not very thick - more like a glaze -, so that you can taste more cream cheesey-ness than powdered sugar.  If you like frosting really thick and stiff with powdered sugar, then feel free to add as much as you want...I just prefer less.  Anyways...back to the cookies.   They are seriously everything you love about red velvet cake, but in cookie form.  Hold up - I take that back, because I've never had a slice of red velvet cake that's nearly as delicious as these cookies.  I had some warm from the oven with the cream cheese frosting oozing off, and also at room temperature the following day (the cream cheese frosting firms up perfectly the next day).  Both incredible...heavenly...to-die-for delicious.  My dad nearly fell to the ground on his first bite.

Yield: about 36 small cookies
  

Ingredients:

  • 2 cups all-purpose flour
  • 1/2 teaspoon baking soda
  • 1/2 teaspoon salt
  • 2 (1 ounce) squares unsweetened baking chocolate, broken into pieces
  • 1/2 cup unsalted butter, softened
  • 2/3 cup brown sugar, firmly packed
  • 1/3 cup white sugar
  • 1 large egg
  • 1 tablespoon red food coloring
  • 3/4 cup sour cream
  • 1 cup chocolate chips (I used semisweet, but other flavors are fine)
  •  
  • Cream Cheese Frosting
  • 1/4 cup unsalted butter, softened
  • 4 ounces cream cheese, at room temperature
  • 1/2 teaspoon vanilla extract
  • 2 cups confectioners' sugar, sifted, or as needed

Directions:

  1. Preheat oven to 375 degrees F (190 degrees C) with the rack in the middle position. Grease baking sheets or line with parchment paper. Sift together the flour, baking soda, and salt.
  2. Break the chocolate squares into chunks, place in a microwave-safe bowl and microwave on High until the chocolate melts, about 90 seconds. Stir the chocolate until smooth and set aside to cool.
  3. In a large bowl, beat 1/2 cup butter, brown sugar, and white sugar until light and fluffy; pour in the egg and beat until smooth. Mix in the red food coloring and chocolate, scraping the bowl down regularly, until evenly blended, about 30 seconds. Add half of the sifted dry ingredients, stirring until well incorporated. Beat in the sour cream and mix in the remaining dry ingredients. Fold in the chocolate chips. Drop spoonfuls of the dough 2 inches apart onto prepared baking sheets.
  4. Bake one sheet at a time in the preheated oven until they spring back when pressed and a toothpick inserted in the center comes out almost completely clean, about 9 minutes. Cool in the pans for 5 minutes before removing to cool completely on a wire rack.
  5. For the cream cheese frosting, whip 1/4 cup unsalted butter, cream cheese, and vanilla until smooth. Blend in the powdered sugar in half cup portions until the frosting reaches the desired consistency.  If you want to eat the cookies when cooled, then wait to frost them until the cookie has completely cooled.  If you just can't resist waiting for them to cool and decide to eat them when warm (which I highly recommend because the chocolate chips are all melty and delicious), then slather the cream cheese frosting on them and dig in(:  Just a warning: the cream cheese frosting may ooze a bit on the warm cookies, but that just makes them so much more irresistible.

***you can also make a cookie sandwich with them if you want.

Dutch Baby


dutch-baby-german-pancake-d.jpg

dutch-baby-german-pancake-b.jpg

For those of you poor souls who don't know what a dutch baby is (also called a German Pancake), it results from pancake batter being poured into a sizzling butter-filled cast iron skillet, and bakes into a wonderful breakfast treat.  Don't ask me why it's called a "Dutch Baby"...because I honestly have no idea.  If I was to give it a name myself, I would name it "Heavenly Pancake Puff." I've been making this recipe for as long as I can remember, and I have no idea why I didn't post it sooner. I've grown up making this delightful pancake. It's slightly more eggy than your usual pancake...but totally not in a gross way.  It's also very light; I could probably roll the entire thing up and eat it myself.  Since eggs make foods puff up, they cause the sides of this pancake to rise high above the edges of the pan, creating a light, puffy, slightly crispy crust with a moist, tender, eggy middle.  The staple topping that makes this pancake so unique is lemon juice.  It sounds weird at first, but the flavors are perfect together and I can't imagine eating a dutch baby without it (just like you wouldn't eat a normal pancake without maple syrup).  I absolutely love watching this baby puff up in the oven!  It does make me sad to watch it deflate once you take it out, though...but then I take a bite and the incredibly delicious taste makes me [happy] again(:

Yield: about 2-4 servings

Ingredients:

  • 3 tablespoons unsalted butter, melted and divided
  • 1/2 cup all-purpose flour
  • 3 tablespoons white sugar
  • 1/2 teaspoon kosher salt or sea salt (these have a better taste than table salt)
  • 1/2 cup milk (preferably not skim...for best taste), room temperature
  • 2 large eggs, room temperature
  • 1/4 teaspoon vanilla extract
  • Garnish: Lemon juice, powdered sugar, cinnamon
  • ***jams, syrups, and fruit are also delicious toppings, but the 3 listed above are the most common (and in my opinion, most delicious) toppings for traditional Dutch Babies.

Directions:

Preheat oven to 375 degrees F.
Place 2 tablespoons of the melted butter into a 10-inch cast iron skillet and place in the oven. Set the remaining tablespoon of melted butter aside to cool slightly. Wait 10 minutes before assembling the other ingredients.  If butter in the skillet is boiling pretty hard within these 10 minutes, remove it from the oven.  Lightly boiling is fine.
Place the flour, sugar, salt, milk, eggs, vanilla and remaining tablespoon of melted butter into the bowl of a food processor or blender and process for 30 seconds. Scrape down the sides of a blender with a rubber scraper, if necessary.  Remove the skillet from the oven (watch out because it's very HOT so use an oven mitt!). Carefully pour the batter into the preheated skillet. Bake on the middle rack of the oven for 20 to 30 minutes or until the edges are puffed and brown. Do not open the oven or else the Dutch Baby may fall. Carefully remove the skillet from the oven, and use a thin spatula to gently coax the pancake onto a large plate. It may fall slightly once removed from the heat, which is totally normal. To serve, cut into wedges and sprinkle with desired toppings. 

Monday, July 16, 2012

Italian Meatballs


I have finally made the ultimate Italian meatball.  My mom has made meatballs before, but they always fell apart really easily and were rather bland (sorry if you're reading this, mom...).  I have had really good meatballs a few times at some Italian restaurants, so I wanted to try to create a knock-your-socks-off meatball recipe myself.  These meatballs literally melt in your mouth.  I seriously ate like four after just pulling them out of the oven.  The milk makes them so incredibly moist, and the flavors blend wonderfully well together.  They have a nice balance of flavors that will only get better once the flavors develop even further in a homemade tomato sauce (the meatballs are superb alone, though).  I served this over spaghetti with home made tomato sauce (I'm still working on a killer tomato sauce recipe, and I'll post it as soon as I can!), freshly grated Parmesan cheese, and crusty French bread.  It was wayyy better than any spaghetti and meatballs I've ever had in any restaurant.  I used 80, 20 ground beef and 2% milk, but 90,10 and 95, 5 will also work for the beef, and any low fat milk will certainly work.  These make awesome left overs, and freeze well too.  Bon Appetit! 


Yield: about 12 meatballs

Ingredients:

  • 1 pound lean ground beef
  • 1/2 teaspoon sea salt
  • 1/2 large onion (or 1 small onion), finely chopped
  • 1/2 teaspoon garlic salt
  • 1 1/2 teaspoons Italian seasoning
  • 3/4 teaspoon dried oregano
  • 1/2 teaspoon crushed red pepper flakes
  • 1 1/2 tablespoons Worcestershire sauce
  • 1/3 cup low fat milk
  • 1/4 cup grated Parmesan cheese
  • 1/2 cup Italian bread crumbs

Directions:

  1. Preheat an oven to 400 degrees F (200 degrees C).  Lightly grease a baking sheet.
  2. Place the beef into a mixing bowl, and season with salt, onion, garlic salt, Italian seasoning, oregano, red pepper flakes, and Worcestershire sauce; mix well. Add the milk, Parmesan cheese, and bread crumbs. Mix until evenly blended, then form into 1 1/2-inch meatballs, and place onto a baking sheet.
  3. Bake in the preheated oven for 10 minutes, remove the baking sheet, and gently flip (more like roll) the meatballs to the opposite side.  The side that was first on the bottom should now be very lightly brown.  Bake in the oven for another 8-12 minutes, or until no longer pink in the center (I suggest testing one at 8 minutes).