Showing posts with label milk. Show all posts

Monday, July 15, 2013

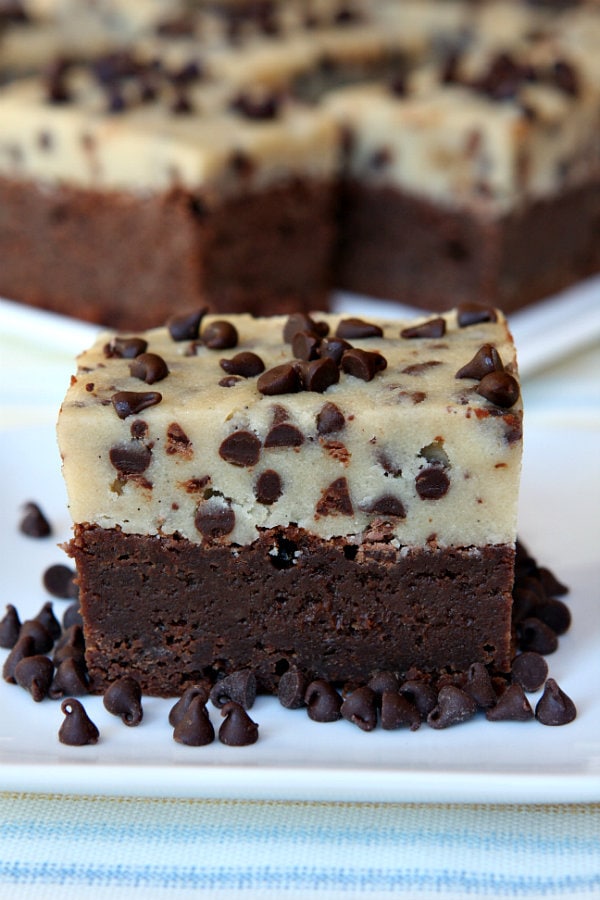
Chocolate Chip Cookie Dough Brownies


I've been on quite a cookie dough frenzy lately.

I mean how can you not be??? 

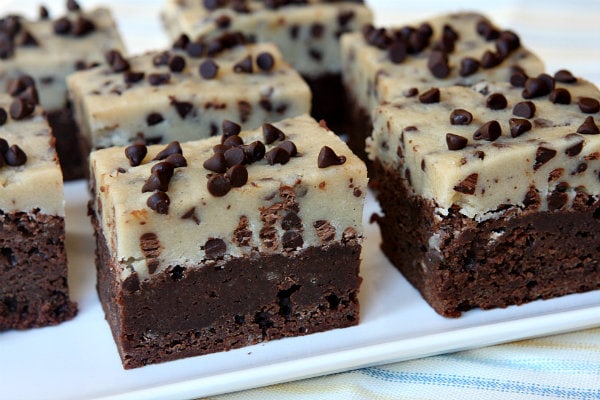
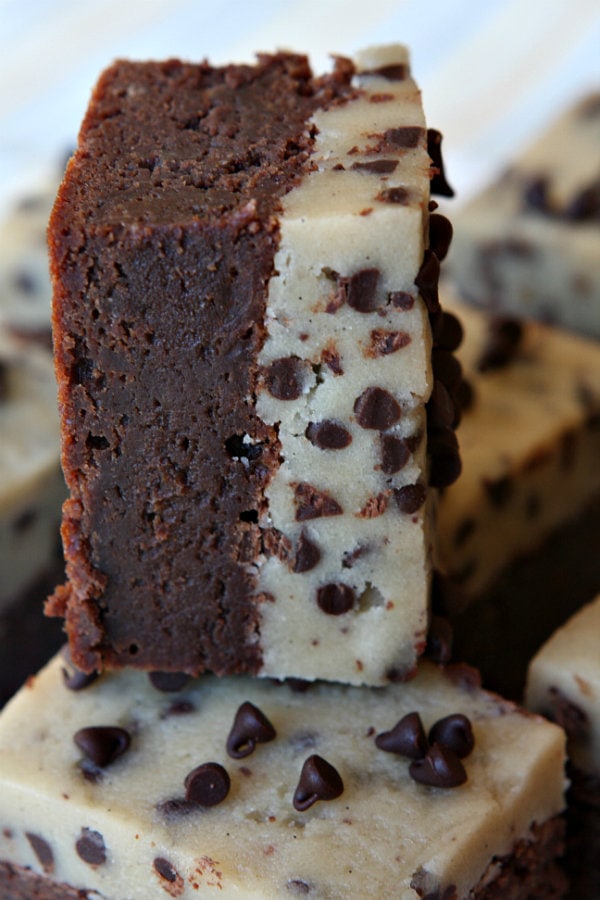
Cookie dough, by definition, is absolute BLISS. It's basically just butter and sugar....and you gotta love those two ingredients. But cookie dough ON TOP OF A BROWNIE?????? Umm...yummmmm! This recipe is so sinfully delicious, and I promise everyone will be asking you for it once they take the first bite. The bottom layer is a super fudgey, rich, densely chocolatey brownie (no cakey texture here! Just the way I like it!), and the cookie dough is wonderfully buttery, vanilla-y, and everything you believe the perfect cookie dough should taste like. And, just like my incredibly delicious cookie dough cheesecake bars here, the cookie dough is eggless, so you can eat as much as your little tummy pleases(:

I brought these treats to a party at my school and they were declared "little squares of heaven." My friend is now seriously OBSESSED with them and goes insane and drools whenever someone mentions them. As do I.

Don't believe me? Try them yourself.

Yield: 16 brownies

Ingredients:
BROWNIE LAYER:
3/4 cup (1 1/2 sticks) unsalted butter
1 1/2 cups bittersweet chocolate chips
1 cup granulated white sugar
1/2 cup packed light brown sugar
4 large eggs
1 teaspoon vanilla extract
1/2 teaspoon salt
1 cup all-purpose flour


COOKIE DOUGH:
3/4 cup (1 1/2 sticks) unsalted butter, room temperature
3/4 cup granulated white sugar
3/4 cup packed light brown sugar
1/4 teaspoon salt
2 tablespoons milk
1 1/2 teaspoons vanilla extract or vanilla bean paste
2/3 cup all-purpose flour
1 cup miniature chocolate chips
additional miniature chocolate chips, if desired (to garnish the top)


Instructions: 
Prepare the brownie layer:
1. Preheat the oven to 350 degrees F. Spray a 9x9-inch pan with nonstick spray, then line with a strip of parchment paper so that it covers the bottom and comes up two sides of the pan. Spray the parchment with nonstick spray too.
2. In a microwave safe bowl (or in the top of a double boiler or pan set on top of a pan of simmering water), microwave in 30 second bursts to melt butter and chocolate chips together until all is melted and smooth. Whisk in the sugars, then whisk in the eggs, vanilla and salt. Sift flour into the bowl and stir that in too. Scrape the brownie batter into the prepared pan. Bake for 25 to 30 minutes, or until the brownie layer is cooked through (toothpick inserted into the center comes out clean). Place the pan of brownies in the refrigerator to speed up the cooling process (or cool at room temperature and add the cookie dough layer later).


Prepare the cookie dough layer:
3. In a large bowl, use an electric mixer to combine the butter, sugars and salt until soft and creamy (2 minutes). Mix in the milk and vanilla. Sprinkle in the flour and mix in until combined. Stir in the 1 cup of chocolate chips. Scoop the cookie dough onto the top of the brownies and spread onto the brownie layer. I find that it's easiest to do this if the brownie layer is chilled and firm. Wet your hands or spray them with nonstick spray and pat the cookie dough on top in a even layer. Sprinkle additional chocolate chips on top to create a nicer, visual appearance. For easy, clean cutting, chill the brownies (wrap the brownies with plastic wrap and chill until firm- 1 to 2 hours or up to 2 days).
4. Cut the brownies: Run a knife along the sides of the brownie pan and then use the parchment paper to lift the brownies from the pan and onto a cutting board. Slice the brownies with a sharp knife, wiping the knife with a paper towel between cuts. If you'd like all of your slices of brownies to look clean-cut without edges, use the knife to cut the sides of the brownies off before cutting pieces. Keep brownies slices covered and chilled until ready to serve.


Note: these taste most delicious just slightly cool (after about an hour of thawing at room temperature) or completely at room temperature (at least two hours of thawing), or my personal favorite: warmed up in the microwave until gooey and amazingly delicious.

Thursday, March 28, 2013

Italian Cream Pancakes

Italian Cream Pancakes Recipe


I know I haven't posted in a while...I've been super busy with school work (junior year is killing me), but now it's FINALLY time for Spring Break! I will try my best to post at least one recipe each day because there are so many recipes I've been meaning to post and I know I am super behind. For my first post in a while, I have decided to present to you these incredible, sweet, nutty pancakes topped with a decadent cream cheese glaze. 

Yes, they are just as delicious as they sound. I promise.

If you've never tasted Italian Cream Cake, then you totally need to. Like...immediately. Sooo..you can start with this breakfast recipe! These pancakes seriously taste just like Italian Cream Cake, only hot and in heavenly pancake form, with warm glaze oozing all over them. Coconut, cream cheese frosting, and pecans are the most perfect combination perhaps in the entire world, and they taste scrumptious in this recipe.  Not to mention, toasting ] the pecans give the pancakes a wonderful nutty-ness that tastes so warm and comforting.

There were no leftovers when I made these for my family, and I'm sure the same thing will happen for you.

You can find this decadent recipe here. 

Friday, January 18, 2013

Toasted Coconut Banana Bread


I've been trying to find the perfect, classic banana bread recipe, and I have not had any luck with that yet, however....during my search, I found this delicious alternative.  Coconut and banana are just so amazing together, am I right?  The combo reminds me of summer: drinking pina-coladas....just so refreshing!  This bread is also not too sweet, and has just the right amount of banana flavor.  In this recipe, your classic banana bread jumps up to a whole new level. Finely shredded coconut adds a sweet crunch to this moist, flavorful treat.  I recommend it plain, but I highly recommend it with these loaded up variations: served warm with a scoop of vanilla ice cream/whipped cream and/or chocolate chips, with coffee for breakfast, chilled in the refrigerator, or toasted with cream cheese frosting and/or nutella and/or peanut butter.

Yield: 1 loaf (about 10-12 servings)

Ingredients:
1 3/4 cups all-purpose flour
1/2 cup sugar

2 teaspoons baking powder
1/2 teaspoon baking soda
1/4 teaspoon salt
2 beaten eggs, at room temperature
1 cup mashed, very ripe bananas (2 large or 3 medium bananas)
1/3 cup vegetable oil
2 tablespoons milk
1 1/4 teaspoons vanilla
1 3/4 cups flaked coconut, toasted

Instructions:

Grease a 9-by-5-by-3-inch loaf pan; set aside. In a large mixing bowl stir together flour, sugar, baking powder, baking soda, and salt. Make a well in the center. In a medium mixing bowl combine beaten eggs, mashed bananas, oil, milk, and vanilla; mix well. Add egg mixture to flour mixture; stir just till combined. (The batter should be lumpy.) Fold in toasted coconut.


Pour batter into prepared loaf pan. Bake in a preheated 350 degrees F oven for 45 to 55 minutes, or till a toothpick inserted near the center comes out clean.

Cool in pan on a wire rack for at least 10 minutes before removing to a wire rack.  Serve warm, at room temperature, and/or chilled.

Friday, December 21, 2012

Nutella Stuffed Cinnamon Sugar Muffins


I could go on all day with these mouth-watering pictures.......
                                            ....but I won't.  Because I know you guys just wanna get to the recipe already.  Let me start off by saying that these are the most magnificent muffins I have ever tasted in my entire life.  (My second favorite is tied with my lemon raspberry muffins and my chocolate chip muffins.) They are like CRACK.  You will be wanting one of these EVERY SINGLE DAY once you bake them.  In fact, my family has already decided to have these for Christmas day breakfast!  Yep yep --- they are that good.

Let me tell you a little bit about them.  The muffin cake itself has the perfect amount of spice; wonderfully cinnamon-y, with just the right amount of nutmeg. It is also super moist and tender, everything you would dream the perfect muffin should be.  You know what a snickerdoodle tastes like right? (I'm working on the perfect snickerdoodle recipe by the way)  Hopefully you do.  Well...these muffins tastes just like snickerdoodles...just in muffin form of course (which makes them way cooler).   Plus they are fluffy.  Which makes them way better than snickerdoodle cookies(:  Anyways, on the outside of these heavenly clouds of pure deliciousness is a decadent cinnamon-sugar-butter topping which causes every single bite to melt in your mouth.  Seriously...it may sound like I'm exaggerating but I swear I'm really not.  And I haven't even gotten to the absolute BEST part of these muffins: the NUTELLA center.  Mmmmm...once you take the first bite into these treats, you'll discover a chocolate surprise in the middle, filled with warm, fudgeysinful nutella.  The chocolate in the nutella pairs amazingly with the vanilla-cinnamon-y-buttery muffin.  They make fantastic left overs too, but are best eaten warm from the oven (of course, these only lasted up until the day after I made them, but they were still awesome). 

Ohmygosh just make these muffins.  I promise they will be a new favorite of yours!


Nutella Stuffed Cinnamon Sugar Muffins
yield:  8 medium-large muffins
  • 1/3 cup (5 Tbsp) unsalted butter, softened to room temperature
  • 1/2 cup sugar
  • 1 egg, at room temperature
  • 1 tsp vanilla extract
  • 1/2 cup milk
  • 1 1/2 cups all-purpose flour
  • 1 1/2 tsp baking powder
  • 1/2 tsp cinnamon
  • 1/4 tsp nutmeg
  • 1/2 tsp salt
  • 8 heaping teaspoons Nutella (about 4 tablespoons)
Cinnamon-Sugar Topping
  • 6 tablespoons white sugar (1/4 cup + 2 tablespoons)
  • 1 tablespoon + 1/2 teaspoon ground cinnamon
  • 4.5 Tbsp unsalted butter (1/4 cup + 1.5 teaspoons)
Preheat oven to 425F.  Spray muffin pan with cooking spray and set aside.
In a large bowl of an electric or stand mixer, cream butter and sugar together on medium speed.  Mix in the egg, vanilla extract, and milk. Gently stir in flour, baking powder, cinnamon, nutmeg, and salt.  DO NOT overmix – stir until *just* combined.
Spoon 1 heaping Tablespoon of batter into muffin cavity.  Layer with 1 heaping tsp Nutella in the center and spoon another heaping Tablespoon of batter on top.  If the muffin tins are completely full, that is ok.  They will not overflow.  Repeat layering batter + Nutella into each muffin tin.  I got exactly 8 muffins.
Bake at 425F for 5 minutes.  Reduce oven to 350F and bake for an additional 12-15 minutes until batter is set. Allow muffins to cool for about 5 minutes.
While the muffins are cooling, make the cinnamon-sugar topping.  Melt the butter for about 30 seconds in the microwave.  Stir and stick back in microwave if not fully melted.  In a separate small bowl, stir together the sugar and cinnamon.  Dip the top of each muffin generously into the melted butter and dip into the cinnamon-sugar mixture.  Swirl them around in the cinnamon-sugar a bit to make sure you get a thick coating. Set upright on cooling rack.  Enjoy!


***photo-creds to Sally's Baking Addiction, and this recipe was adapted/altered from her as well.

Sunday, November 25, 2012

Cheesy Potato and Corn Chowder


This takes comfort food to a whole new level.  That's what I love about chowder recipes...they're easy, yet incredibly rich and literally the definition of true soul-food.  This is rich, creamy (yet chunky!), cheesy, and full of fabulous flavor.  It's also incredibly perfect for those cold, winter nights.  I wouldn't change anything about this recipe...it's just too perfect.  The only thing I may experiment with is trying it with different meats, like chicken, ham, or - I think this would taste best - sausage. My family and I gobbled it up and we all agreed that this is one of my best chowder recipes of all time.  I served it with crusty french bread for dipping, and it was a wonderful, southern, comforting meal.

Yield: about 6-8 servings

Ingredients:
2 tablespoons butter
1 cup chopped celery
1 cup chopped onion 
2 14.5 ounce cans chicken broth
3 cups peeled and cubed potatoes
1 15-ounce can whole kernel corn
1 15-ounce can creamed corn
1 4-ounce can diced green chiles
1 2.5 ounce package country style gravy mix
1 cup milk
1 cup heavy cream
1 1/4 cup shredded, Mexican-style blend cheese
Garnish: crumbled bacon, sliced green onions, and/or extra cheese (optional)

Instructions:

  1. In large saucepan, melt butter over medium high heat. Add celery and onion; cook and stir until tender, about 5 minutes.
  2. Add chicken broth; bring to a boil. Add potatoes; cook over low heat for 20 to 25 minutes or until potatoes are soft, stirring occasionally.
  3. Stir in both corn cans and chiles; return to boiling. Combine milk and heavy cream, and dissolve gravy mix in the milk/cream mixture; stir into boiling mixture.  Let simmer over low heat for about 10 minutes. Add cheese; cook and stir over low heat until cheese is melted.  Garnish (if desired) and serve hot.
***If you love spicy, feel free to add some hot sauce to your bowl(:

Saturday, August 4, 2012

Blueberry Cornmeal Pancakes


Ohmygosh.  These were just too good.  This is my new all time favorite pancake recipe ever.  When I say these melt in your mouth, they literally MELT IN YOUR MOUTH.   Your fork will cut through them like butter. They are incredibly soft, fluffy, and full of flavor.  Most basic pancake recipes are pretty tasteless besides the add-ins you put in them, but this batter - even without the blueberries - has a wonderful sweet and salty taste that seriously tastes like not only the the best pancakes you'll ever have, but the best cornbread as well.  If you were to take the cornbread taste of this pancake, and put it into an actual, thicker, baked pan of cornbread, that pan of cornbread would be the bomb!  I served this recipe with my buttermilk syrup (here) and it was absolutely to die for.  My family all agrees that I have to make it again very soon.  Aaaand I'm going to request this on my birthday.  Yup...it's that special.  I adapted it from a Martha Stewart recipe, and my version is one of those rare recipes where I wouldn't change anything about it.


Yield: about 4 servings (about 1 dozen 5- to 6-inch pancakes)


Ingredients:

  • 1 cup all-purpose flour
  • 1/2 cup cornmeal
  • 1/4 cup white sugar, plus 1 tablespoon
  • 1 1/4 teaspoons baking powder
  • 1 teaspoon coarse salt
  • 1/2 teaspoon baking soda
  • 1 1/2 cups low-fat buttermilk
  • 1/4 cup milk 
  • 1 1/2 ounces (3 tablespoons) unsalted butter, melted and cooled, plus more for griddle
  • 1 large egg, lightly beaten
  • 2 cups (1 pint) blueberries

  •                 whipped cream (optional)

  • Instructions:
  1. Whisk together flour, cornmeal, 1/4 cup white sugar, the baking powder, salt, and baking soda. In another bowl, whisk together buttermilk, milk, butter, and egg. Whisk wet ingredients into dry ingredients until just combined (mixture will be lumpy).
  2. Preheat oven to 200 degrees. Heat a griddle or large nonstick skillet over medium-low heat. Toss blueberries with remaining tablespoon of sugar. Brush griddle with melted butter. Spoon batter onto griddle 1/3 cup at a time. Sprinkle with sugared blueberries, about 2 tablespoons per pancake. Cook until edges are set, 4 to 5 minutes. Flip, and cook until golden brown, about 2 minutes. Repeat with remaining batter and blueberries, adding more butter to griddle and keeping prepared pancakes warm on a baking sheet in the oven. Serve with desired syrup(s) and/or whipped cream.

Thursday, August 2, 2012

Whole Wheat Chocolate Chip Muffin For One


Okay.  I've had a slight chocolate chip muffin obsession lately.  Especially after eating so many of these.  Are you one of those people that are really tempted to eat the entire batch of muffins you make?  Yeah...I totally know the feeling.  So I decided to create a single chocolate chip muffin, that was actually (somewhat) healthy. I had no idea if it would turn good, since it made such a small amount, but I'm not kidding you when I say: this muffin tasted awesome. It uses whole wheat flour (yeah fiber!),  you can make it low fat with your choice of the type of butter and milk you use, and it's sugar free (minus the chocolate chips...but you can add other add-ins).  I actually regret making just one serving because I really wanted someone else to taste it so they could share the {happy feeling} my belly was having after eating this yummy little indulgence.  I bet this tastes even better than your favorite chocolate chip muffin recipe (it tastes very similar to my all-time favorite chocolate chip muffin recipe here).

Ingredients:
  • 2 Tbsp whole wheat flour (or white whole wheat)
  • 1 Tbsp all-purpose flour
  • 1/4 tsp baking powder
  • dash of salt
  • 1.5 Tbsp chocolate chips (feel free to use other add-ins, like nuts and/or coconut, etc.)
  • 1/2 tsp vanilla extract
  • 1 Tbsp unsalted butter, melted, and cooled slightly (you can use low fat if you want)
  • 1 Tbsp + 1 tsp milk (I used soy, but any other type will do)
  • 1 Tbsp sweetener (I used Stevia, but any other sweetener is fine too)
Instructions:
  1. Preheat oven to 330 degrees. Grease one muffin cup or line muffin tray with 1 liner. Set aside.
  2. Mix flours, baking powder, salt, and chocolate chips together in one bowl.  Combine vanilla, melted butter, milk, and sweetener in another bowl.  Add wet ingredients to the dry, and mix until just combined. DO NOT overmix (overmixing will create a hard/tough muffin).
  3. Pour batter into prepared muffin tin. Bake for 14-17 minutes, or until a knife inserted in the center comes out with just a few crumbs on it. Let cool at least 5 minutes in pan before removing.

Thursday, July 26, 2012

Raspberry Almond Coffee Cake


I love coffee cake.  In my opinion, there's nothing better than waking up in the morning to a hot cup of coffee and some sweet coffee cake on the side.  This coffee cake is super moist, light, and has just the right amount of sweetness.  I love the combination of raspberries, vanilla, and almonds.  If you're a big almond fan, I recommend using half almond extract, half vanilla extract.  The almond extract really compliments the sliced almonds on top of the cake.  Another thing I love about this coffee cake is how pretty it looks!  There is a beautiful, pink, raspberry swirl running all through the cake, and the top is garnished with sliced almonds and sweet drizzle of icing.  There is so much delicious flavor going on in this cake.  You can serve it warm with vanilla ice cream and/or whipped cream, and/or you can serve it at room temperature.  In my opinion, I liked it best at room temperature the next day - or even the second or third day - because it gets moister over time.  I'm not sure how it tastes after the third day because it never lasted that long in my house.


Yield: an 8-inch round cake (about 8-10 servings)
***recipe doubles well in a 9-inch pan


Ingredients:

  • 1 cup fresh raspberries
  • 3 tablespoons brown sugar
  • 1 cup all-purpose flour
  • 1/3 cup white sugar
  • 1/2 teaspoon baking powder
  • 1/4 teaspoon baking soda
  • 1/8 teaspoon salt
  • 1/2 cup sour cream
  • 2 tablespoons butter, melted
  • 1 teaspoon vanilla extract (or half vanilla, half almond extract...your choice)
  • 1 egg
  • 1/4 cup sliced almonds
  •  
  • 1/4 cup sifted confectioners' sugar
  • 1 teaspoon milk
  • 1/4 teaspoon vanilla extract

Directions:

  1. Preheat oven to 350 degrees F (175 degrees C). Spray an 8 inch round cake pan with cooking spray.
  2. Combine raspberries and brown sugar in a bowl. Set aside.
  3. In a large bowl, combine flour, sugar, baking soda, baking powder, and salt. Combine sour cream, butter or margarine, 1 teaspoon vanilla (or half a teaspoon almond, half vanilla...if using), and egg, and add to flour mixture. Stir just until moist. Spoon 2/3 of the batter into the prepared pan. Drain raspberry mixture, and spread it evenly over the batter. Spoon remaining batter over raspberry mixture (It's okay if the filling doesn't completely cover the top). Top with almonds.
  4. Bake for 30-35 minutes, or until a wooden pick inserted in center comes out clean. Let cool for 10 minutes on a wire rack.
  5. Combine confectioners' sugar, milk, and 1/4 teaspoon vanilla. Stir well. Drizzle glaze over cake. Serve warm or at room temperature.

Monday, July 23, 2012

Buttermilk Pancakes


FINALLY!! My search is officially over for the fluffiest, and most delicious buttermilk pancake recipe EVER.  A bajillion times better than Ihop, boxed mixes, and any other breakfast restaurant. I've tried too many times to make buttermilk pancakes, and they almost always turned out flat, too thick, or lacking flavor...that is...until today.  This morning, I tried (for about the hundredth time) making buttermilk pancakes, and they were absolute perfection.  Super fluffy, lightly sweet, perfect consistency, shaped into perfect circles, cooked perfectly....did I mention these pancakes were perfect?? The secret is fresh buttermilk!  For the best flavor, you have to use fresh buttermilk.  I always combined milk with vinegar or lemon juice to create "sour" milk, since it's a good substitution for buttermilk in most recipes, but this recipe requires fresh buttermilk for best flavor. It's also extremely important that you cook all the batter within 10 minutes of mixing it together, or else the "fluff" factors in the baking soda and baking powder will wear off and the pancakes will turn into crepes (this was one of my main issues with most of my failed buttermilk pancake trials). I served these with my Buttermilk Syrup recipe (here) and my family all agreed this is the best pancake recipe we've ever had.  I (literally) cannot wait to make these again.  This is definitely going to be my default pancake recipe for now on.


Yield: about 2 dozen pancakes


Ingredients:

  • 3 cups all-purpose flour
  • 3 tablespoons white sugar
  • 3 teaspoons baking powder
  • 1 1/2 teaspoons baking soda
  • 3/4 teaspoon salt
  • 3 cups buttermilk, room temperature
  • 1/2 cup milk, room temperature
  • 3 eggs, room temperature
  • 1/3 cup unsalted butter, melted and cooled 

Directions:

  1. In a large bowl, combine flour, sugar, baking powder, baking soda, and salt. In a separate bowl, beat together buttermilk, milk, eggs and melted butter with a whisk until smooth. Keep the two mixtures separate until you are ready to cook.
  2. Heat a lightly oiled griddle or frying pan over medium high heat. You can flick water across the surface and if it beads up and sizzles, it's ready!
  3. Pour the wet mixture into the dry mixture, using a wooden spoon or fork to blend. Stir until it's just blended together (it's okay if there are some flour lumps.  They will break open on the griddle and cause more fluffiness). Do not over stir! Pour or scoop the batter onto the griddle, using approximately 1/4 cup for each pancake. Brown on both sides and serve hot.

***I suggest not poking the middle of the pancake to check for doneness on the inside, because this will cause the pancake to deflate a little since air is escaping.  For maximum fluffiness, just make lightly brown on both sides and I promise they will be cooked through.

***If adding mix-ins like nuts, chocolate chips, and fruit, then stir into the flour mixture and follow the recipe as stated.

Thursday, July 19, 2012

Dutch Baby


dutch-baby-german-pancake-d.jpg

dutch-baby-german-pancake-b.jpg

For those of you poor souls who don't know what a dutch baby is (also called a German Pancake), it results from pancake batter being poured into a sizzling butter-filled cast iron skillet, and bakes into a wonderful breakfast treat.  Don't ask me why it's called a "Dutch Baby"...because I honestly have no idea.  If I was to give it a name myself, I would name it "Heavenly Pancake Puff." I've been making this recipe for as long as I can remember, and I have no idea why I didn't post it sooner. I've grown up making this delightful pancake. It's slightly more eggy than your usual pancake...but totally not in a gross way.  It's also very light; I could probably roll the entire thing up and eat it myself.  Since eggs make foods puff up, they cause the sides of this pancake to rise high above the edges of the pan, creating a light, puffy, slightly crispy crust with a moist, tender, eggy middle.  The staple topping that makes this pancake so unique is lemon juice.  It sounds weird at first, but the flavors are perfect together and I can't imagine eating a dutch baby without it (just like you wouldn't eat a normal pancake without maple syrup).  I absolutely love watching this baby puff up in the oven!  It does make me sad to watch it deflate once you take it out, though...but then I take a bite and the incredibly delicious taste makes me [happy] again(:

Yield: about 2-4 servings

Ingredients:

  • 3 tablespoons unsalted butter, melted and divided
  • 1/2 cup all-purpose flour
  • 3 tablespoons white sugar
  • 1/2 teaspoon kosher salt or sea salt (these have a better taste than table salt)
  • 1/2 cup milk (preferably not skim...for best taste), room temperature
  • 2 large eggs, room temperature
  • 1/4 teaspoon vanilla extract
  • Garnish: Lemon juice, powdered sugar, cinnamon
  • ***jams, syrups, and fruit are also delicious toppings, but the 3 listed above are the most common (and in my opinion, most delicious) toppings for traditional Dutch Babies.

Directions:

Preheat oven to 375 degrees F.
Place 2 tablespoons of the melted butter into a 10-inch cast iron skillet and place in the oven. Set the remaining tablespoon of melted butter aside to cool slightly. Wait 10 minutes before assembling the other ingredients.  If butter in the skillet is boiling pretty hard within these 10 minutes, remove it from the oven.  Lightly boiling is fine.
Place the flour, sugar, salt, milk, eggs, vanilla and remaining tablespoon of melted butter into the bowl of a food processor or blender and process for 30 seconds. Scrape down the sides of a blender with a rubber scraper, if necessary.  Remove the skillet from the oven (watch out because it's very HOT so use an oven mitt!). Carefully pour the batter into the preheated skillet. Bake on the middle rack of the oven for 20 to 30 minutes or until the edges are puffed and brown. Do not open the oven or else the Dutch Baby may fall. Carefully remove the skillet from the oven, and use a thin spatula to gently coax the pancake onto a large plate. It may fall slightly once removed from the heat, which is totally normal. To serve, cut into wedges and sprinkle with desired toppings. 

Monday, July 16, 2012

Italian Meatballs


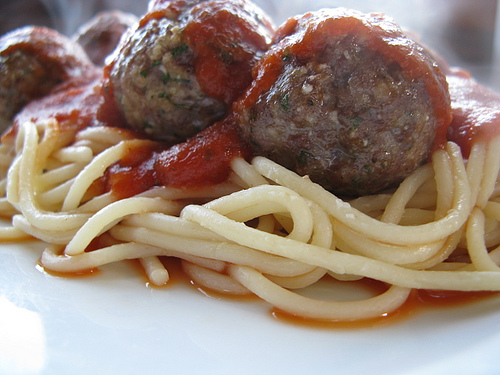
I have finally made the ultimate Italian meatball.  My mom has made meatballs before, but they always fell apart really easily and were rather bland (sorry if you're reading this, mom...).  I have had really good meatballs a few times at some Italian restaurants, so I wanted to try to create a knock-your-socks-off meatball recipe myself.  These meatballs literally melt in your mouth.  I seriously ate like four after just pulling them out of the oven.  The milk makes them so incredibly moist, and the flavors blend wonderfully well together.  They have a nice balance of flavors that will only get better once the flavors develop even further in a homemade tomato sauce (the meatballs are superb alone, though).  I served this over spaghetti with home made tomato sauce (I'm still working on a killer tomato sauce recipe, and I'll post it as soon as I can!), freshly grated Parmesan cheese, and crusty French bread.  It was wayyy better than any spaghetti and meatballs I've ever had in any restaurant.  I used 80, 20 ground beef and 2% milk, but 90,10 and 95, 5 will also work for the beef, and any low fat milk will certainly work.  These make awesome left overs, and freeze well too.  Bon Appetit! 


Yield: about 12 meatballs

Ingredients:

  • 1 pound lean ground beef
  • 1/2 teaspoon sea salt
  • 1/2 large onion (or 1 small onion), finely chopped
  • 1/2 teaspoon garlic salt
  • 1 1/2 teaspoons Italian seasoning
  • 3/4 teaspoon dried oregano
  • 1/2 teaspoon crushed red pepper flakes
  • 1 1/2 tablespoons Worcestershire sauce
  • 1/3 cup low fat milk
  • 1/4 cup grated Parmesan cheese
  • 1/2 cup Italian bread crumbs

Directions:

  1. Preheat an oven to 400 degrees F (200 degrees C).  Lightly grease a baking sheet.
  2. Place the beef into a mixing bowl, and season with salt, onion, garlic salt, Italian seasoning, oregano, red pepper flakes, and Worcestershire sauce; mix well. Add the milk, Parmesan cheese, and bread crumbs. Mix until evenly blended, then form into 1 1/2-inch meatballs, and place onto a baking sheet.
  3. Bake in the preheated oven for 10 minutes, remove the baking sheet, and gently flip (more like roll) the meatballs to the opposite side.  The side that was first on the bottom should now be very lightly brown.  Bake in the oven for another 8-12 minutes, or until no longer pink in the center (I suggest testing one at 8 minutes).

Sunday, July 8, 2012

Lemony Asparagus Pasta with Shrimp


This is my new favorite pasta recipe ever.  Like...of all time. I am so NOT exaggerating. I really need to enter this in a contest or something, because it would win first prize for sure. The pictures don't look as nice because I totally forgot about them since I ate my bowl so fast, so I had to take them at the very last minute.  Spaghetti, asparagus, and shrimp are bathed in a rich sauce with a slight bite of mustard, garlic, lemon, and Parmesan.  The shrimp is super flavorful as well, and very juicy.  My parents and I both agree the shrimp itself is the best we've ever had.  Cooking the large amount of garlic in the oil left over from the shrimp, salt, and pepper gives the sauce an amazingly flavorful base.   I'm still in shock of how perfectly this turned out....I honestly threw it together myself expecting an average pasta dish.  The result is summery and refreshingly light, but rich and comforting at the same time.  I've never had anything like it before, and  -> I wouldn't change a thing about it.<-   My parents are still raving about it as we speak....they're saying I need to give it to Carrabba's to put on their menu.  And my mom is making me make it for her every night before a race for her pasta meal (carb loading). My family and I will definitely be looking forward to those nights!

Yield: about 4 servings

Ingredients:
1 tablespoon olive oil
1 pound extra large, raw shrimp
salt and pepper


8 ounces whole-wheat spaghetti pasta
1 bunch asparagus, trimmed and cut into 3/4-inch pieces
1/2 cup heavy cream
1 cup low fat milk (I used 2%)
4 teaspoons Dijon mustard
4 teaspoons all-purpose flour
1/4 teaspoon salt
1/2 teaspoon ground black pepper
1 teaspoon  extra-virgin olive oil
3.5 tablespoons minced fresh garlic
1/2 teaspoon dried tarragon 
1/2 teaspoon freshly grated lemon zest
2 teaspoons lemon juice
1 cup freshly grated Parmesan cheese, divided


Instructions:
In a large skillet over medium-high heat, heat the tablespoon olive oil.  Add the shrimp and cook until pink and just cooked through, about 4 to 5 minutes (I recommend cutting the biggest one in half to make sure it's done).  While shrimp is cooking, add a very generous amount of salt and pepper.  When shrimp is fully cooked, transfer to a bowl and cover with aluminum foil to keep warm.  Do not clean off the skillet you cooked the shrimp in; set it aside for later use with the sauce.

Bring a large saucepan of water to a boil. Cook pasta for 6 minutes. Add asparagus and continue cooking, stirring occasionally, until the pasta and asparagus are just tender, about 3 minutes more. Drain and return to the pot.


Meanwhile, whisk milk, mustard, flour, salt and pepper in a medium bowl. Add the one teaspoon olive oil to the skillet you cooked the shrimp in over medium-high heat. Add garlic and cook, stirring constantly, until fragrant and lightly browned, 30 seconds to 1 minute. Whisk in the milk mixture. Bring to a simmer, stirring constantly, and cook until thickened, 3 to 5 minutes. Stir in tarragon, lemon zest and juice.


Stir the sauce into the cooked pasta and place over medium heat. Cook, stirring constantly, until the sauce is thick, creamy and coats the pasta, about one to two minutes. Reduce heat to low and stir in the cooked shrimp.  Stir 1/2 cup Parmesan into the pasta until combined. Serve the pasta topped with the remaining 1/2 cup Parmesan.

Thursday, July 5, 2012

Texas-Style Blueberry Cobbler


berry cobbler - photo by helmutwalker photography

Yes...It did overflow a little bit...but it's the taste that counts.

I got an email a few days ago from America's Test Kitchen, and in it was a....(drum roll please)....free recipe!  They never give away free recipes, so I was super excited.  The recipe was for Texas-Style Blueberry Cobbler.  I'm not really sure what makes it "Texas-Style"; maybe the lemon zest?  Lack of vanilla extract?  Who knows.  And I know I already have an awesome Blueberry Cobbler on my blog, but I couldn't resist an America's Test Kitchen recipe.  I knew their recipe had to be better.  And it was.   It was absolutely amazing.  Best cobbler I've ever had.  I'm going to keep my other Blueberry Cobbler recipe (here) because it's still incredibly delicious, and has more of a vanilla flavor.  Where as ATK recipe has a slight hint of lemon, which brings out the blueberry flavor and pairs well with the buttery note.  I made this last night - only I made mine in three ramekins because mine are smaller - and my parents and I ate them so fast I barely had time to get a picture.  This was the perfect dessert for the Fourth of July, because the juices of the blueberries looked reddish-purple, giving the dish a red, white, and blue effect(: The white came from the Haagen-Dazs Vanilla Bean Ice Cream (my new favorite vanilla ice cream). My mom said that she wasn't going to have any because she was full from dinner, but after she had the first bite she immediately changed her mind and gobbled it down.  She said I'm definitely going to make her fat....but I think that's a risk I'm willing to take. ;)


Yield: 2 to 3 servings

You will need two 12-ounce ramekins with straight sides.  If you have the smaller kind, then just divide the tablespoon of butter in thirds and cook for 30 to 35 minutes.

Ingredients:

1   tablespoon unsalted butter, cut into 2 pieces,
     plus 2 tablespoons melted and cooled
⅓  cup sugar
½  teaspoon grated lemon zest
1   cup blueberries
½  cup all-purpose flour
¾  teaspoon baking powder
¼  teaspoon salt
⅓  cup whole milk
1. Adjust oven rack to upper-middle position; heat oven to 350 degrees. Place two 12-ounce ramekins on aluminum foil-lined baking sheet and place 1 butter piece in each ramekin. Transfer to oven and heat until butter is melted, about 5 minutes.
2. Mash 1 tablespoon sugar and lemon zest with spoon. In separate bowl, mash together blueberries and 1 teaspoon sugar mixture until coarsely mashed.
3. Combine remaining sugar, flour, baking powder, and salt in large bowl. Whisk in milk and melted butter. Remove sheet pan from oven, transfer to wire rack, and divide batter evenly among ramekins.
4. Dollop blueberry mixture over batter and sprinkle with remaining lemon sugar. Bake 35 to 40 minutes, or until tops are brown and edges are crisp, rotating pan halfway through baking. Let cool on wire rack for 15 minutes. Serve warm.  Garnish with vanilla ice cream if desired.