Showing posts with label egg whites. Show all posts

Sunday, July 15, 2012

Lemon Raspberry Muffins


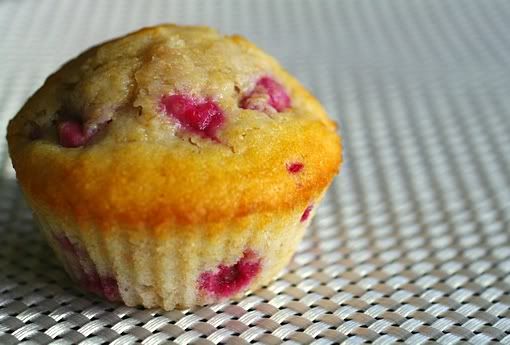
I love raspberry and lemon together and I thought it would make the perfect breakfast muffin. And I was right.  It totally did.  These were unbelievably good.  (I know I say that about every recipe on this site, but I truly only add the best recipes, so you can trust me.)  These muffins have a perfect combination of sweet and tart.  I had some warm (with whipped cream!), and some cool, and they are amazing either way.  However, they tasted best - surprisingly...since most muffins taste best fresh from the oven - at room temperature the next day.  Once you make these muffins, you'll have one warm of course, since you can't resist...but with the remaining muffins, put them in a plastic bag when just the tiniest bit warm, seal it, and have them the next day.  The flavors mellow together and taste absolutely delicious.  The muffins are also incredibly moist, especially the next day after putting it in a sealed bag....more like a cupcake than a muffin.  Make sure to keep the muffins in the muffin tin while cooling; do not take them out of the tin and put them directly onto a cooling rack or else the outside will cool too quickly and get slightly crunchy/less moist.  Oh yeah!  I forgot to say the best part!  These are LOW FAT!   I can't even tell you how un-low fat these taste.  They only have 3 tablespoons of vegetable oil (healthy fat, as opposed to butter) among the whole dozen muffins.  I also made them with yogurt and egg whites, and the yogurt is key to what makes them so moist. This is going to be my go-to muffin recipe for now on!

Yield: 12 muffins

Ingredients:

  • 1/2 cup plain yogurt
  • 3 tablespoons vegetable oil
  • 3 tablespoons lemon juice
  • 2 egg whites
  • 1 1/2 cups all-purpose flour
  • 3/4 cup white sugar
  • 2 teaspoons baking powder
  • 1/4 teaspoon salt
  • 1 teaspoon grated lemon zest
  • 1.5 cups fresh raspberries
  • 2 tablespoons white sugar
  • Garnish: whipped cream (optional)

Directions:

  1. Preheat the oven to 400 degrees F. Grease a 12 cup muffin tin, or line with paper liners.
  2. In a large bowl, mix together the yogurt, oil, lemon juice, and egg whites. In a separate bowl, stir together the flour, 3/4 cup sugar, baking powder, salt, and lemon zest. Add the wet ingredients to the dry, and mix until just blended. Gently stir in the raspberries. Spoon batter evenly into the prepared muffin cups. Sprinkle remaining sugar over the tops.
  3. Bake for 13 to 17 minutes in the preheated oven, or until the top springs back when lightly touched, and a knife inserted in the center comes out clean (if raspberry sticks to it, that's okay...as long as no lemon batter does). Cool muffins in the tin on a wire rack.  I recommend having warm muffins with a dollop of whipped cream.  Store left over muffins in a sealed container/bag.


Saturday, June 9, 2012

Blueberry - Coconut - Nut Muffins


Does that picture look yummy or what?  Nutty, sweet and fruity, this muffin bursts with the flavors of the tropics.  The one-two punch of coconut and macadamia nuts in this luxurious muffin will make you think you’re having your morning coffee in Hawaii <. This recipe was adapted from Eating Well Magazine, and is every bit as delicious as the picture.  I altered it a little based on what I had on hand, and it turned out so amazing.  This was my first time making a really killer blueberry muffin, and I wouldn't change anything about the recipe.  Also, these muffins are surprisingly healthy!  They're made with whole wheat flour, healthy oils, and fresh fruit, so you don't have to feel guilty about eating more than one(: Drizzle them with honey and a dollop of whipped cream for an added touch of sweetness.


Make Ahead Tip: Store, individually wrapped, at room temperature for up to 2 days or in the freezer for up to 1 month. To reheat, remove plastic wrap, wrap in a paper towel and microwave on High for 30-45 seconds.


Yield: 12 muffins

Ingredients: 
1/4 cup sweetened coconut; 
2 tbsp plus 3/4 cup all-purpose flour, divided; 
2 tbsp plus 1/2 cup brown sugar, divided; 
5 tbsp chopped macadamia nuts (or any other nuts of your preference), divided;
2 tbsp vegetable or canola oil, divided; 
1 cup whole-wheat flour; 
1 tsp baking powder; 
1/4 tsp baking soda; 
1/8 tsp salt; 
1/2 tsp ground cinnamon; 
1 large egg; 
1 large egg white; 
3/4 cup nonfat buttermilk (regular is fine too); 
2 tbsp butter, melted; 
1/2 tsp coconut or vanilla extract (I used vanilla, but I wish I had coconut!!); 
1 1/2 cups fresh blueberries (make sure they're not wet, or they will sink to the bottom)
Garnish/toppings: honey, butter, and/or whipped cream (optional)

Instructions:
1. Preheat oven to 400°F. Coat a 12-cup muffin pan with cooking spray.
2. Combine coconut, 2 tablespoons all-purpose flour, 2 tablespoons brown sugar and 2 tablespoons macadamia nuts in a small bowl. Drizzle with 1 tablespoon oil; stir to combine. Set aside.
3. Whisk the remaining 3/4 cup all-purpose flour, whole-wheat flour, baking powder, baking soda, salt and cinnamon in a medium bowl. Whisk the remaining 1/2 cup brown sugar, the remaining 1 tablespoon oil, egg, egg white, buttermilk, butter and coconut (or vanilla) extract in a medium bowl until well combined. Make a well in the center of the dry ingredients and pour in the wet ingredients; stir until just combined. Add blueberries and the remaining 3 tablespoons nuts; stir just to combine. Divide the batter among the prepared muffin cups. Sprinkle with the reserved coconut topping and gently press into the batter.
4. Bake the muffins until golden brown and a wooden skewer inserted in the center comes out clean, about 15-20 minutes. Let cool in the pan for 10 minutes, then remove from the pan and let cool on a wire rack at least 5 minutes more before serving.
5.  Serve warm with desired toppings.

Monday, May 28, 2012

Chocolate Waffles With Caramel Sauce and Ice Cream


Oh yesss...dessert for breakfast. That is my favorite thing in the entire world.  And what could be better than a waffle sundae for breakfast?  I can answer that ----> absolutely nothing! I woke up a few mornings ago craving something sweet, so I browsed through some of my recipes, and when I saw this - I knew it was the one.  Who can resist a chocolate waffle with home made caramel sauce, and ice cream??  Ice cream for breakfast is something I have a little too much(:  I guess you can say my sweet tooth was satisfied after I made these waffles. This recipe was absolutely heavenly.  The caramel sauce especially was the best caramel sauce I've ever had.  I'm gonna keep the recipe handy for future dishes, because it makes an incredible dessert topping and goes perfect with ice cream.  I used Ben and Jerry's American Dream Ice cream because that was what I had on hand (vanilla ice cream with caramel swirl and fudge covered waffle cone pieces...yum!!)  My parents and I gobbled these waffles up.  And my mom declared it the best thing she'd tasted in a long time.  I didn't disagree.

Ingredients:
For the Caramel Sauce:


1/3 cup brown sugar
1/3 cup heavy cream
4 tablespoons unsalted butter

For the Waffles:
4 tablespoons unsalted butter, melted
1 tablespoon unsweetened cocoa powder
1/3 cup sugar
1 egg, separted
1/2 cup all-purpose flour
1 teaspoon baking powder
1/4 teaspoon salt
1/3 cup milk
2 tablespoons chopped walnuts (optional)
Vanilla (or your choice of) ice cream, for serving
Chocolate shavings, for decoration

Instructions:

FOR THE CARAMEL SAUCE:
Combine all of the sauce ingredients in a small saucepan. Stir over low heat until the sugar dissolves. Bring to a boil, reduce heat and simmer, stirring, for 3 minutes.


FOR THE WAFFLES:
Combine the melted butter and cocoa powder and stir until well combined. Add the sugar and egg yolk and beat well.


Sift together all the dry ingredients and add to the chocolate mixture alternately with the milk. Beat the egg white until stiff. Fold into the chocolate mixture.


Heat a waffle iron and cook the mixture according to the manufacturer's instructions. Serve immediately with the Caramel Sauce, ice cream, nuts (optional) and shavings of chocolate.

Saturday, May 19, 2012

The Perfect Waffle Recipe


Waffles are a wonderful thing.  And I've been looking for the perfect waffles recipe for a long, long, long time.  Well...as of yesterday morning...I finally found it.  These waffles are absolutely perfect. The difference between this recipe and every other boring, non-crispy waffle recipe is beating the egg whites and adding lemon zest.  The beating of the egg whites makes the waffles wonderfully crispy, and the lemon zest ties all the flavors together and gives the result an amazing taste.  Crispy on the outside, yet soft and fluffy on the inside, with a delicious flavor even plain. But who eats waffles plain?  These taste so amazing any way you dress them up.  I had sections of mine with a little peanut butter and maple syrup, strawberries and whipped cream and maple syrup, and the magnificent maple butter.  If you've never had maple butter, you have to try it!  It's absolutely phenomenal in oatmeal, on pancakes, waffles, or toast, and I also recently tried it in a sweet potato and it was sooo incredible.  My dad and I tasted it at a food festival downtown, and we were totally blown away and bought it instantly.  You can check it out here.  Also, I froze the leftover waffles I had and popped them in the toaster a few days later and they still tasted sooo delicious!  The lemon zest was a little more pronounced, giving them an amazing flavor, and they were perfectly crispy.


Yield: about 5 Belgian waffles.

Ingredients:

  • 2 cups all-purpose flour
  • 2 teaspoons baking powder
  • 2 tablespoons white sugar
  • 1/2 teaspoon salt
  • 2 egg whites
  • 2 egg yolks
  • 2 tablespoons grated lemon zest
  • 1 teaspoon vanilla extract
  • 2 cups milk
  • 6 tablespoons butter, melted

Directions:

  1. Preheat a waffle iron according to manufacturer's instructions.
  2. Whisk the flour, baking powder, sugar, and salt together in a mixing bowl; set aside. Beat egg whites until foamy in a separate large glass or metal mixing bowl (not until stiff peaks form...but right before that). Whisk the egg yolks, lemon zest, and vanilla extract together in a third bowl; whisk in the milk. Stir in the flour mixture until smooth. Fold in the melted butter and then the beaten egg whites until just incorporated.
  3. Cook the waffles according to manufacturer's instructions until golden brown.  Top with desired toppings and serve immediately. 

Friday, April 20, 2012

Strawberry Pavlova

I saw this recipe on Allrecipe.com a few weeks ago, and I had never had Pavlova before, so I figured: why not? I altered it a little bit based on what I had in my house, and it turned out soooo tasty!  And incredibly pretty! The perfect dessert on a hot, spring or summer day.  It's light, sweet, and very refreshing. What made this pavlova super amazing was the fact that the strawberries I used were freshly picked that same day.  A local strawberry patch is now open where I live, and my family picks strawberries every year.  Mmm...who doesn't love freshly picked, sweet strawberries with whipped cream?  This pavlova is simply a light, sweet, base for that.  Crunchy on the outside, and soft and fluffy on the inside.  The almond extract gives it a delicious flavor that pairs really well with the strawberries and whipped cream.  After a few days, the outside of this pavlova will get too soft, so eat it quickly!  I promise ---> it won't be difficult.

Yield: about 12 servings

Ingredients:

  • 4 egg whites
  • 1 1/4 cups sugar, divided
  • 2 pinches of flour, divided
  • 1 teaspoon lemon juice
  • 1/2 teaspoon almond extract
  • desired amount of Cool Whip, thawed
  • 1 quart fresh strawberries, sliced

Directions:

  1. Place egg whites in a large mixing bowl; let stand at room temperature for 30 minutes. Beat egg whites on medium speed until foamy. Add 1 pinch of flour; beat until soft peaks form. Gradually add 1-1/4 cups sugar, 1 tablespoon at a time, beating on high until stiff peaks form. Sprinkle pinch of flour over egg white mixture; fold in. Fold in lemon juice and extract.
  2. Coat a 14-in. pizza pan with nonstick cooking spray. Spoon meringue onto pan, forming any shape you want. Build up edges slightly. Bake at 250 degrees F for 45-55 minutes or until crisp. Cool on pan over a wire rack.
  3. When cool, spread with Cool Whip. Arrange strawberries over top. Serve immediately.

Tuesday, December 27, 2011

Almond Butter Cake


A few years ago, my mom and I had a fun idea that we wanted to try that we thought could lead to a successful business and some extra money: decorating wedding cakes.  Haa...boy, did that idea last.  We thought it would be really cool to make wedding cakes, decorate them, and sell them for reasonable prices, since most wedding cakes now-a-days are sky-high expensive.  The cost is typically in the hundreds; ranging from $300-600.  I'm sure a bride would kill to buy a cake at lets say...$50?  That looks like a pretty low price to me, compared to $300.  So my mom and I started with the basic, first step: making a delicious wedding cake.  We looked online and through all our cookbooks, trying to find the perfect recipe.  I finally found it in "The Ultimate Southern Living Cookbook" (Which - unfortunately - no recipes from it are available online.)  Now...this recipe was made in 3 ginormous cake pans and created to serve 85 people...so, of course, I cut it down to 1/6.  I mean really...who would be willing to use 4.5 cups of butter, 7.5 cups of white sugar, 6 16-ounce boxes of powdered sugar, 13.5 cups of flour, and 27 egg whites in one recipe??? Not me, that's for sure.  Cutting it down to 1/6 was the perfect amount, and I only had to bake it in one pan.  The recipe stated that it would take 1 hour and 45 minutes to prep, 2.5 hours to cook, and 3.5 hours to assemble and decorate.  No way was I spending 8 hours on a cake!!!  The hands on time it took my mom and I to make this (since we made a fraction of the recipe) was 2 hours tops.  And it came out perfect!  It's a rich, almond-y, buttery cake with a thin, sweet layer of apricot filling that makes it super moist.  It's then topped with a decadent, almond-butter frosting.  I brought some of this to school for my lunch table to try, and everyone loved it.  One of my friends declared it the best cake she'd ever tasted and still her all-time favorite today.  She's obsessed with it and makes her mom make it as her birthday cake every year.  My mom and I really should start working on this business again, cause with this cake, our business would be booming.


Yield: 1 10x3 inch round cake pan  (about 12-15 servings)


Ingredients:
1/2 cup butter, softened
1/4 cup shortening
1.25 cups sugar
2.25 cups all-purpose flour
1/2 tablespoon baking powder
1/4 teaspoon salt
3/4 cup cold water
1 teaspoon vanilla extract
1/2 teaspoon almond extract
4 large egg whites, at room temperature


Apricot Filling:
1/2 cup apricot halves, drained.
1/2 tablespoon amaretto (optional)


Almond-Butter Frosting:
1/4 cup butter, softened
1/4 cup shortening
1 16-ounce package powdered sugar, unsifted
1/3 cup whipping cream
1/6 teaspoon salt
1/2 teaspoon almond extract


To Bake Cake:
1. Grease bottom and sides of cake pan.
2. Beat butter and shortening at medium-high speed with electric mixer 3 minutes.  Gradually add sugar, beating at medium-high speed 4 minutes.
3.  Combine flour, baking powder, and salt; add to butter mixture alternately with the cold water, beginning and ending with the flour mixture, beating well after each addition.  Stir in vanilla and almond extracts.  
4. Beat egg whites in a large bowl until soft peaks form (about 1.5 minutes).  Stir half of the beaten egg white into batter to lighten; fold remaining egg white into batter.  Pour into pan.  Gently drop pan on counter-top twice to release air bubbles from batter.
5. Bake at 325 degrees F for 40 to 45 minutes or until cake springs back when lightly touched in center and begins to pull away from sides of pan.  Cool in pan on wire rack 20 minutes.  Loosen edges of cake with a knife.  Remove from pan, and let cool completely, rounded side up, on wire rack.


To Fill:
1. Lay cake on a flat surface.  Carefully slice it in half horizontally, using a long knife with a serrated edge.  Insert two wooden picks into each layer, one above the other, to indicate how the two layers should match up when going back together after filling.
2. Process apricot and amaretto in container of an electric blender or food processor until smooth. Spread on bottom half of cake layer, spreading evenly over cake.  Replace top layer, carefully matching wooden picks to keep layers level.


To Frost:
1. Beat butter and shortening at medium speed with electric mixer 2 minutes or until creamy.  Gradually add sugar, beating at medium speed 2 to 3 minutes.  Add whipping cream, salt, and almond extract, beating well. Add more cream if necessary.  Continue beating until mixture is fluffy.  Frost top and sides of cake immediately.


Tuesday, December 6, 2011

Chewy Hot Chocolate Cookies

cimg2469-1cimg2442-1
I've said it before, and I'll say it again: I love hot chocolate!  And these cookies taste just like it.  I was really scared when they first came out of the oven because they were so crackly and looked super crunchy...and I am not a big fan of crunchy cookies; I like the moist and chewy ones.  But these were not crunchy at all!  The edges are slightly crispy, and the inside is like sinking your teeth into a moist, fudgey, hot chocolate-tasting brownie.  I'm not really sure why they remind me of hot chocolate...I guess because most of the ingredients are just like the ones in hot chocolate.  These made my tummy veryyy happy(:

Yield: about 16 cookies
Ingredients:
2 1/4 cups powdered sugar
1/4 teaspoon salt
1 cup cocoa powder
3 egg whites
1 teaspoon vanilla extract
3/4 cup chocolate chips

Instructions:
1. In a large bowl, mix together unrefined powdered sugar, salt and cocoa powder. 
2. In a separate bowl, mix egg whites, and vanilla extract.  Add wet ingredients to dry ingredients and mix with an electric mixer at low speed for 2 minutes – the batter should be shiny and smooth.  Stir in chocolate chips.  Cover bowl and refrigerate for 3 hours or up to overnight. 
3. Preheat oven to 350*F and spray cookie sheet with cooking spray or line with parchment paper.  Drop tablespoon-sized balls of dough onto cookie sheet. Don’t flatten and be sure to leave space between the drops – these cookies spread out in the oven!  Bake for 9-10 minutes until tops are glossy and crackly.  Let stand for 3 minutes and remove to cool.