Showing posts with label lemon juice. Show all posts

Wednesday, November 21, 2012

Tilapia Parmesan


  • Mmmm..cheesy...buttery fish.  So yummy.  This recipe is so simple, yet so delicious.  Many people find tilapia recipes bland and boring...well, not this one.  I absolutely love it served over rice because of the amazing sauce...the rice soaks it up and tastes sooo yummy.  This is super easy and better than anything you'd order in a restaurant.  Everyone in my family had seconds, and we didn't end up with any leftovers!  The texture is perfect, and the zing of the Parmesan and spices were also perfect.  The blend of flavors is truly incredible. This recipe is sure to impress!

  • Ingredients:
  • 1/2 cup Parmesan cheese
  • 1/4 cup butter, softened
  • 3 tablespoons mayonnaise
  • 2 tablespoons fresh lemon juice
  • 1/4 teaspoon dried basil
  • 1/4 teaspoon ground black pepper
  • 1/8 teaspoon onion powder
  • 1/8 teaspoon celery seed
  • 1/2 teaspoon paprika
  • 1/4 teaspoon garlic powder
  • 1/4 teaspoon crushed red pepper flakes
  • 2 pounds tilapia fillets
Instructions:
  1. Preheat your oven’s broiler. Grease a broiling pan or line pan with aluminum foil.
  2. In a small bowl, mix together the Parmesan cheese, butter, mayonnaise and lemon juice. Season with dried basil, pepper, onion powder, celery seed, paprika, garlic powder, and crushed red pepper flakes. Mix well and set aside.
  3. Arrange fillets in a single layer on the prepared pan. Broil a few inches from the heat for 2 to 3 minutes. Flip the fillets over and broil for a couple more minutes. Remove the fillets from the oven and cover them with the Parmesan cheese mixture on the top side. Broil for 2 more minutes or until the topping is browned and fish flakes easily with a fork. Be careful not to over cook the fish.

Sunday, October 28, 2012

Rosemary Ranch Chicken Kabobs


I'm not a huge fan of dressings.  Whenever I have a salad, I don't usually use that much dressing; its just never been my thing.  However, after making this recipe, my whole viewpoint of dressing completely changed.  Who knew that ranch dressing could make chicken so........wonderful??  The ranch dressing added sooo much incredibly delicious flavor to the chicken, and made it perfectly salty and wonderfully moist.  You truly can't get any moister than this chicken is.  This is definitely one of my new favorite chicken recipes.  Ohmygoodness, just typing about it makes me want to eat a bunch of it.  The chicken literally melts in your mouth, and it's super duper addicting.  The sauce is awesome too, especially over rice!

Yield: about 6 servings


Ingredients
  • ½ cup olive oil
  • ½ cup ranch dressing
  • 3 tablespoons Worcestershire sauce
  • 1 tablespoon minced fresh rosemary
  • 1/2 teaspoon salt
  • 1 teaspoon lemon juice
  • 1 teaspoon white vinegar
  • ¼ teaspoon ground black pepper, or to taste
  • 1 tablespoon white sugar, or to taste (optional)
  • 5 skinless, boneless chicken breast halves – cut into 1 inch cubes
Instructions
  1. In a medium bowl, stir together the olive oil, ranch dressing, Worcestershire sauce, rosemary, salt, lemon juice, white vinegar, pepper, and sugar. Let stand for 5 minutes. Place chicken in the bowl, and stir to coat with the marinade. Cover and refrigerate for at least 8 hours, or overnight.
  2. Preheat the grill for medium-high heat. Thread chicken onto skewers and discard marinade.
  3. Lightly oil the grill grate. Grill skewers for 8 to 12 minutes, or until the chicken is no longer pink in the center, and the juices run clear.


Friday, August 24, 2012

Pasta with Shrimp and Creamy Roasted Tomatoes


I'm on a roll with the shrimp recipes lately. My Garlicy Shrimp Scampi , New Orleans Barbecue ShrimpSweet and Spicy Honey Grilled Shrimp Skewers, and (my personal favorite) Lemony Asparagus Pasta with Shrimp are all incredible.  I'm a sucker for creamy pastas and juicy shrimp, so this recipe had my name all over it when I first saw it on Recipe.com.  I love the idea of roasting the tomatoes and adding them to a creamy sauce...this makes such a wonderful, roasted-tomato flavor.  Heavy cream also makes everything better, causing this sauce to be super creamy and comforting.  This has big, flavorful shrimp swimming in a roasted tomato-creamy sauce.  The sauce isn't too tomato-y, which I really liked, and has a touch of lemon flavor...very refreshing.  It was rich and filling (from the heavy cream), yet light and summery (from the lemon flavor and shrimp) at the same time. There is also a perfect amount of sauce in proportion with the pasta and shrimp.  If you like lots of shrimp, use two pounds.  If you prefer less shrimp, then use one pound.  I used two pounds and there was lots of flavorful, big, juicy shrimp with every bite.  My parents said this was "restaurant quality"...I totally agree.

Yield: about 4 servings

Ingredients:
1 1/2 cups grape tomatoes
1 tablespoons extra-virgin olive oil
1 teaspoon fresh thyme leaves
Kosher salt and freshly ground pepper
3/4 pounds pasta (of your choice) 
1 cup heavy cream
1 to 2 pounds large shrimp, shelled and deveined
2 teaspoons fresh lemon juice
1 teaspoons finely grated lemon zest
2 tablespoons coarsely chopped fresh flat-leaf parsley 

Directions:
1.
Preheat the oven to 375 degrees. In a large ovenproof skillet, toss the tomatoes with the olive oil and and thyme and season with salt and pepper. Roast the tomatoes for about 25 minutes, until starting to brown and their skins split.
2.
Meanwhile, in a large pot of boiling, salted water, cook the pasta until al dente; drain.
3.
Add the cream and a generous amount of salt and desired amount of pepper to the tomatoes and bring to a simmer. Cook over moderate heat, gently crushing the tomatoes, until the cream thickens slightly, about 3 minutes. Add the shrimp*** and simmer over moderate heat until cooked through, about 2-4 minutes.  Season with more salt and pepper. Add the pasta to the skillet along with the lemon juice and toss over low heat until the pasta is coated, about 1 minute. Add the lemon zest and parsley and toss. Add more salt and pepper to taste.  Transfer the pasta to warm bowls and serve at once.

***If using 2 pounds of shrimp, cook the shrimp in 2 batches, transferring the first batch to a plate with a slotted spoon and keeping warm with foil.  Add first batch of shrimp to pasta in the end.


***adapted from Recipes.com

Thursday, July 26, 2012

Chicken Piccata


I think this was the first time I actually liked chicken piccata.  I've tasted it in restaurants before, but I always thought it had too much wine, lemon, or caper flavor.  This chicken piccata is just right.  It has juicy, tender chicken swimming in a light, lemon-wine-butter sauce.  This is the perfect dish for the summer, and looks very impressive...not to mention incredibly easy to prepare!  I recommend serving it over rice or pasta, but it's so good any way you wanna have it.  It's also super yummy to dip some garlic bread or roasted potatoes in the tasty lemon sauce.  I would tell you how it tastes the next day after sitting in the sauce over night, but there weren't any leftovers (and I doubled the recipe).


Yield: about three servings

Ingredients:

  • 3 large skinless, boneless chicken breast halves, pounded thin
  • salt and pepper to taste
  • 1/2 cup all-purpose flour
  • 1 tablespoons olive oil
  • 1 tablespoon butter
  • 3 cloves garlic, minced
  • 1 cup low sodium chicken broth
  • 1/4 cup white wine
  • 1/2 lemon, thinly sliced
  • 1/4 cup fresh lemon juice
  • 2 tablespoons capers
  • 3 tablespoons butter
  • 2 tablespoons minced Italian (flat-leaf) parsley

Directions:

  1. Preheat oven to 200 degrees F (95 degrees C). Place a serving platter into the oven to warm.
  2. Season the chicken breast pieces with salt and pepper and dredge them in flour. Shake off excess flour. Heat the olive oil and butter in a skillet; pan-fry the chicken pieces until golden brown on both sides, about 3 minutes per side. Work in batches and do not crowd skillet, adding oil as needed . Place the chicken pieces onto the warmed platter in the oven. When finished with all the chicken, drain most of the oil from the skillet, leaving a thin coating on the surface of the pan.
  3. Cook and stir the minced garlic in the skillet until fragrant, about 20 seconds. Pour in the chicken broth and white wine. Scrape and dissolve any brown bits from the bottom of the skillet. Stir in the lemon slices and bring the mixture to a boil. Let cook, stirring occasionally, until the sauce reduces to about 2/3 cup, 5 to 8 minutes.  Remove lemon slices and discard. Add the lemon juice and capers; simmer until the sauce is reduced and slightly thickened, about 5 minutes more. Drop the butter into the skillet and swirl it into the sauce by tilting the skillet until the butter is melted and incorporated. Add the parsley; remove from heat and set aside.
  4. Arrange the chicken medallions on serving plates and spoon sauce over each portion to serve.

Sunday, July 22, 2012

Sweet and Spicy Honey Grilled Shrimp Skewers


My mom wanted to have a healthy, low fat meal a few days ago, and she said she was gonna grill up some barbecue shrimp.  This "cooking" she speaks of means she uses bottled barbecue sauce to baste shrimp.  And since I've turned into a little chef over the years, and really do not prefer bottled/store bought items, I insisted that I make a light sauce instead.  She agreed, of course.  I looked up a few of the top grilled shrimp recipes throughout the web, and came up with this delicious marinade.  I absolutely LOVE the flavors that combine in this dish!  The slightly spicy kick from the red pepper mixed with the sweet honey and fruity flavors, and mixed with the tart flavors from the vinegar, lemon juice, and shrimp were totally out of this world.  I never would have thought of using "fruity" flavors like applesauce and strawberry jam, but the result was so refreshing...the {perfect summer meal}.  I recommend serving this over rice, noodles, or salad.  I had this over a salad with chopped strawberries and goat cheese.  Best salad I've ever had.  My mom told me she'll definitely make this recipe instead of her "bottled" barbecue shrimp for now on.

Ingredients:

  • 6 tablespoons honey
  • 6 tablespoons olive oil
  • 2 tablespoons chopped fresh basil (or two teaspoons dried)
  • 2 tablespoons strawberry jam
  • 1/2 teaspoon crushed red pepper flakes
  • 2 cloves garlic, minced
  • 1/4 cup red wine vinegar or apple cider vinegar
  • 2 tablespoons lemon juice
  • 4 teaspoons brown sugar
  • 3 tablespoons applesauce
  • 2 pounds jumbo shrimp, peeled and deveined

Directions:

  1. Whisk together the honey, olive oil, basil, strawberry jam, red pepper flakes, garlic, red wine vinegar, lemon juice and brown sugar in a small bowl. Place and shrimp into a large resealable plastic bag or a large container with a tight lid. Pour the marinade over the shrimp, seal the bag or container, and shake to coat (if lid of container isn't very sealed, you can just stir the shrimp/marinade mixture well); refrigerate for 1.5 to 2 hours.
  2. Preheat an outdoor grill for medium-high heat.
  3. Thread the shrimp alternately on 8 metal or soaked wooden skewers.  Reserve sauce.
  4. Cook the skewers on the preheated grill until the shrimp are opaque, about 5 minutes per side, basting every 2 and a half minutes with the reserved sauce.  Serve hot.


Thursday, July 19, 2012

Dutch Baby


dutch-baby-german-pancake-d.jpg

dutch-baby-german-pancake-b.jpg

For those of you poor souls who don't know what a dutch baby is (also called a German Pancake), it results from pancake batter being poured into a sizzling butter-filled cast iron skillet, and bakes into a wonderful breakfast treat.  Don't ask me why it's called a "Dutch Baby"...because I honestly have no idea.  If I was to give it a name myself, I would name it "Heavenly Pancake Puff." I've been making this recipe for as long as I can remember, and I have no idea why I didn't post it sooner. I've grown up making this delightful pancake. It's slightly more eggy than your usual pancake...but totally not in a gross way.  It's also very light; I could probably roll the entire thing up and eat it myself.  Since eggs make foods puff up, they cause the sides of this pancake to rise high above the edges of the pan, creating a light, puffy, slightly crispy crust with a moist, tender, eggy middle.  The staple topping that makes this pancake so unique is lemon juice.  It sounds weird at first, but the flavors are perfect together and I can't imagine eating a dutch baby without it (just like you wouldn't eat a normal pancake without maple syrup).  I absolutely love watching this baby puff up in the oven!  It does make me sad to watch it deflate once you take it out, though...but then I take a bite and the incredibly delicious taste makes me [happy] again(:

Yield: about 2-4 servings

Ingredients:

  • 3 tablespoons unsalted butter, melted and divided
  • 1/2 cup all-purpose flour
  • 3 tablespoons white sugar
  • 1/2 teaspoon kosher salt or sea salt (these have a better taste than table salt)
  • 1/2 cup milk (preferably not skim...for best taste), room temperature
  • 2 large eggs, room temperature
  • 1/4 teaspoon vanilla extract
  • Garnish: Lemon juice, powdered sugar, cinnamon
  • ***jams, syrups, and fruit are also delicious toppings, but the 3 listed above are the most common (and in my opinion, most delicious) toppings for traditional Dutch Babies.

Directions:

Preheat oven to 375 degrees F.
Place 2 tablespoons of the melted butter into a 10-inch cast iron skillet and place in the oven. Set the remaining tablespoon of melted butter aside to cool slightly. Wait 10 minutes before assembling the other ingredients.  If butter in the skillet is boiling pretty hard within these 10 minutes, remove it from the oven.  Lightly boiling is fine.
Place the flour, sugar, salt, milk, eggs, vanilla and remaining tablespoon of melted butter into the bowl of a food processor or blender and process for 30 seconds. Scrape down the sides of a blender with a rubber scraper, if necessary.  Remove the skillet from the oven (watch out because it's very HOT so use an oven mitt!). Carefully pour the batter into the preheated skillet. Bake on the middle rack of the oven for 20 to 30 minutes or until the edges are puffed and brown. Do not open the oven or else the Dutch Baby may fall. Carefully remove the skillet from the oven, and use a thin spatula to gently coax the pancake onto a large plate. It may fall slightly once removed from the heat, which is totally normal. To serve, cut into wedges and sprinkle with desired toppings. 

Sunday, July 15, 2012

Lemon Raspberry Muffins


I love raspberry and lemon together and I thought it would make the perfect breakfast muffin. And I was right.  It totally did.  These were unbelievably good.  (I know I say that about every recipe on this site, but I truly only add the best recipes, so you can trust me.)  These muffins have a perfect combination of sweet and tart.  I had some warm (with whipped cream!), and some cool, and they are amazing either way.  However, they tasted best - surprisingly...since most muffins taste best fresh from the oven - at room temperature the next day.  Once you make these muffins, you'll have one warm of course, since you can't resist...but with the remaining muffins, put them in a plastic bag when just the tiniest bit warm, seal it, and have them the next day.  The flavors mellow together and taste absolutely delicious.  The muffins are also incredibly moist, especially the next day after putting it in a sealed bag....more like a cupcake than a muffin.  Make sure to keep the muffins in the muffin tin while cooling; do not take them out of the tin and put them directly onto a cooling rack or else the outside will cool too quickly and get slightly crunchy/less moist.  Oh yeah!  I forgot to say the best part!  These are LOW FAT!   I can't even tell you how un-low fat these taste.  They only have 3 tablespoons of vegetable oil (healthy fat, as opposed to butter) among the whole dozen muffins.  I also made them with yogurt and egg whites, and the yogurt is key to what makes them so moist. This is going to be my go-to muffin recipe for now on!

Yield: 12 muffins

Ingredients:

  • 1/2 cup plain yogurt
  • 3 tablespoons vegetable oil
  • 3 tablespoons lemon juice
  • 2 egg whites
  • 1 1/2 cups all-purpose flour
  • 3/4 cup white sugar
  • 2 teaspoons baking powder
  • 1/4 teaspoon salt
  • 1 teaspoon grated lemon zest
  • 1.5 cups fresh raspberries
  • 2 tablespoons white sugar
  • Garnish: whipped cream (optional)

Directions:

  1. Preheat the oven to 400 degrees F. Grease a 12 cup muffin tin, or line with paper liners.
  2. In a large bowl, mix together the yogurt, oil, lemon juice, and egg whites. In a separate bowl, stir together the flour, 3/4 cup sugar, baking powder, salt, and lemon zest. Add the wet ingredients to the dry, and mix until just blended. Gently stir in the raspberries. Spoon batter evenly into the prepared muffin cups. Sprinkle remaining sugar over the tops.
  3. Bake for 13 to 17 minutes in the preheated oven, or until the top springs back when lightly touched, and a knife inserted in the center comes out clean (if raspberry sticks to it, that's okay...as long as no lemon batter does). Cool muffins in the tin on a wire rack.  I recommend having warm muffins with a dollop of whipped cream.  Store left over muffins in a sealed container/bag.


Sunday, July 8, 2012

Lemony Asparagus Pasta with Shrimp


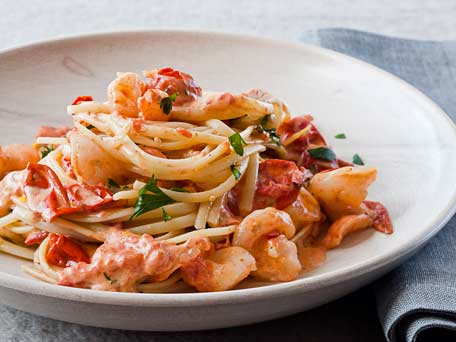
This is my new favorite pasta recipe ever.  Like...of all time. I am so NOT exaggerating. I really need to enter this in a contest or something, because it would win first prize for sure. The pictures don't look as nice because I totally forgot about them since I ate my bowl so fast, so I had to take them at the very last minute.  Spaghetti, asparagus, and shrimp are bathed in a rich sauce with a slight bite of mustard, garlic, lemon, and Parmesan.  The shrimp is super flavorful as well, and very juicy.  My parents and I both agree the shrimp itself is the best we've ever had.  Cooking the large amount of garlic in the oil left over from the shrimp, salt, and pepper gives the sauce an amazingly flavorful base.   I'm still in shock of how perfectly this turned out....I honestly threw it together myself expecting an average pasta dish.  The result is summery and refreshingly light, but rich and comforting at the same time.  I've never had anything like it before, and  -> I wouldn't change a thing about it.<-   My parents are still raving about it as we speak....they're saying I need to give it to Carrabba's to put on their menu.  And my mom is making me make it for her every night before a race for her pasta meal (carb loading). My family and I will definitely be looking forward to those nights!

Yield: about 4 servings

Ingredients:
1 tablespoon olive oil
1 pound extra large, raw shrimp
salt and pepper


8 ounces whole-wheat spaghetti pasta
1 bunch asparagus, trimmed and cut into 3/4-inch pieces
1/2 cup heavy cream
1 cup low fat milk (I used 2%)
4 teaspoons Dijon mustard
4 teaspoons all-purpose flour
1/4 teaspoon salt
1/2 teaspoon ground black pepper
1 teaspoon  extra-virgin olive oil
3.5 tablespoons minced fresh garlic
1/2 teaspoon dried tarragon 
1/2 teaspoon freshly grated lemon zest
2 teaspoons lemon juice
1 cup freshly grated Parmesan cheese, divided


Instructions:
In a large skillet over medium-high heat, heat the tablespoon olive oil.  Add the shrimp and cook until pink and just cooked through, about 4 to 5 minutes (I recommend cutting the biggest one in half to make sure it's done).  While shrimp is cooking, add a very generous amount of salt and pepper.  When shrimp is fully cooked, transfer to a bowl and cover with aluminum foil to keep warm.  Do not clean off the skillet you cooked the shrimp in; set it aside for later use with the sauce.

Bring a large saucepan of water to a boil. Cook pasta for 6 minutes. Add asparagus and continue cooking, stirring occasionally, until the pasta and asparagus are just tender, about 3 minutes more. Drain and return to the pot.


Meanwhile, whisk milk, mustard, flour, salt and pepper in a medium bowl. Add the one teaspoon olive oil to the skillet you cooked the shrimp in over medium-high heat. Add garlic and cook, stirring constantly, until fragrant and lightly browned, 30 seconds to 1 minute. Whisk in the milk mixture. Bring to a simmer, stirring constantly, and cook until thickened, 3 to 5 minutes. Stir in tarragon, lemon zest and juice.


Stir the sauce into the cooked pasta and place over medium heat. Cook, stirring constantly, until the sauce is thick, creamy and coats the pasta, about one to two minutes. Reduce heat to low and stir in the cooked shrimp.  Stir 1/2 cup Parmesan into the pasta until combined. Serve the pasta topped with the remaining 1/2 cup Parmesan.

Thursday, June 28, 2012

Filet Steaks with an Irish Whiskey and Mushroom Cream Pan Sauce


Oh my goody goodness this was good.  Too good.  Way too good.  I'm still amazed I was capable of making such a wonderful dinner.  Last night, we had some left over heavy cream in the refrigerator from the Chocolate Fudge Truffle Cheesecake I made for my mom's birthday last week (you can find this sinful dessert recipe here), and since we almost never have heavy cream, I insisted that I make a dinner recipe using it.  My mom had already bought steak fillets, and I had a recipe saved that I had been wanting to try since it included heavy cream and whiskey (who could go wrong with these two marvelous ingredients!?).  So I altered the saved recipe based on what we had, and it turned out to be the best steak dish I've ever had.  My parents also agree.  It was absolutely perfect....the steaks themselves cut like butter, were super duper juicy, and had a wonderful, meaty flavor.  The sauce was unlike anything I had ever had before.  It had the dominant flavor of beef - from the stock - but the whiskey gave it a zesty burst of flavor, and the cream wasn't overpowering at all; in fact, my parents couldn't even tell there was any cream in the sauce.  It simply blended all the flavors of the ingredients together and made the sauce slightly rich.  I decided to add the mushrooms to the dish last minute, and boy am I happy I did because they went so perfectly with the rich, beefy sauce.  However, if you don't like mushrooms, they can easily be omitted.  This is a heavenly dish that is sure to impress.


Yield: 4 servings


Ingredients:
Four 1 to 1.25 inch pieces beef tenderloin (about 7.5 ounces each)
Kosher salt and freshly ground black pepper
1 tablespoon vegetable oil (if not using a cast iron pan)
1 tablespoon unsalted butter
1 tablespoon finely chopped shallots
5 white mushrooms, sliced (optional)
1/4 cup Irish Whiskey, such as Jameson
1/2 cup beef stock 
1/2 teaspoon Worcestershire sauce
2 teaspoons Dijon mustard
1/2 cup heavy cream
1/2 to 1 teaspoon lemon juice


Directions:

1.
Season each steak generously with salt and pepper. Heat a heavy-based (preferably cast-iron) skillet that's large enough to hold the steaks over high heat until quite hot. (Add the 1 tablespoon vegetable oil if not using cast iron.) Test by touching the edge of one steak to the pan surface; it will sizzle briskly when ready. Immediately drop in the steaks and sear one side for 2 minutes. Sneak a peek to see if the first side is nicely browned. If not, continue to sear that side for another minute or so. Flip the steaks and sear the other side for 2 to 3 minutes. Reduce the heat to medium high, cook for another 2 minutes, flip, and cook until a digital instant-read thermometer in the center of the meat reads 120 degrees F for rare or 125 degrees F for medium rare, another 1 to 2 minutes. Transfer the steaks to the warm platter and let them rest, covered loosely with foil, while you make the sauce.  You can also set the steaks in a separate skillet and place on the "warming" section of your oven if you have it.
2.
To make the pan sauce: Return the unwashed pan to medium heat. Add the butter and let it melt (be careful not to let it burn if the burner is still very hot!). Add the shallots and and cook, stirring, until fragrant and just tender, 1 to 2 minutes.  Add the whiskey and mushrooms and stir with a wooden spoon, scraping up any browned bits stuck to the pan. Add the broth and Worcestershire sauce , raise the heat to medium high, and bring to a boil. Whisk in the mustard and then the cream. Continue to cook at a boil, stirring, until reduced to a saucy consistency, 5 to 7 minutes. Taste the sauce and season with salt, pepper, and lemon juice. Place a steak on each plate, drizzle with the juices left in the steak pan, and serve the steaks with the mushroom cream sauce.

Saturday, May 19, 2012

Banana Cake with Cream Cheese Frosting


Do those pictures look yummy or what?  Well, the pictures are nothing compared to the taste of this heavenly banana cake.  My friend and I made this a few days ago for a party at school, and it turned out fabulous!  A ton of people tried it, and everyone was "mmmm"ing like crazy and telling me how delicious it was.  I had never made banana cake before - just banana bread - but I'm definitely gonna make it again soon.  This cake was unique because it was cooked at a very low temperature of 275 degrees (as opposed to the usual 350) and then after it was cooked, it was immediately put into --- get this --- the freezer.  Weird, right?? The reason for this is so that the cake cooks evenly in the oven, with a soft outer crust and tender interior. Also, to prevent it from cooking any more when you pull it out, it's put directly into the freezer...making the result extremely soft, fluffy, and incredibly moist.  Putting it in the freezer also allowed it to be frosted and ready to be eaten in no time;  My friend and I were eating our first slice just two hours after stepping into the kitchen. And it looked absolutely beautiful with the cream cheese frosting and a sprinkle of chopped nuts!  Perfect for any occasion.  I can't wait to make more banana cakes in the future.  With this perfect cake base, the flavors you could combine with it are endless...chocolate chip, peanut butter, nutella, peanut butter and nutella, chocolate marble, peanut butter chip, butterscotch chips, white chocolate chip, caramel/praline, strawberry, coconut...I could go on forever.  Try this recipe...you won't be disappointed.

Ingredients:

  • 3/4 cup butter
  • 2 1/8 cups white sugar
  • 3 eggs
  • 2 teaspoons vanilla extract
  • 3 cups all-purpose flour
  • 1 1/2 teaspoons baking soda
  • 1/4 teaspoon salt
  • 1 1/2 cups buttermilk
  • 2 teaspoons lemon juice
  • 1 1/2 cups mashed bananas (about 4 medium)
  •  
  • 1/2 cup butter, softened
  • 1 (8 ounce) package cream cheese, softened
  • 3 1/2 cups confectioners' sugar
  • 1 teaspoon vanilla extract
  • Chopped nuts (optional)

Directions:

  1. Preheat oven to 275 degrees F (135 degrees C). Grease a 9x13 inch pan. In a small bowl, mix mashed bananas with lemon juice, set aside. In a medium bowl, mix flour, baking soda and salt. Set aside.
  2. In a large bowl, cream 3/4 cup butter and 2 1/8 cups sugar until light and fluffy. Beat in the eggs one at a time, then stir in 2 teaspoons vanilla. Beat in the flour mixture alternately with the buttermilk. Stir in banana mixture. Pour batter into prepared pan.
  3. Bake in preheated oven for 1 hour, or until a toothpick inserted into the center of the cake comes out clean. Remove from oven and place directly into freezer for 45 minutes. This will make the cake very moist.
  4. For the frosting: In a large bowl, cream 1/2 cup butter and cream cheese until smooth. Beat in 1 teaspoon vanilla. Add confectioners sugar and beat on low speed until combined, then on high until frosting is smooth. Spread on cooled cake.  Sprinkle with chopped nuts if desired.

Wednesday, May 2, 2012

Lemon Blueberry Cake Loaf


Ohmygoodness this is my new favorite bread...cake...loaf...whatever you wanna call it!  It's just my favorite thing ever.  It tastes like a mix between a coffee cake and a pound cake.  I absolutely LOVED it with coffee for breakfast! It's even better than Starbucks's iced, lemon pound cake! And that's one of my favorite things at Starbucks. The lemon and blueberry flavors in this loaf compliment each other so well, making the it a perfect spring dish.  It's so incredibly moist, and tastes amazingly fresh even up to the third day (it barely lasted that long in my house, though).  Don't use any more blueberries than the recipe states because it's the perfect amount as is.  Try this warm from the oven with whipped cream, and also when it's cooled. For some very strange reason, I thought it tasted best the third day, when I had wrapped a slice in a plastic bag.  Wrapping it made it even more incredibly moist and the texture was just phenomenal.  If I made it again, I would still have a slice warm with whipped cream because I loved that, but I would wrap the rest of the loaf when it's slightly warm and let it sit, wrapped overnight.  This would assure a melt-in-your-mouth, soft, moist, perfect texture and perfect, rich taste.  


Yield: 1 loaf (about 12 servings)

Ingredients:

  • 1/3 cup melted butter
  • 1 cup white sugar
  • 3 tablespoons lemon juice
  • 2 eggs
  • 1 1/2 cups all-purpose flour
  • 1 teaspoon baking powder
  • 1 teaspoon salt
  • 1/2 cup milk
  • 2 tablespoons grated lemon zest
  • 1 cup fresh blueberries
  •  
  • 2 tablespoons lemon juice
  • 1/4 cup powdered

Directions:

  1. Preheat oven to 350 degrees F (175 degrees C). Lightly grease an 8x4 inch loaf pan.
  2. In a mixing bowl, beat together butter, 1 cup sugar, juice and eggs. Combine flour, baking powder and salt; stir into egg mixture alternately with milk. Fold in lemon zest and blueberries. Pour batter into prepared pan.
  3. Bake in preheated oven for 55 to 65 minutes, until a toothpick inserted into center of the loaf comes out clean. Combine lemon juice and 1/4 cup powdered sugar in a small bowl, and pour over warm loaf.   Cool bread in pan for at least 10 minutes before serving.  If you choose to have some when room temperature the next day, then when the loaf is just slightly warm, cover with plastic wrap or aluminum foil and let sit overnight.