Showing posts with label sour cream. Show all posts

Friday, November 2, 2012

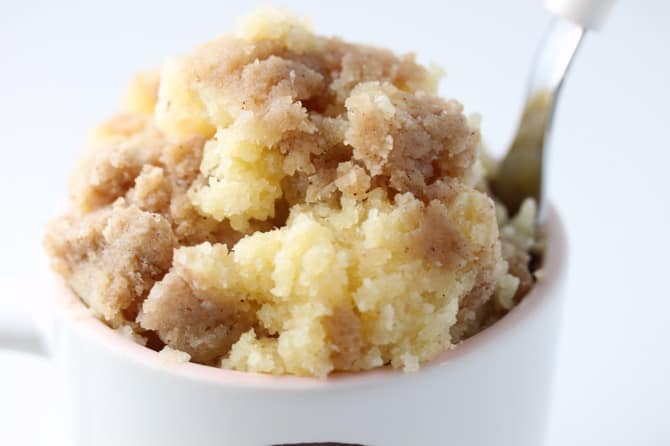
5 Minute Coffee Cake In a Mug


Ohmygoodness.  This is pure GENIUS.  Who wants to go through the trouble of baking a huge pan of coffee cake one morning that would take over an hour to prepare when you're super hungry?? Not me, that's for sure..  I prefer eating not long after waking up.  This recipe is absolutely amazing.  It's SO delicious!  It's perfectly sweet, moist, buttery, and pairs perfectly with --- shocker --- coffee! I can honestly say it's one of the best coffee cakes I've ever had.  It's definitely THE BEST classic coffee cake I've ever had (yup, even yummier than Starbucks).  And it's ready in minutes.

You can find this incredible recipe here.  BUT make the alterations below!

The alterations I highly suggest are:
~Do not let the butter get melty. It should be softened; just soft enough to cream the sugar in.  You will get a much moister cake when the butter is soft like this.
~Cook it based on your microwave.  All microwaves are different levels of power. Check it after 45 seconds.  My microwave is pretty powerful, so my cake was perfectly cooked in only 45 seconds.  The very tippy-top was still slightly gooey (in a good way!), but the inside was definitely cooked.  To check, try sticking a knife into the center of yours to see if it comes out clean.
~Use 1 tablespoon of flour in the topping. The topping was way too floury with 2 tablespoons.  You may have to crumble it a little with your hands cause it was kind of wet, but super yummy.
~Mix half of the topping into the batter. This assures a delicious, buttery, brown sugary, cinnamon-y delight in every bite(: Instead of a heaping sugar-butter blob on top.

Tuesday, July 31, 2012

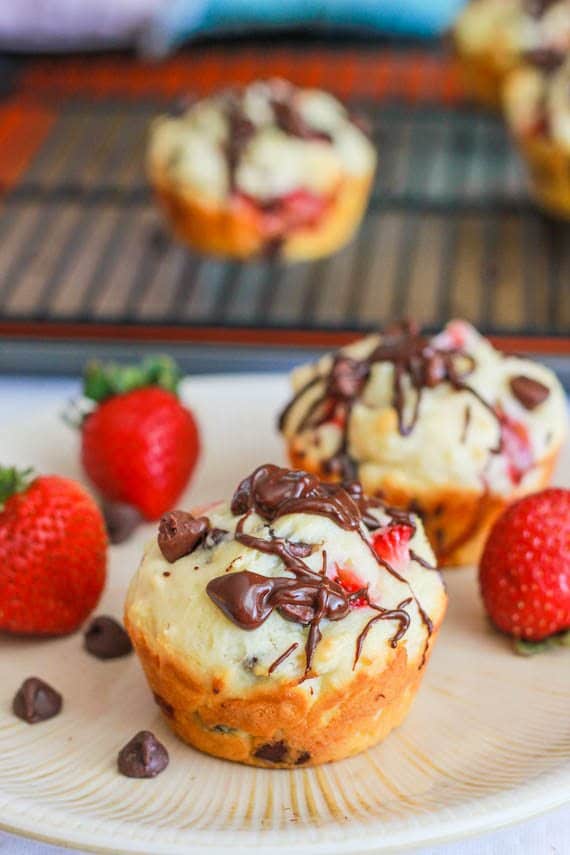
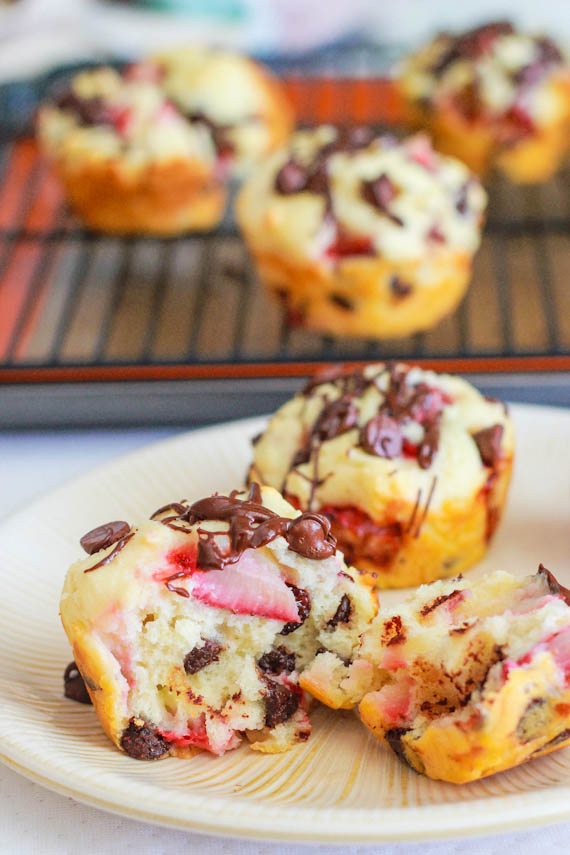
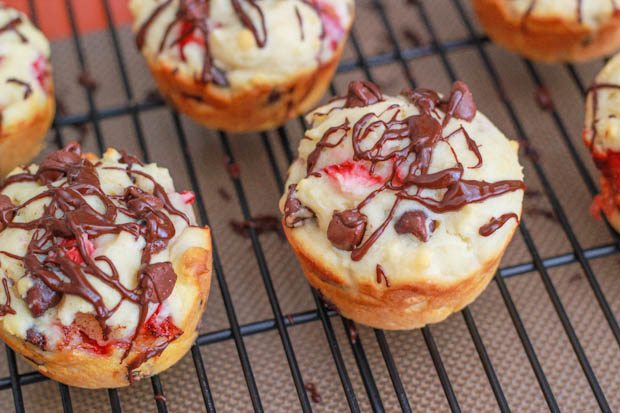
Chocolate Covered Strawberry Muffins


I think we can all agree that chocolate and strawberries are a match in heaven.  Am I right??? 


Heck to the yesssssss.


I had some fresh strawberries in my refrigerator yesterday morning, and I wanted to use them up in some kind of super yummy recipe.  Aaaand I was craving chocolate (when am I not??).  So I figured...why not make something with chocolate and strawberries?  I wasn't really craving pancakes, and I could have easily made chocolate chip pancakes and threw some strawberries on top.  I wanted something more creative.  Oatmeal?  Nahh...too boring.  And then a little light bulb went off in my head and I decided muffins.  Oh how I loveee muffins!  I call them "breakfast's cupcake."  Many people wonder the difference between a cupcake and a muffin, and you are gonna realize that you already know the answer once I tell you: Cupcakes are more cakey.  I know.  You totally knew that already, right?  Cupcakes are also more light and fluffy, whereas muffins are more dense (but not too dense! More like pound cake.), chewy, and bready.  A cupcake batter can be made into a cake, but if you were to pour muffin batter into a cake pan, it may not turn out the same.  

Okay, now back to this recipe.  A really, really good muffin should have a very moist texture, similar to a cupcake but still a little more dense.  This recipe is the definition of a perfect muffin.  I's everything you could dream your perfect muffin should be like. The muffin is so moist from the sour cream, and wonderfully fluffy.  It's light, though not quite as light as a cupcake.  So chocolatey (did I mention they have a chocolate drizzle, in addition to the chocolate chips already in it? Genius.), and filled with sweet chunks of delicious, fresh strawberries.  These taste SO GOOD hot from the oven with whipped cream.  Ohmygoodness...my mouth is watering just thinking of how yummy they were.  I tasted one this morning (24 hours later) at room temperature and it was still awesome.  However, I recommend heating it up, to make it even more awesome.  But I do think it was best out of the oven.  I cannot wait to make these again, but I think next time I'll try them white white chocolate chips and/or vanilla chips!  Mmmm!  These, unfortunately, were not my original recipe...so I cannot take the spotlight.  I recently discovered a wonderful blog called Sally's Baking Addiction, and you can find the recipe from her...here.

Thursday, July 26, 2012

Raspberry Almond Coffee Cake


I love coffee cake.  In my opinion, there's nothing better than waking up in the morning to a hot cup of coffee and some sweet coffee cake on the side.  This coffee cake is super moist, light, and has just the right amount of sweetness.  I love the combination of raspberries, vanilla, and almonds.  If you're a big almond fan, I recommend using half almond extract, half vanilla extract.  The almond extract really compliments the sliced almonds on top of the cake.  Another thing I love about this coffee cake is how pretty it looks!  There is a beautiful, pink, raspberry swirl running all through the cake, and the top is garnished with sliced almonds and sweet drizzle of icing.  There is so much delicious flavor going on in this cake.  You can serve it warm with vanilla ice cream and/or whipped cream, and/or you can serve it at room temperature.  In my opinion, I liked it best at room temperature the next day - or even the second or third day - because it gets moister over time.  I'm not sure how it tastes after the third day because it never lasted that long in my house.


Yield: an 8-inch round cake (about 8-10 servings)
***recipe doubles well in a 9-inch pan


Ingredients:

  • 1 cup fresh raspberries
  • 3 tablespoons brown sugar
  • 1 cup all-purpose flour
  • 1/3 cup white sugar
  • 1/2 teaspoon baking powder
  • 1/4 teaspoon baking soda
  • 1/8 teaspoon salt
  • 1/2 cup sour cream
  • 2 tablespoons butter, melted
  • 1 teaspoon vanilla extract (or half vanilla, half almond extract...your choice)
  • 1 egg
  • 1/4 cup sliced almonds
  •  
  • 1/4 cup sifted confectioners' sugar
  • 1 teaspoon milk
  • 1/4 teaspoon vanilla extract

Directions:

  1. Preheat oven to 350 degrees F (175 degrees C). Spray an 8 inch round cake pan with cooking spray.
  2. Combine raspberries and brown sugar in a bowl. Set aside.
  3. In a large bowl, combine flour, sugar, baking soda, baking powder, and salt. Combine sour cream, butter or margarine, 1 teaspoon vanilla (or half a teaspoon almond, half vanilla...if using), and egg, and add to flour mixture. Stir just until moist. Spoon 2/3 of the batter into the prepared pan. Drain raspberry mixture, and spread it evenly over the batter. Spoon remaining batter over raspberry mixture (It's okay if the filling doesn't completely cover the top). Top with almonds.
  4. Bake for 30-35 minutes, or until a wooden pick inserted in center comes out clean. Let cool for 10 minutes on a wire rack.
  5. Combine confectioners' sugar, milk, and 1/4 teaspoon vanilla. Stir well. Drizzle glaze over cake. Serve warm or at room temperature.

Sunday, July 22, 2012

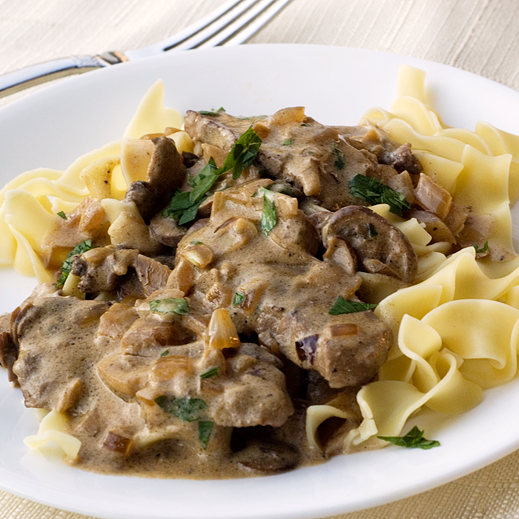
Steak Stroganoff


This was my very first time ever eating Stroganoff.  It was also my dad's first time, and he is seriously raving about it as I type this right now.  My mom had Beef Stroganoff a few times growing up, but she said it was disgusting compared to this delicious recipe I cooked.  Some people would call this "Beef" Stroganoff, but that seems to me more of a Hamburger Helper type dish with ground beef and ketchup (kind of like a Sloppy Joe taste). This dish uses sirloin steak, so I'm calling it Steak Stroganoff.  The thing that makes this more unique than other Stroganoff recipes is the fact that this slow cooks for an hour, so the simmering blends all the flavors together and the meat gets super tender.  The tender meat is then mixed with a mushroom cream sauce.  I love the cream sauce because it's unlike any cream sauce I've ever had.  It's not like a rich, Alfredo sauce with heavy cream.  It's lighter, but still creamy and comforting, and uses sour cream and cream cheese.  The tartness of the sour cream balances with the sweet, red wine, and the mustard and Worcestershire sauce adds even more depth to the dish.  I served this with a side of steamed broccoli, but I recommend serving it with some french bread or garlic bread as well to soak up all the creamy sauce.  The result is a comforting, yet hearty meal that everyone will love.


Ingredients:

  • 2 pounds beef tenderloin or top sirloin, cut into 1/4 inch thick by 2 inches long strips 
  • 1/2 cup red wine, preferably Burgundy or Pinot Noir
  • 1/2 teaspoon salt
  • 1/2 teaspoon ground black pepper
  • 4 tablespoons butter
  • 1 medium white onion, chopped
  • 4 tablespoons corn starch
  • 1 1/4 cup beef stock
  • 1 tablespoon prepared mustard
  • 1 tablespoon Worcestershire Sauce
  • 8 ounces sliced mushrooms, separated into 2 4-ounce piles
  • 1/3 cup sour cream
  • 1/3 cup cream cheese, softened
  • salt to taste
  • ground black pepper to taste

For the noodles:
1 lb egg noodles
1 tablespoon butter

Garnish:
Sliced scallions and freshly grated Parmesan cheese

Directions:

  1. Season steak with 1/2 teaspoon of both salt and pepper, place in a large sealable bag and pour 1/2 cup red wine over the meat.  Shake to fully coat, and marinate in the refrigerator for 1 to 2 hours.
  2. In a large skillet over medium heat, melt the butter and pour in the beef strips along with the wine juices in the bag. Brown the beef strips, then push the beef strips off to one side. Add the onions and half of the sliced mushrooms (4-oz) into the wine/butter mixture and cook slowly for 3 to 5 minutes, then push to the side with the beef strips.
  3. Stir the cornstarch into the juices on the empty side of the pan (onions, mushrooms, and steak pieces will probably get into this puddle of juices, which is fine, it's just to give you more room to work with without a bunch of food getting in the way). Pour in beef broth and bring to a boil, stirring constantly. Lower the heat and stir in mustard and Worcestershire sauce. Cover and simmer for 1 hour or until the meat is tender.
  4. Five minutes before serving, stir in the other 4 ounces of mushrooms, sour cream, and cream cheese. Heat briefly and then salt and pepper to taste.
  5. Serve with buttered egg noodles (below) and serve (also below).

For Noodles:
Bring a large saucepan of salted water to a boil. Add the noodles to the pan of boiling water and cook at a low boil until al dente, about 10 minutes. Drain, then toss the noodles with the butter to coat.

To serve:
Arrange the buttered noodles on warm serving plates and top with the stroganoff. Garnish with desired amount of sliced scallions and freshly grated Parmesan cheese, and serve immediately.

Thursday, July 19, 2012

Red Velvet Cookies


I was looking for a way to use up some cream cheese in my fridge, and I stumbled upon a red velvet cookie recipe in my recipe box.  It was love at first sight.  Who can resist a fluffy, chocolatey, moist red velvet cake cookie? The consistency of the "cookie" is the perfect balance of red velvet cake moist-ness but the thicker texture of a soft cookie. The cookie itself is amazing, but it's not a true "Red Velvet Cookie" without the cream cheese frosting (it would simply be a red, fluffy, chocolate cookie).  This frosting is what really makes these cookies out of this world.  Maybe I just hadn't had cream cheese frosting in a while, but it's absolutely divine.  I'm not even embarrassed to say that I was eating it by the spoonful.  I like my cream cheese frosting not very thick - more like a glaze -, so that you can taste more cream cheesey-ness than powdered sugar.  If you like frosting really thick and stiff with powdered sugar, then feel free to add as much as you want...I just prefer less.  Anyways...back to the cookies.   They are seriously everything you love about red velvet cake, but in cookie form.  Hold up - I take that back, because I've never had a slice of red velvet cake that's nearly as delicious as these cookies.  I had some warm from the oven with the cream cheese frosting oozing off, and also at room temperature the following day (the cream cheese frosting firms up perfectly the next day).  Both incredible...heavenly...to-die-for delicious.  My dad nearly fell to the ground on his first bite.

Yield: about 36 small cookies
  

Ingredients:

  • 2 cups all-purpose flour
  • 1/2 teaspoon baking soda
  • 1/2 teaspoon salt
  • 2 (1 ounce) squares unsweetened baking chocolate, broken into pieces
  • 1/2 cup unsalted butter, softened
  • 2/3 cup brown sugar, firmly packed
  • 1/3 cup white sugar
  • 1 large egg
  • 1 tablespoon red food coloring
  • 3/4 cup sour cream
  • 1 cup chocolate chips (I used semisweet, but other flavors are fine)
  •  
  • Cream Cheese Frosting
  • 1/4 cup unsalted butter, softened
  • 4 ounces cream cheese, at room temperature
  • 1/2 teaspoon vanilla extract
  • 2 cups confectioners' sugar, sifted, or as needed

Directions:

  1. Preheat oven to 375 degrees F (190 degrees C) with the rack in the middle position. Grease baking sheets or line with parchment paper. Sift together the flour, baking soda, and salt.
  2. Break the chocolate squares into chunks, place in a microwave-safe bowl and microwave on High until the chocolate melts, about 90 seconds. Stir the chocolate until smooth and set aside to cool.
  3. In a large bowl, beat 1/2 cup butter, brown sugar, and white sugar until light and fluffy; pour in the egg and beat until smooth. Mix in the red food coloring and chocolate, scraping the bowl down regularly, until evenly blended, about 30 seconds. Add half of the sifted dry ingredients, stirring until well incorporated. Beat in the sour cream and mix in the remaining dry ingredients. Fold in the chocolate chips. Drop spoonfuls of the dough 2 inches apart onto prepared baking sheets.
  4. Bake one sheet at a time in the preheated oven until they spring back when pressed and a toothpick inserted in the center comes out almost completely clean, about 9 minutes. Cool in the pans for 5 minutes before removing to cool completely on a wire rack.
  5. For the cream cheese frosting, whip 1/4 cup unsalted butter, cream cheese, and vanilla until smooth. Blend in the powdered sugar in half cup portions until the frosting reaches the desired consistency.  If you want to eat the cookies when cooled, then wait to frost them until the cookie has completely cooled.  If you just can't resist waiting for them to cool and decide to eat them when warm (which I highly recommend because the chocolate chips are all melty and delicious), then slather the cream cheese frosting on them and dig in(:  Just a warning: the cream cheese frosting may ooze a bit on the warm cookies, but that just makes them so much more irresistible.

***you can also make a cookie sandwich with them if you want.

Wednesday, July 11, 2012

Creamiest Mashed Potatoes


I'm gonna be honest...I'm not a mashed potato fan.  They just taste so plain and boring! Even on Thanksgiving, mashed potatoes have never been on my plate.  They are absolutely tasteless to me.  That is....until I created this recipe.  Garlic mashed potatoes, as opposed to plain mashed potatoes, I like a little bit more since there's more flavor, so I decided to perk up your normal mashed potato recipe into the ultimate garlic mashed potato recipe.  Now these potatoes have the perfect amount of garlicy flavor, and are incredibly creamy.  Sour cream, cream cheese, and butter make these {melt in your mouth}.  Another thing that's unique about this recipe is that the potatoes are made in the slow cooker for a few hours.  This allows all the flavors to blend together, and the result is phenomenal.  It also allows the potatoes to stay warm throughout your whole meal, even when you go back for seconds...and thirds(;  One thing I think is essential to mashed potatoes is SALT.  Add lots and lots of salt! It brings out all the flavors and makes them taste ten times better. I recommend using garlic salt if you're a garlic fan for the best flavor.  Make sure to blend the butter in at the very end; this makes the potatoes richer when served because the "buttery" flavor is a little more pronounced.  Adding the same salty, garlicy water to the potatoes that they were boiled in also adds a flavor boost.  I made these as a side dish to steak and salad, and the potatoes tasted heavenly mixed with the steak.  My parents and I all agree that these are the best mashed potatoes we've ever had.  My mom nearly fell to her knees on her first bite.  These will definitely be on my Thanksgiving plate this year!

Yield: about 10 servings

Ingredients:

  • 5 pounds red potatoes, cut into chunks
  • 2 tablespoons minced garlic
  • 3 cubes chicken bouillon
  • 1 (8 ounce) container sour cream
  • 1 (8 ounce) package cream cheese, softened
  • 1/2 cup butter, softened
  • garlic salt, salt and pepper to taste

Directions:

  1. In a large pot of lightly salted boiling water, cook the potatoes, garlic, and bouillon until potatoes are tender but firm, about 15-18 minutes. Drain, reserving water. In a bowl, mash potatoes with sour cream and cream cheese, adding reserved water as needed to attain desired consistency.
  2. Transfer the potato mixture to a slow cooker, cover, and cook on low for 2 to 3 hours, stirring every hour to prevent sides from sticking. Just before serving, stir in butter and season with garlic salt, salt and pepper to taste.


Tuesday, July 3, 2012

King Ranch Mac and Cheese


I first spotted this recipe on the cover of a Southern Living Magazine, and I knew I had to make it.  This takes comfort food to a whole new level.  It's cheesy, creamy, slightly sticky, and filled with different flavors that make this way more unique than the classic macaroni and cheese.  There are peppers, chicken, and lots of tex-mex spices that give this so much wonderful flavor.  It tastes just like cheesy chicken enchiladas!  I absolutely LOVE the crispy, cheesy crust that forms on top of this dish too.  My family and I ate so much of it in one sitting, and my friend and I gobbled the rest of it up a few days later as leftovers.  My friend said it was one of the best macaroni and cheeses she'd ever had and loved how there was chicken in it.  The next time I make this, I think I'm gonna try substituting other things for the chicken, like crab or - omg! ----> lobster!!!  Mmmm.  I'll let you know how it tastes!  This also makes amazing left overs...it tastes just as delicious a few days later.  This is such an easy, quick, super yummy dish that will definitely be a regular on your weekly dinner menu.

You can find this recipe here.

Tuesday, April 10, 2012

Saint Patrick's Day Cake


This is officially the best cake I've ever had.  I was planning on making it for Saint Patrick's Day since it has that theme with the beer and Irish cream and all...but I never had time.  Sooo I decided to make it as my birthday cake instead!  I did only make one layer of this cake since there's only three people in my family and I wouldn't have wanted the cake to dry out if we didn't eat it in time.  If you choose to make one layer, then just half the recipe below.  But I recommend making the full amount because the cake lasts for a long time (I had the last slice today and it was the 3rd day, and it still tasted incredible) and you will definitely have no problem eating it all in a short period of time once you have your first slice.  I don't know about you guys, but I'm a huge sucker for alcoholic beverages in desserts.  I know...my parents aren't very happy about that...but I can't control my taste buds!  This cake is the absolute best chocolate cake/birthday cake/Saint Patricks Day cake I've ever tasted!  I think it's even better than my Best Chocolate Cake recipe (found here), which kind of defeats the title..but that recipe is still the best classic chocolate cake I've ever had.  However, this recipe is a little more jazzed up with the beer in the cake, the Bailey's buttercream frosting, and the chocolate ganache.  The chocolate cake layer itself is moist, rich, and perfectly dark chocolatey.  But the frosting and ganache is what really sets this cake from a 10 on a 1 to 10 scale to 100.  The Irish cream liquor gives this frosting an incredibly unique, sweet, and rich taste that I had never tasted before but instantly fell in love with.  If you are a big frosting fan, then I would recommend doubling it...it's very delicious to eat it by the spoonful as well(:  And then you have this incredibly chocolatey and rich deep chocolate ganache drizzled on top that makes the cake so beautiful and perfect.  I'm going to be making this for many holidays and birthdays to come in the future.

Ingredients:

Cake:
  • 1 cup Irish stout beer (such as Guinness®)
  • 1 cup butter, cut into pieces
  • 3/4 cup unsweetened cocoa powder
  • 2 eggs
  • 2/3 cup sour cream
  • 2 cups all-purpose flour
  • 2 cups white sugar
  • 1 1/2 teaspoons baking soda
  • 3/4 teaspoon salt
  •  
  • Frosting:
  • 3 cups confectioners' sugar, or as needed
  • 1/2 cup butter at room temperature
  • 4 tablespoons Irish cream liqueur (such as Baileys®), or as needed
  •  
  • Ganache:
  • 1 heaping cup of bittersweet chocolate chips (or dark chocolate chips)
  • 2/3 cup heavy cream
  • 2 tablespoons butter at room temperature

  • Directions:

    1. Preheat oven to 350 degrees F (175 degrees C). Line 2 9-inch cake pans with parchment paper, and spray with cooking spray.
    2. Pour the beer into a saucepan, add the butter, and bring to a simmer over medium-low heat. Remove the pan from the heat, and whisk in the cocoa powder until the mixture is smooth. Allow the mixture to cool. In a bowl, beat the eggs and sour cream together until smooth with an electric mixer, and stir in the stout mixture to make a smooth, thick liquid.
    3. In a large bowl, mix together the flour, sugar, baking soda, and salt. Pour the stout mixture into the flour mixture, and gently combine with a spatula. Pour the batter into the prepared pans.
    4. Bake in the preheated oven until the cakes are set and a toothpick inserted into the center of a cake comes out clean, about 30 minutes. Remove and let cool in pans for 5 minutes before inverting the cakes onto wire racks to finish cooling.
    5. Mix together the confectioners' sugar, butter, and Irish cream liqueur until the mixture forms a smooth and spreadable frosting (add more sugar or liqueur as needed to create the desired consistency). Spread half the frosting on top of each cake.
    6. Place the chocolate chips into a heatproof bowl. Bring cream to almost boiling in a small saucepan, and pour over the chocolate. Stir in the butter, and stir the mixture until the chocolate melts and the mixture is very smooth. Allow to cool until the mixture is pourable but not thin or overly runny, 10 to 15 minutes. Stack a cake gently on top of the other, frosting sides uppermost, and carefully drizzle the chocolate mixture over the cake, allowing decorative drips to run down the sides.

Thursday, March 29, 2012

White Almond Sheet Cake


This is my new favorite cake ever.  It was the first sheet cake I've ever made as well. It tastes very similar to my Almond Butter Cake (found here) except this one is more moist and has more of a buttery-almond flavor as opposed to the lighter flavor with a touch of apricot.  I baked this sheet cake last night to take to school today for a party in civics, and I honestly had to force my parents to not eat any more pieces after I gave them some.  My mom says - hands down - that it's the best thing I've ever made.  I swear, they would have eaten the whole cake.  I don't blame them though...I had to force myself to only a couple slices because I wanted to have enough to take to school.  And it was totally worth the wait because they were soooo delicious today as well!  I can't decide if I like this cake better warm or cold; it's phenomenal either way.  What makes this cake so good is the flavor of almond extract.  I absolutely love almond extract, and I know it has a tendency to be overpowering in desserts, but it was the perfect amount for this recipe.  The sour cream also makes this cake super duper moist.  One thing I love about this cake is that it bakes up so quickly! And putting the frosting on it when it's warm makes the frosting seep into the cake and soak up all that yummy, sweet flavor. Do NOT skip the frosting!  It truly makes the cake.

Ingredients:

  • 1 cup unsalted butter
  • 1 cup water
  • 2 cups all-purpose flour
  • 2 cups sugar
  • 2 eggs, beaten
  • 1/2 cup sour cream
  • 1 teaspoon almond extract
  • 1/8 teaspoon vanilla extract
  • 1 teaspoon baking soda
  • 1 teaspoon salt

  • Frosting:
  • 1/2 cup butter
  • 1/4 cup milk
  • 4 1/2 cups confectioners' sugar
  • 1/2 teaspoon almond extract
  • 1/8 teaspoon vanilla extract

  • 3/4 cup sliced almonds (optional) 

Directions:

  1. In a large saucepan, bring butter and water to a boil. Remove from the heat; stir in the flour, sugar, eggs, sour cream, almond extract, vanilla extract, baking soda and salt until smooth.
  2. Pour into a greased 15-in. x 10-in. x 1-in. baking pan. Bake at 375 degrees F for 20 to 22 minutes or until a toothpick inserted near the center comes out clean and cake is golden brown. Cool for 15 minutes.
  3. For frosting, in a large saucepan, combine butter and milk. Bring to a boil. Remove from the heat; stir in sugar, almond extract, and vanilla extract. Spread over warm cake.  Sprinkle with sliced almonds if desired.